Creating a blog was out of the question for a long time for me, as measuring everything in the kitchen was like biting into an eggshell. I enjoy cooking and don’t want to waste even a slightest bit of enjoyment in that small world of mine. But little did I know that everything will change, when my husband came home with the Oscar nominated film ‘Julie and Julia’( a real life story) where Julie Powell (part played by Amy Adams) challenged herself to make all the 524 recipes from Julia Child's cook book ‘Mastering the Art of French Cooking’ and blogging all her experiences (The Julie/Julia Project). It was an inspiring movie. A few days later when we were discussing this casually with a friend of ours over tea…everything changed dramatically…..” How about you making at least half of it in one year? Not French but your own. 262 recipes that will inspire others and present it as a blog?” For a minute my mind traveled faster than light… With an experience as a helper in my mother in laws kitchen for 6 years followed by a three year everyday struggle to satisfy the palate of my foodie husband, if I cannot do it then why should I cook? But on the other side with an experience in English literature extending no more than expanding outline stories in English grammar class when I was 18 and two small kids that come in handy at times, will a commitment for the next one year work? Anyway my ‘cook's ego’ didn’t allow me to say no...

So my friends …here I am opening my recipe book, trying to perfect and present 262 recipes in the coming 365 days….A Challenge that will of course tastes good. Come.. Have a walk with me along my journey.. Cheering and inspiring….Forgiving and tolerating…Testing and tasting….for ‘A Tasty Challenge’

Search This Blog

Wednesday, October 20, 2010

Cucumber and Lamb Soup

Recipe No: 101
The inspiration for this soup is from a cook book by Linda Doeser.  Lamb and Cucumber are some how considered as a real good combination especially in Middle Eastern cuisine.  The quality of this soup depends entirely on the quality of Chicken Stock. So please make your own or use a good variety from your super market. Please don’t use Chicken broth which is milder than Chicken stock.
Ingredients                                     Serves 4
To Marinate
  • Lamb thinly sliced……….1/2 Cup
  • Soy sauce……..…………….1/2 Tablespoon
  • Rice Wine…………..……….1/2 Teaspoon (Optional)
  • Sesame Oil……..…………..1/2 Teaspoon
To Make the Soup
  • Chicken Stock……….…….3 Cups
  • Cucumber Slices…..……..1 Cup
  • Rice Vinegar……………….1/2 Tablespoon (If not use ¼ Teaspoon White Vinegar)
  • Soy Sauce………………...…A Dash
  • Salt and Pepper to taste
Method of Preparation
  1. Marinate the Lamb pieces with the ingredients mentioned in the Marinade section and keep aside for 30 minutes. After 30 minutes drain the excess marinade if any.
  2. Bring the Chicken stock to a rolling boil and add the Lamb pieces. Mix well to separate the Lamb pieces.
  3. Let it boil for 2 minutes and add the Cucumber Slices.
  4. Once boiled add Vinegar, Soy Sauce, Salt and Pepper.
  5. Serve the Soup while it is piping hot.
Notes: 
  • Don't cook the Soup for too long after adding the Cucumbers or they will disintegrate. 
  • As the Lamb pieces are really thin it will cook within minutes.


    Make it enjoy the deliciousness and 
    serve it to your family with love…

    Rabbit Roast

    Celebrating the 100th post with a rare treat (Rabbit Roast) and a dedication
     
    Its five months since I started my blog… and today I am posting my 100th recipe. I should confess that even though I was not enjoying this when I started, within this short period of time this has become an integral part of my life, gained a bunch of new friends and was able to share my food thoughts with others. I had a bunch of plans(before moving from California) to celebrate this with my beloved friends back in California who really encouraged me to do this, and willingly donated themselves to be the Guinea pigs in my experiments with food. But unfortunately, as we are now in far away places, all those celebrations are reduced to a dedication note which I know is nothing… but still promising to myself that if I get a chance to cook for those guys one more time, then I will try to get the best spread on the table… So to you all my dear friends… In California…. in Philly… In Denver... and back in India…I dedicate this post. Spread a smile on your face for me while reading this as you have helped me discover a new pass time…

    Rabbit Roast
    Recipe No: 100
    I don’t know anyone who eats Rabbit on a regular basis, but this can be a very good rare occasion extravaganza. Rabbit is a bit different from other meats by its peculiar taste… which expert taste testers call ‘gaminess’. I followed my regular roasting procedure as in two of my previous posts (Lamb Shank Roast and Chicken Roast) but the peculiar taste of Rabbit makes it so different.
    Ingredients                                                 Serves 4
    • Rabbit……………………………1 (Around ½ Kg)
    To Grind
    • Shallots Sliced……………..…1/4 Cup
    • Ginger……………………….….1 inch piece
    • Garlic………………………..….5 Big cloves
    • Red Chilly Powder………….1 Teaspoon
    • Coriander Powder……….…1 ½ Teaspoon
    • Turmeric Powder……..……1/4 Teaspoon
    • Pepper powder………………1/2 Teaspoon
    • Garam Masala Powder…..3/4 Teaspoon + ½ teaspoon for sprinkling at the end
    • Lemon Juice………….………1 Tablespoon
    • Salt………………………..……..1 Teaspoon
    To Saute
    • Vegetable Oil………………...3 Tablespoons
    • Onion Sliced…………...……..2 ½ Cups
    • Curry Leaves……..………….2 Sprigs
    • Coconut milk…….…………...1/4 Cup
    • Coconut Oil……………………1 Teaspoon
    Method of Preparation
    1. Cut and clean the Rabbit into big pieces (I got  10 pieces from one Rabbit)
    2. Combine and grind all the ingredients in the ‘to grind’ section to a paste. Take half of this paste and marinate the Rabbit pieces and keep aside for 30 minutes. Keep the rest of the paste for later use.
    3. Heat 2 Tablespoons of Oil in a nonstick pan and shallow fry the marinated Rabbit pieces on both sides. Transfer them to a Pressure cooker.
    4. To the same pan add the rest of the Oil and saute Onion and Curry leaves till lightly brown on medium high heat. (If not browned the roast will be sweet)
    5. Once browned, lower the heat to medium low; add the left over ground paste and saute for at least 5 minutes. This stage is very important as it decides the color of the roast. Be patient and let the paste get rid of the raw taste and become brownish black in color. But take care not to burn it; so I will recommend constant stirring.
    6. Once it reached a brownish black color add this to the Rabbit in the Pressure Cooker together with 2 cups of water. Pressure cook this till 6 whistles. Let it cool.
    7. Once cooled, dump all the contents from the cooker into the pan and let the extra water evaporate. Stir now and then taking care not to break the Rabbit pieces. Adjust the salt level according to your taste.
    8. Once almost dry add the Coconut milk and let it attain the consistency you need. Sprinkle some Curry Leaves, Garam Masala and Coconut oil on top; switch off the flame; close the lid and let it rest for at least 30 minutes before serving.
    Notes:
    • The resting period in the pan is kind of important as per the elders, as they call it ‘Pathrapakam’ meaning that it should sit in the vessel it cooks for some time to attain the perfect taste.
    • Rabbit has more cooking time than that of Chicken; so adjust the time according to your cooking conditions.


    Make it, enjoy the deliciousness and 
    serve it to your family with love...

    Tuesday, October 19, 2010

    Vegetable Burger

    Recipe No: 99
    Ingredients                                         Makes 4
    To make the Veggie Patties
    • Oil………………………………..2 Tablespoon
    • Mushrooms………………..…1 ½ Cups (Slice into small pieces)
    • Onion chopped…………..….1/4 Cup
    • Grated Vegetables………...1 Heap Cup (I use Carrots, Beans, Peas and Cabbage)
    • Garlic…………………………..2 Cloves minced
    • Black Pepper Powder…....1/2 Teaspoon
    • Red Chilly Powder………..1/2 Teaspoon
    • Coriander Powder……...…1/2 Teaspoon
    • Roasted Cumin Powder…1/4 Teaspoon
    • Garam Masala Powder....1/4 Teaspoon
    • Salt…………………….………as per needed
    • Quick Cooking Oats…..….1/3 Cup
    • Bread Crumbs……………..1/2 Cup
    • Egg…………………….………2 (Slightly Beaten)
    • Grated Cheese……….……1/4 Cup
    To make the Burger
    • Burger Buns…………..……4
    • Cheese Slices………...…….4
    • Butter………………………..As per needed
    • Lettuce and Tomato Slices as needed
    Method of Preparation
    To make the Veggie Patty
    1. Heat Oil in a pan and saute Onions and Mushrooms with a bit of Salt until the Mushrooms are brown. By the way, water may ooze out of the Mushrooms, so this process may take a bit of time.
    2. Add the Vegetables and Minced Garlic and continue sauteing for three minutes. Add Pepper powder, Red Chilly powder, Coriander powder, Roasted Cumin powder and Garam Masala Powder; mix and switch off the flame. At this stage the salt should be a bit on the higher side so that the Patty will have enough salt once all the other ingredients are added.
    3. When the sauteed mixture is slightly cooled, add Oats, Bread Crumbs, Grated Cheese and Egg; mix really well and let it sit for half an hour.
    4. Divide the mixture into four equal parts. This will not be as solid as most of the other Burger patties. Roll each portion into a ball and press it between your palms to flatten. Smooth the edges with your fingers to form a  patty.
    5. Heat a tablespoon of Oil in a non stick pan on medium high heat and fry the patties until browned on both sides.
    6. While the second side is almost done; place a slice of Cheese and let it start to melt along the edges.
    To assemble the Burger
    1. Split the Buns into two and brush the inner sides with a bit of Butter and place it Butter side down on the pan for a minute till it is heated through.
    2. Place the bottom of the Bun on a plate followed by a piece of Lettuce, a slice of Tomato, and the Veggie patty followed by the top of the Bun.
    3. Serve as hot as possible.
    Notes:
    • Use other Burger toppings like sauteed Onions or Bell peppers if you like.
    • The Patty before cooking is not hard but when cooked it will set because of the presence of the Egg. This will keep the Patty really moist.
    • Don't keep the Patty mixture for more than 1/2 hour or it will become slightly watery.
    • It will take only minutes to cook the Patty, so make it only when you need it. Don't allow the Burgers to be cold as it tastes the best when hot and the Cheese still oozing.
    • To make roasted Cumin powder either dry roast(without Oil) Cumin seeds till it is slightly brown and fragrant and then powder it or dry roast store bought Cumin powder in a pan until slightly brown and fragrant.


    Make it, enjoy the deliciousness and 
    serve it to your family with love…

    Saturday, October 16, 2010

    Chicken Spring Rolls

    Recipe No: 98
    This is a perfect finger food that can be served as an appetizer or as a simple nibble on a comfortable afternoon together with Tea. Something different to make with the left over Rotisserie Chicken. If you are a Vegetarian just substitute the Chicken with Mushrooms.
    Ingredients                                                      Makes 16-18
    • Vegetable Oil………………………..2 Tablespoons
    • Bean sprouts……………………..…1 Cup
    • Green/ Spring onions…………....1 Cup (Slice into thin long strips. About 1 bunch)
    • Carrots…………………………...…...2 (Slice into thin long strips)
    • Shredded Cooked ..Chicken..….1 ½ Cups
    • Salt……………………………….…….1/2 Teaspoon
    • Brown Sugar……………………..…1 Teaspoon
    • Light Soy Sauce………………..….1 Tablespoon
    • Rice Wine……………………….…...1 Tablespoon
    • Spring Roll Wrappers………...…9 Large or 18 Small
    • Corn Flour…………………..……...1 Tablespoon + some for spreading on the bottom of the plate.
    • Oil for deep frying
    Method of Preparation
    To make the Filling
    1. Cut Green Onions and Carrots into thin shreds roughly the same size of Bean Sprouts.
    2. Mix together Brown Sugar, Salt, Soy Sauce and Rice Wine and keep aside till ready to be used.
    3. Heat Oil in a pan on high heat until smoking and add Bean Sprouts, Carrots and Spring Onions and saute for around 2 minutes, stirring constantly.
    4. Mix in the Chicken for a minute and add the prepared Soy Sauce mixture.
    5. Mix everything together until dry and switch off the flame.
    To make the Rolls
    1. Mix 1 Tablespoon of Corn flour with 1 Tablespoon of water and make into a thick paste.
    2. Prepare a plate by spreading a bit of Corn flour on the bottom.
    3. Start working with one Spring Roll Wrapper at a time. Here I am working with small wrappers. (If you are working with large wrappers, please read the ‘notes’ section carefully)
    4. Spread a teaspoon of filling on the wrapper diagonally as a thin line. Fold the lower half of the wrapper above the filling followed by the two sides.
    5. Brush the remaining portion of the wrapper with the Corn Flour paste and roll it all the way to the end tightly without any air bubbles.
    6. Arrange them on the prepared plate with the seam side down.
    7. Heat at least two inches Oil in a frying pan on high heat for deep frying.
    8. Fry the prepared rolls till they are golden brown in color.
    9. Serve hot with Soy Sauce.
    Notes:
    • If you are using the big Spring Roll Wrappers, cut them diagonally into two. Place a Tablespoon of the filling one third of the way down the wrapper with the triangle pointing away from you. Fold the lower portion on to the filling, followed by the sides and roll the rest up tightly. Don’t forget to brush the Corn starch paste before rolling.
    • Dust off the extra Corn Flour before frying the Rolls. 


    Make it, enjoy the deliciousness and 
    serve it to your family with love…

    Friday, October 15, 2010

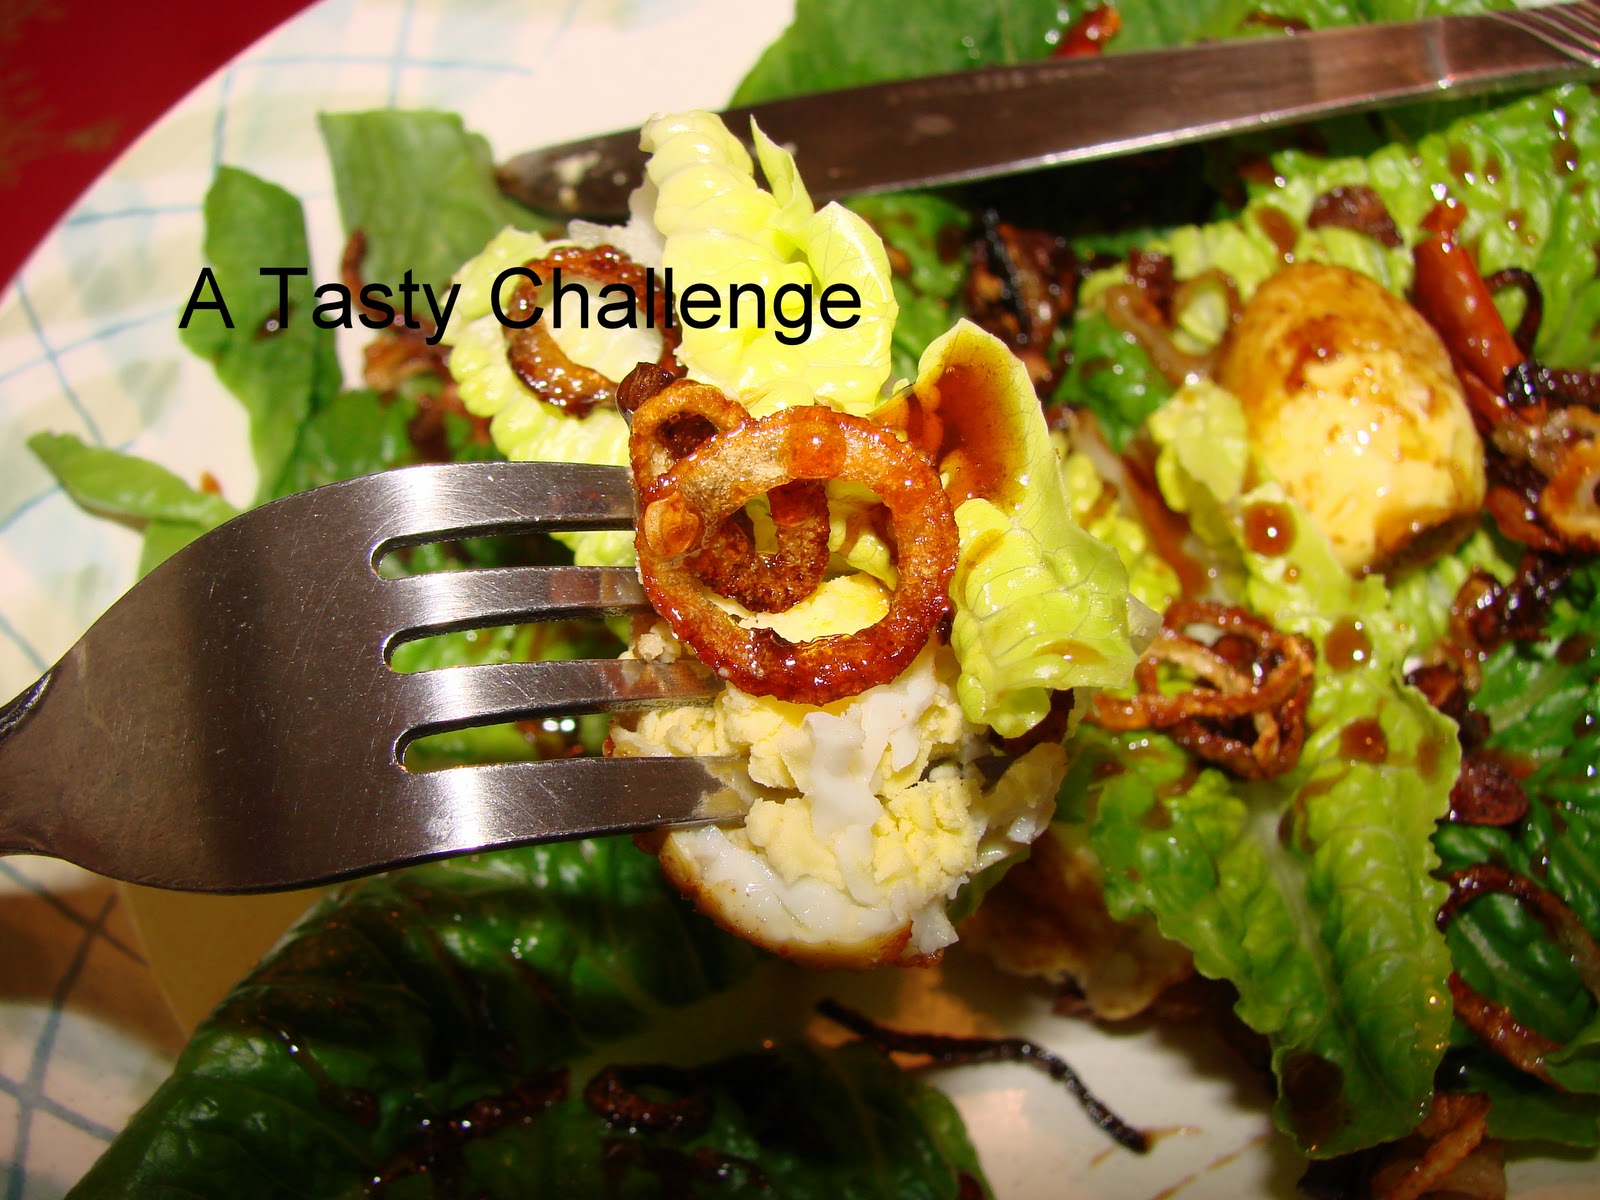
    Masala Fried Quail Egg Salad

    Recipe No: 97
    “Salad making is an art.” These are not a 'once said' golden words from a famous person. These are the words that my husband uses to show his resentment whenever I make a salad for dinner… So in order to put a temporary halt to his resentment and tempt to him to eat a salad... well I need some extra ordinary measures. This one came as a first step in mastering that 'art'….inspired from a picture in a cook book….
    Ingredients                                         Serves 1
    • Hard Boiled Quail Eggs……..3
    • Lettuce…………………………...3 Medium sized leaves (Tear by hands)
    • Shallots………………………...…3 (Slice into thin rounds)
    • Garlic……………………………...1 Clove (Slice into thin rounds)
    • Dry Whole Red Chilly…….....1 (Split into two with your hands before using)
    • Oil……………………………….....1/2 Teaspoon + for deep frying the egg
    For the Masala Powder
    • Red Chilly Powder………...…1/8 Teaspoon
    • Coriander Powder……………1/8 Teaspoon
    • Turmeric Powder…………….A Pinch
    • Roasted Cumin Powder……1/8 Teaspoon
    • Garam Masala Powder…….1/8 Teaspoon
    • Salt………………………………...1/8 Teaspoon
    For the Sauce
    • Brown Sugar………………...4 Tablespoons
    • Worcestershire sauce…….2 Tablespoons
    • Tamarind Water………...…4 Tablespoons
    Method of Preparation
    To make the Sauce
    1. Boil the ingredients to make the sauce in a pan on medium high heat. Once the sugar is melted lower the heat to medium low and let it simmer till the sauce become a syrupy consistency. Keep aside till ready to be used.
    To make Masala Fried Eggs
    1. Mix the ingredients for the Masala and coat the eggs. Keep the remaining Masala aside for later use.
    2. Heat oil for deep frying on high and fry the eggs for a minute or till the outer side of the egg attains a light brown color. 
    3. Drain the excess oil on a paper towel. When it is still hot sprinkle the remaining Masala on the Egg and keep aside till ready to be used.
    To make the fried Shallots
    1. Heat ½ Teaspoon of Oil in a pan and fry sliced Shallots, Garlic and Dry Red Chilly till golden brown.
    2. Drain the excess Oil if any.
    To Assemble the Salad
    1. Arrange the Lettuce in the bottom of a plate and place the fried Eggs on top.
    2. Sprinkle the fried Shallot mixture on top of the salad followed by a drizzle of the Tamarind sauce.
    3. Serve while the Eggs are still hot.
    Notes:
    • If Quail Eggs are not available substitute it with one regular Egg and don’t forget to quarter it before serving.
    • The Tamarind Sauce should be sweet, sour and salty. Adjust the amount of ingredients according to your taste. 
    • The Tamarind Sauce will thicken when it cools down. So switch the stove off a bit in advance. If in case it thicken a bit too much, add a tablespoon of water to loosen it  just before using.


    Make it, enjoy the deliciousness and
    serve it to your family with love...

    Thursday, October 14, 2010

    Mango Kulfi

    Recipe No: 96
    Kulfi is one of the most famous North Indian Desserts and I started having  it often after coming to US. This rich, creamy decadence is especially attractive as it comes on a stick. Adding some Mango flavor makes it extra special.
    Ingredients                                 Makes 12
    • Mango Pulp………………………………..1 Cup (Store bought)
    • Heavy Cream……………………………..1 ½ Cups
    • Cardamom………………………………...2 (Use only the seeds)
    • Sugar…………………………………….…..8 Tablespoons
    • Saffron Strands…………………………..1 good pinch
    • Coarsely ground Pistachios……….....2 Tablespoons
    • Mango Essence…………………………..1/2 Teaspoon
    • Popsicle molds
    Method of Preparation
    1. Powder together Cardamom seeds, Sugar and Saffron. This process will make the sugar dissolve faster in the cream. Instead you can pound this together in a Mortar and Pestle till Cardamom seeds and Saffron is almost powdered.
    2. Combine the Mango Pulp, Sugar mixture, and Heavy Cream and whip till it attains a thick consistency. This won’t whip up hard as a Whipping Cream but it will attain a thick consistency so that when you raise the whip, the dripping mixture will form ribbons on top of the batter.
    3. Mix in Mango essence and ground Pistachios into the Mango Heavy Cream mixture.
    4. Pour it into Ice Pop molds and freeze for 6-8 hours or till it is set properly.
    5. To unmold, pour hot water on the under surface of the mold till the frozen Kulfi loosen up along the sides.
    6. Serve cold with a light sprinkle of crushed Pistachios.
    Notes:
    • If you don’t have Popsicle molds, then pour this into small paper cups and cover with Aluminum foil. Insert Popsicle sticks along the middle of the Aluminum foil into the middle of the Kulfi till it touches the bottom of the paper cups. The Aluminum foil will protect the Kulfi from cross contamination in the freezer (Contamination from  raw meat or fish) and will keep the Popsicle stick in place.
    • If you don’t have Popsicle molds or Paper cups just pour the mixture into a big container; freeze it and serve like Ice cream.
    • I never made this with fresh mangoes. The store bought Mango pulp has a very strong concentrated flavor which is perfect for this Dessert and are available in most of the Indian and International stores.
    • Mango Essence is essential for this and is available in most of the Indian stores.


    Make it, enjoy the deliciousness and
    serve it to your family with love…

    Wednesday, October 13, 2010

    Bean Biscuits

    Recipe No: 95
    Let me take you for a small tour along my childhood. Being 10 and 9 years younger to my brothers, my father used to send me with them to the nearby bakery to get some snacks on one single condition. I should hold on to the hands of either one of them the whole time. So clinging onto the hands of one of my brother I used to make bakery visits often. Most of the times I will be welcomed by the sight of a big glass jar filled with scrumptious Bean Biscuits. Just like an instinct I will ask my brothers pointing to the glass jar “Can you buy that…..please…?” even though I know that the answer will be a big ‘NO’, mostly because my father would have instructed my brothers to buy something else…. So I will stand there staring at that big jar full of these small, lighter than air biscuits, committing crime in my mind by imagining me putting my hands into the jar and scooping up fistfuls of those biscuits and eating it voraciously…. But when I grew big, I used to buy these whenever I get a chance. I even packed a few packets of these sweet treats on my way back to US from my last Kerala trip.

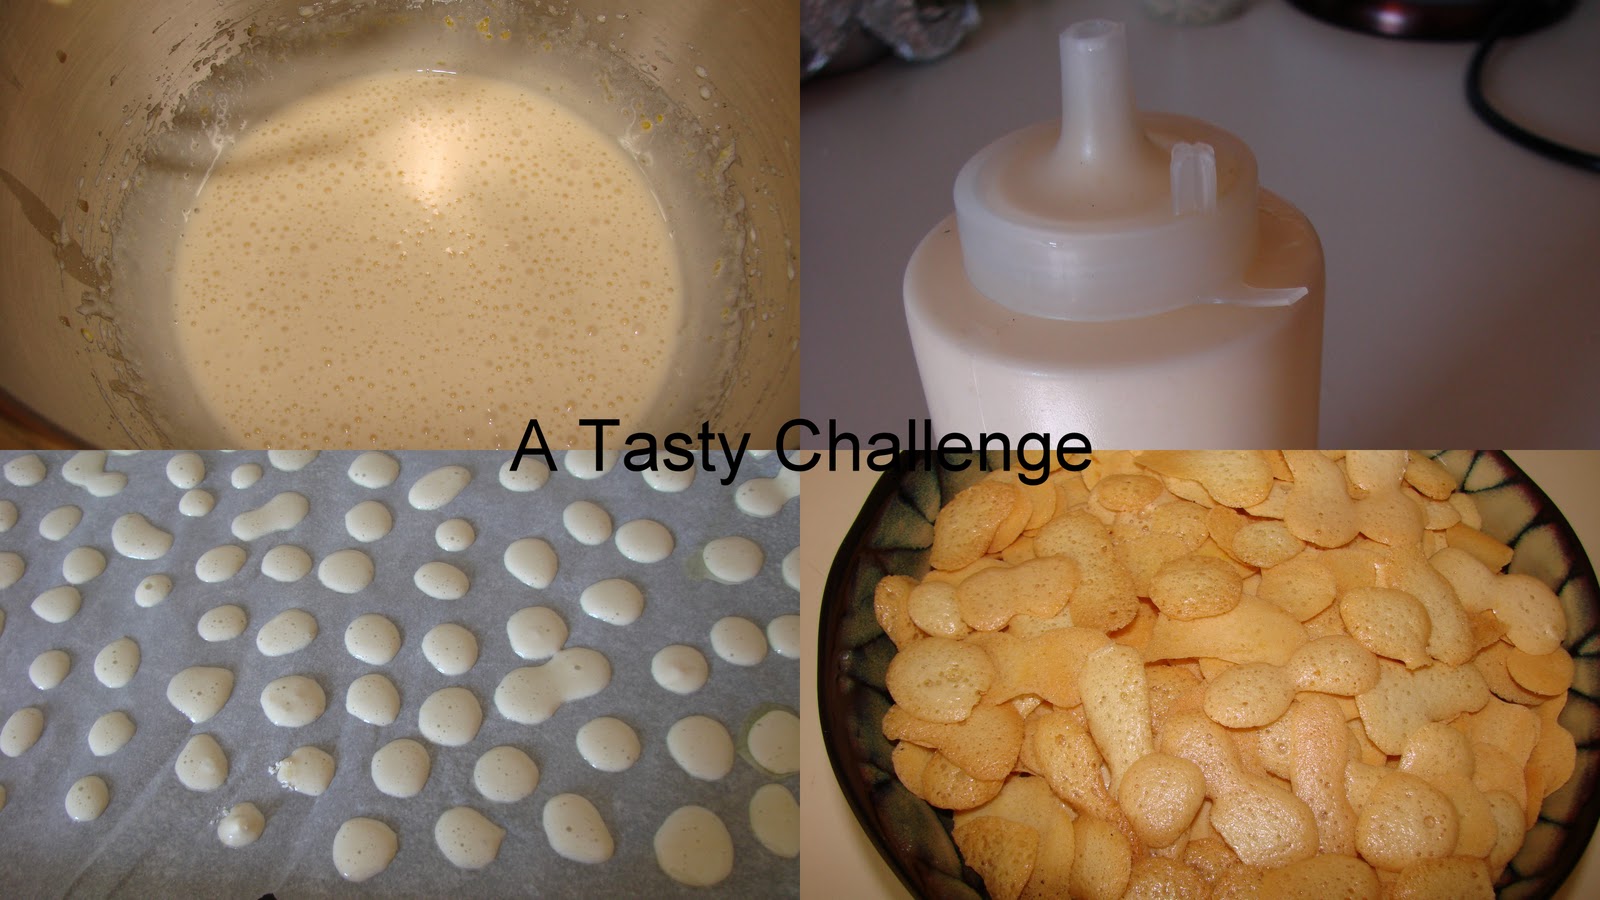
    Suddenly, last week when I was talking to my brother over phone I remembered these moments and decided to give this all time favorite a try. The taste of these resembles very much like a basic sponge cake. So I decided to make such a kind of batter and the difficulty was to adjust the temperature. After making two batches I got the temperature correct and I should say these came out well. I think the name is from the shape of these Biscuits, but if you look closely they come in all shapes, mostly round. So here it is the good old Bean Biscuits…
    Ingredients
    • Egg………………………................2 (At room temperature)
    • Sugar……………………................2/3 Cup
    • All purpose Flour/Maida....….6 Tablespoons
    • Baking Powder……………......…1/8 Teaspoon
    • Vanilla Essence…………….....….1 Teaspoon
    Method of Preparation
    1. Preheat the oven to 250˚F/120˚C.
    2. Line a baking sheet with parchment paper and apply a small coating of Oil or Butter. Use cooking spray if you have.
    3. Sift together Flour and Baking Powder and keep aside till ready to be used.
    4. Beat Egg, Sugar and Vanilla Essence really good till it is pale in color and doubles in volume. This process is easy if you have a stand or hand mixer.
    5. Add the Flour mixture and mix gently with a wooden spoon. Don’t use a mixer for this step.
    6. Transfer this mixture into a sauce bottle.
    7. Drip the batter onto the baking sheet to make small drops leaving space in between the drops.
    8. Once the sheet is full put this in the middle rack of the preheated oven for 12 to 15 minutes or till it starts to brown lightly around the edges.
    9. Keep it in  an airtight container when cooled.
    Notes:
    • After the cooking time the Biscuits will be slightly soft to touch but will harden up within minutes.
    • If you don't have a sauce bottle, use a Zip Lock bag instead. Fill up the bag and make a small hole in one corner so that the batter will drip when you apply a small pressure.
    • The texture of these cookies should be very light and crispy.


    Make it, enjoy the deliciousness and
    serve it to your family with love…