Creating a blog was out of the question for a long time for me, as measuring everything in the kitchen was like biting into an eggshell. I enjoy cooking and don’t want to waste even a slightest bit of enjoyment in that small world of mine. But little did I know that everything will change, when my husband came home with the Oscar nominated film ‘Julie and Julia’( a real life story) where Julie Powell (part played by Amy Adams) challenged herself to make all the 524 recipes from Julia Child's cook book ‘Mastering the Art of French Cooking’ and blogging all her experiences (The Julie/Julia Project). It was an inspiring movie. A few days later when we were discussing this casually with a friend of ours over tea…everything changed dramatically…..” How about you making at least half of it in one year? Not French but your own. 262 recipes that will inspire others and present it as a blog?” For a minute my mind traveled faster than light… With an experience as a helper in my mother in laws kitchen for 6 years followed by a three year everyday struggle to satisfy the palate of my foodie husband, if I cannot do it then why should I cook? But on the other side with an experience in English literature extending no more than expanding outline stories in English grammar class when I was 18 and two small kids that come in handy at times, will a commitment for the next one year work? Anyway my ‘cook's ego’ didn’t allow me to say no...

So my friends …here I am opening my recipe book, trying to perfect and present 262 recipes in the coming 365 days….A Challenge that will of course tastes good. Come.. Have a walk with me along my journey.. Cheering and inspiring….Forgiving and tolerating…Testing and tasting….for ‘A Tasty Challenge’

Search This Blog

Thursday, March 10, 2011

Duck Roast

Recipe No: 215
I followed my regular roasting recipe (Chicken Roast, Rabbit Roast and Lamb Shank Roast) with some changes here and there so that the Masala compliments the Protein used.
Ingredients                                    Serves 6
  •  Duck Cut into big pieces...750 Grams (Clean, wash and dry)
To Grind
  • Shallots sliced…………………...1/2 Cup
  • Ginger-Garlic Paste………...….2 Tablespoons (or use 2 big pieces of Ginger and 12 big cloves of Garlic)
  • Turmeric Powder……………….1/2 Teaspoon
  • Coriander Powder…………...…1 Tablespoon
  • Red Chilly Powder…………..…1 1/2 Teaspoons
  • Pepper Powder…………………..1/2 Teaspoon
  • Garam Masala Powder………..1 1/2 Teaspoons
  • Lemon Juice or Vinegar……...2 Tablespoons
  • Salt…………………………..………As Per Taste
    To Saute
    • Coconut Oil………………….……5 Tablespoons
    • Onion Sliced thin…………...…..3 Cups
    • Curry Leaves………………..…….3 Sprigs
    • Coconut Milk………………….….3/4 Cup
    • A sprig of Curry leaf, ½ Teaspoon of Garam Masala Powder and a Teaspoon of Coconut Oil to sprinkle on top towards the end
    Method of Preparation
    1. Combine and grind all the ingredients in the ‘to grind’ section to a course paste. Take half of this paste and marinate the Duck pieces and keep aside for 30 minutes. Keep the rest of the paste for later use.
    2. Heat 3 Tablespoons of Oil in a nonstick pan and shallow fry the marinated Duck pieces. Transfer them to a Pressure cooker.
    3. To the same pan, add the rest of the Oil and saute Onion and Curry leaves till lightly brown on medium high heat. (If not browned the roast will be sweet)
    4. Once browned, lower the heat to medium low; add the left over ground paste and saute for at least 5 minutes. This stage is very important as it decides the color of the roast. Be patient and let the paste get rid of the raw smell and taste and become brownish black in color. But take care not to burn it. So I will recommend stirring constantly at this stage.
    5. Once it reached a brownish black color add this to the Duck in the Pressure Cooker together with 2 1/2 cups of Water. Let the Duck and the Onion mixture cook in the pressure cooker for 5 whistles or till done.
    6. Once cooled, dump all the contents from the cooker into the pan on medium high heat and let the extra water evaporate. Stir now and then, taking care not to break the  pieces.
    7. Once almost dry, add the Coconut milk and let it attain the consistency you need. 
    8. Sprinkle some Curry Leaves, Garam Masala Powder and Coconut Oil on top; switch off the flame; close the lid and let it rest for at least 30 minutes before serving.
    Notes:
    • The resting period in the pan is kind of important as per the elders, as they call it ‘Pathrapakam’ meaning that it should sit in the same vessel it cooks for some time to attain the perfect taste.
    • Duck has more cooking time when compared to Chicken. So adjust the time accordingly in your cooking conditions.
    • If you don't want the extra fat in the roast, please follow this. Once the Duck is cooked in the cooker; take the meat out and leave the gravy in the fridge for 45 minutes or in the freezer for 15 minutes. All the fat will solidify on top of the vessel. You can easily discard this and then follow the rest of the procedure. You will get all the taste of the dish without any extra fat.
    • Duck skin is used widely, but I don't prefer to use it in this preparation.  If you want to use it, please do, but as Duck skin is heavy on fat it may clog the Pressure cooker nozzle while cooking (if used in excess) and so please do take care.
    • As I served this Duck Roast with Ghee Rice, I decided to leave some gravy. But traditionally it is made as a semi dry dish, which goes very well with Appam.
    • This goes well with most of the Rice dishes, Chappathi, Roti, Bread, and the most classic of all...Appam. 


      Make it, enjoy the deliciousness and 
      serve it to your family with love...

      Chocolate Cream Biscuits

      Recipe No: 214
      I am a big fan of Britannia Bourbon (Chocolate Cream) Biscuits (Somehow I don’t like any of the other brands.) and unfortunately (or fortunately for me!) my kids are not. But even now, I buy these at times and indulge in a blissful moment all by myself!!! So I decided to make something that is similar to that Britannia Bourbon and along came these Biscuits… and I should say I didn’t get a chance to indulge in these Biscuits much, as my daughter went crazy over it and ate most of it together with her father!!!
      Ingredients                                         Makes around 15
      To make the Biscuits
      • Butter……………………….......1/2 cup/ 1 stick/ 8 Tablespoons (room Temperature)
      • All Purpose Flour/ Maida…1 ¼ Cup
      • Cocoa Powder………………...2 Tablespoons
      • Fine Sugar……………………..1/4 Cup (If Sugar has big granules powder it slightly)
      • Water……………………………2 Tablespoons
      • Granulated Sugar for sprinkling on top
      To make the Cream
      • Semisweet Chocolate chips…1/3 Cup
      • Milk Powder…………………..…1 Tablespoon
      • Water…………………………..….1 Tablespoon
      • Vanilla Essence………………...1/4 Teaspoon
      • Instant Coffee Powder…….…1/8 Teaspoon
      • Butter………………………….…..1 Tablespoon
      • Powdered Sugar………………..1 Tablespoon
      Method of Preparation
      To make the Biscuits
      1. Mix together Flour, Sugar and Cocoa Powder really well.
      2. Mix in the Butter with your hands (just like you make Puttupodi) thoroughly until it resembles wet sand.
      3. Add the Water and knead it into soft dough.
      4. Cover the dough with Aluminum Foil and refrigerate for about ½ hour.
      5. Preheat the oven to 375˚F/190˚C.
      6. Once chilled, roll out the dough into a rectangle with 1/8 of an inch
        thickness.
      7. Cut 3 X 1 inch rectangles from the rolled out dough and place them on a buttered cookie sheet ½ inch apart.
      8. Prick the top of the Biscuits with a fork and sprinkle granulated Sugar on top of half of the Biscuits.
      9. Bake them in the middle of the oven for 12 minutes or until the sides start to turn light brown.
      10. Once out of the oven, let it cool on the sheet itself.
      To make the Cream (Substitutes in the notes section)
      1. Dissolve  Milk Powder in Water thoroughly. (Use 1 ½ Tablespoons of Heavy Cream instead)
      2. Add Chocolate chips, Coffee and Butter to the Milk and double boil till it melts thoroughly. (You can Microwave it, but do stop and mix every 10 seconds.)
      3. Once slightly cooled, mix in Vanilla Essence and Powdered Sugar to the Chocolate mixture and keep aside till ready to be used.
      To assemble the Cream Biscuits
      1. Spread some Cream on the flat side of the Biscuits without Sugar and sandwich it with  Biscuits with Sugar on top. Press slightly so that the Cream spreads till the edge.
      2. Allow it to set for 1 hour before serving.
      Notes:
      • In US, the regular Sugar is very fine. So I used granulated Sugar, which has bigger granules to sprinkle on top of the Biscuits. Fine Sugar will not be seen once the Biscuits are done. If the Sugar you are using have big granules(like the ones in India) do use that to sprinkle on top.
      • Rotate the tray half way through baking to ensure even cooking of the Biscuits.
      • This Biscuits will not rise or spread much as there are no leavening agents in the dough. But because of the amount of Butter it will be very light.
      • While making the Cream, mix in the Powdered Sugar to the chocolate mixture only after it is cooled otherwise the Sugar will melt.
      • If the prepared Cream is a bit on the loose side, keep it in the fridge and allow it to chill so that it hardens slightly.
      • Let the Biscuits cool thoroughly before making it into Cream Biscuits.
      • This Biscuits as such is not on the Sweeter side as it is meant to be eaten with the Cream which is on the sweeter side. But I have to say my daughter like it even without the Cream.
      • The Cream in the middle will become more stable as it sits. After 5-6 hours it will become perfect. (We didn't have so much patience and so the Cream came out a bit while eating.)
      • Substitutes for the Chocolate Cream:
      1. If you want a Vanilla Cream do mix Butter with Powdered Sugar and a bit of Vanilla Essence till it attains a creamy consistency.
      2. Avoid Vanilla Essence from the above Cream and add Cocoa Powder made into a paste with Water to get a very simple Chocolate Cream. Add Powdered Sugar as needed.


      Make it, enjoy the deliciousness and 
      serve it to your family with love…

      Tuesday, March 8, 2011

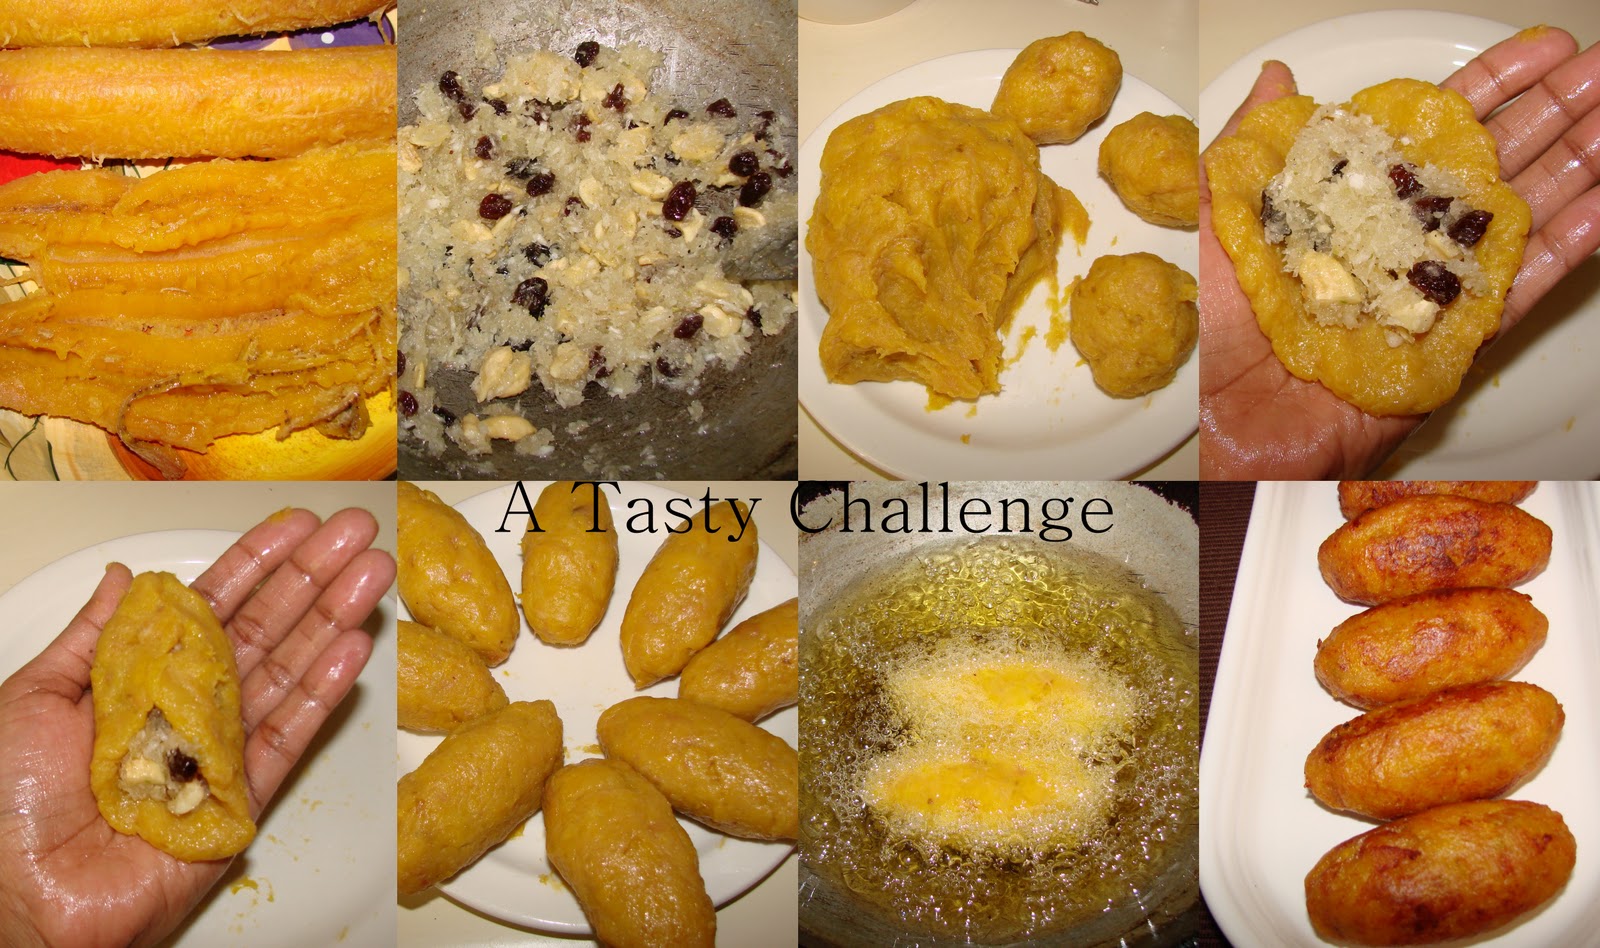
      Unnakaya (Fried Stuffed Plantains)

      Recipe No: 213
      My Mother used to make these  whenever there are ripe Plantains in my house  and is a very good way to use them. Even though she never used any names for this dish, I found that it is Unnakaya, something that is very usual in Malabar cuisine.
      Ingredients                                       Makes 8 big
      • Ripe sweet Plantains…….…..3
      • Oil for frying
      To make the Filling
      • Ghee……………………………....1 Tablespoon
      • Cashew pieces………………….2 Tablespoons
      • Raisins……………………………1 Tablespoon
      • Grated Coconut……………….3/4 Cup
      • Sugar……………………………..3 Tablespoons
      • Cardamom Powder………….1/2 Teaspoon
      Method of Preparation
      To make the Filling
      1. Heat Ghee in a pan on medium heat and fry the Cashew pieces till it starts to brown along the edges.
      2. Add the Raisins and let it plump up before adding the Coconut and Sugar.
      3. Let the Sugar melt and the mixture dries up slightly. Don’t let the Coconut change its color.
      4. Off the heat and add the Cardamom Powder. Keep it aside till ready to be used.
      To make and fry Unnakaya
      1. Steam the Plantains until soft. Let it cool down.
      2. Cut it through the middle and remove the seeds and veins from the middle.
      3. Mash the Plantains really good and divide it into 8 equal portions.
      4. Apply a light coating of Ghee on your palm and press a portion to make it flat.
      5. Place 1/8th of the filling in the middle and cover it with the Plantain mixture as shown in the picture.
      6. Shape it and keep it aside till ready to be fried. Repeat this process with all the other portions.
      7. Heat at least an inch of Oil in a pan on high heat and fry the stuffed Plantain till golden brown all around.
      8. Once done, move it onto a  kitchen tissue to get rid of the excess Oil and serve hot.
      Notes:
      • While steaming the Plantains don’t let it come in touch with Water, or it will absorb a lot of Water which makes it difficult for shaping. Also it will absorb a lot of Oil while frying if there is moisture in the Plantain mixture.
      • I love to Cook the Plantains in a pressure cooker by placing it on an Idli rack (I actually use 2 so that they will be above the Water) for 1 whistle. 
      • This is a very good way to use the leftover steamed Plantains. The longer it stays after cooking, the more it looses Water which is good for Unnakaya.
      • You can increase or decrease the amount of Sugar in the filling depending on the sweetness of the Plantains.


      Make it, enjoy the deliciousness and 
      serve it to your family with love…

      Monday, March 7, 2011

      Chicken Toast

      Recipe No: 212
      This is my version of the famous Chinese appetizer ‘Shrimp Toast’, made with Chicken. Generally this is deep fried and if anyone has fried Bread before, you will know how it will absorb Oil like a sponge. So I decided to shallow fry in a pan, but definitely you can bake or grill.
      Ingredients                                           Serves 8
      • Skinless, boneless Chicken….........200 grams
      • Shortening/Dalda/ Margarine…..1 ½ Tablespoons
      • Green/ Spring Onion/ Scallions….1 (Chopped fine)
      • Ginger chopped fine………………....1 Teaspoon
      • Green Chilly chopped fine………….1 Teaspoon
      • Beaten Egg……………………………...3 Tablespoons
      • Corn Starch……………………………..1 Tablespoon
      • Salt…………………………………………1/4 Teaspoon
      • Bread……………………………………..6 Pieces (I used whole Wheat)
      • Sesame seeds…………………………..1 Tablespoon
      • Oil as needed
      Method of Preparation
      1. Chop Chicken finely. Once almost chopped, add the Shortening and chop it together until it  blends in with the Chicken.
      2. Add Spring Onion, Ginger, Green Chilly, Egg, Corn Starch and Salt and mix well.
      3. Divide this mixture into 6 portions and spread each portion evenly on a slice of Bread.
      4. Sprinkle some Sesame seeds on top and repeat this process with all the pieces of Bread.
      5. Heat 2 tablespoons of Oil in a pan on medium low heat and place two slices of Bread each with the Chicken side down.
      6. Once the Chicken is cooked and the top browns slightly, turn it over and let the bread side crisp up.
      7. Once the Bread is crispy, take it out of the pan; drain the excess Oil by placing it on a paper towel; remove the sides of the Bread; slice each piece into 3 or 4 lengthwise (depending on the size of the bread) and serve hot with ketchup.
      Notes:
      • Frying, Grilling or Baking, place the Bread with the Chicken side down, first on the pan so as to keep much of the juices of the Chicken away from the Bread, thus preventing it from becoming soggy.
      • Do this dish only in medium or medium low flame; otherwise it will brown the bread fast without making it crispy.
      • Do add more Oil in between batches if necessary.
      • Don’t cut the edges of the Bread before frying as it will give some sort of a support  while frying.
      • If the Oil factor is okay with you, then do keep fry. (I should say it will make the Bread really crispy and tasty.)


      Make it, enjoy the deliciousness and 
      serve it to your family with love…

      Saturday, March 5, 2011

      Meen Podichathu (Fish Keema style)

      Recipe No: 211
      This is the result of a desperate attempt to get something tasty out of the canned Tuna. It is very similar to the Chicken Keema preparation that I posted before and is  excellent  if you are short on time and don’t want to thaw a frozen Fish.
      Ingredients                                    Serves 5
      • Fish/ Canned Tuna……........14 oz (If using fresh Fish, use 300 grams of cooked and mashed fish without bones/ approximately 2 cups)
      • Oil……………………………….......1 ½ Tablespoons
      • Mustard Seeds…………….........1/2 Teaspoon
      • Onion chopped…………...........1 cup
      • Ginger Garlic paste…..............1 Teaspoon
      • Curry Leaves……………...........1 Sprig
      • Red Chilly Powder………........1 Teaspoon
      • Coriander Powder………........3/4 Teaspoon
      • Turmeric Powder…………......1/4 Teaspoon
      • Garam Masala Powder…......1/2 Teaspoon
      • Tomato chopped……………....1/2 small
      • Potato……………………………...1 small (cut into small cubes)
      • Fresh Green Peas……………...1/4 (If using dried, use after cooking)
      • Coriander Leaves chopped…2 Tablespoons
      • Salt as needed
      • Pinch of Garam Masala Powder, ½ teaspoon Coconut Oil and a sprig of Curry Leaf to sprinkle on top)
      Method of Preparation
      1. Heat Oil in a pan on medium high heat and splutter the Mustard Seeds.
      2. Add Onion and saute till it starts to brown on the edges.
      3. Add Curry leaves and Ginger Garlic paste; saute till the raw smell is gone.
      4. Reduce the flame to medium low and add Red Chilly Powder, Coriander Powder, Turmeric Powder and Garam Masala Powder; saute really good for at least a minute. Stir constantly so that it won’t burn. 
      5. Add the Tomato and stir till it is mashed.
      6. Add Fish, Potato, Green Peas, Salt and 1 cup Water; cover the pan and let it simmer till the Potato is cooked.
      7. Once cooked and all the water is absorbed, saute it for a minute or two on a medium heat stirring now and then, taking care not to mash the Potatoes.  
      8. Add Coriander Leaves and mix well.
      9. Sprinkle ½ teaspoon Coconut oil, a pinch of Garam Masala Powder and a sprig of Curry Leaf on top just before turning the stove off.
      10. Keep the pan covered for 15 minutes before serving warm with Rice or Chappathi.
      Notes:
      • If you are using canned Tuna, drain it well before using.
      • Take care not to mash the Potatoes while stirring.
      • This can also be used as a filling to make appetizers, stuff a Bread etc:


      Make it, enjoy the deliciousness and 
      serve it to your family with love…


      Pacha Pattani/ Dried Green Peas Curry

      Recipe No: 210
      This Curry brings a ton of memories from 12 years of my hostel life… Well, two hostels to be specific and both of them served a version of Dried Green Peas Curry. At that time, I should say, this was one of my favorites as it was better than most of the other dishes. After that hostel life, I ate Green Peas Curry only now and then, especially when my Mother in law made it, but it soon emptied its way to fresh Peas which taste very different from the dried variety.

      The hidden memory of this Curry was suddenly poked when I ate this from a friend’s house and its comeback was rather strong. I started making this ever since especially because it is very easy to make, yet delicious. So here is the recipe... just like my friend explained...
      Ingredients                                          Serves 3
      • Dried Green Peas………………3/4 cup (wash and soak in Water for 4 hours)
      • Oil…………………………………..1 Tablespoon
      • Mustard Seeds…………………1/2 Teaspoon
      • Onion thinly sliced…………...1/2 cup
      • Split Indian Green Chilly…..4
      • Ginger Garlic Paste…………..3/4 Teaspoon
      • Curry Leaves…………………..1 Sprig
      • Red Chilly Powder………......1/4 Teaspoon
      • Coriander Powder…………....3/4 Teaspoon
      • Turmeric Powder…………..…1/4 Teaspoon
      • Garam Masala Powder……..1/2 Teaspoon
      • Tomato………………………..….1/2 big sliced
      • Thin Coconut milk………..….1 Cup
      • Thick Coconut Milk……….....1/2 Cup
      • Vinegar…………………………...1/2 Teaspoon
      • Salt as needed
      Method of Preparation
      1. Heat Oil in a pan (pan of the pressure cooker will do) on medium high heat and splutter the Mustard Seeds.
      2. Add Onion, Green Chilly, Ginger Garlic paste and Curry leaves; saute till it wilts. (Doesn’t have to wait till it browns)
      3. Add the drained soaked Green Peas and fry for 2 minutes.
      4. Add Red Chilly Powder, Coriander Powder, Turmeric Powder and Garam Masala Powder; mix everything together really well.
      5. Add the Tomato, Salt, Thin Coconut Milk and 1 Cup Water; close the cooker and let it cook till done. (It took 5 whistles in my cooker)
      6. When the Pressure is gone, open the pan and add Thick Coconut Milk and Vinegar.
      7. Mix well and let it start to boil along the edges.
      8. Switch off the heat and serve hot with Appam or Bread (Bread was the usual hostel combo!).
      Notes:
      • The Green Peas should be cooked till it is soft to touch but not until mashed. If it is mashed, its skin separates which will not be a good scene.
      • I like it without much gravy, but add more Water if you need more.
      • This has a tendency to thicken as it sits. If it is too thick at the time of serving, please do add some hot Water to thin it.


      Make it, enjoy the deliciousness and 
      serve it to your family with love…

      Wednesday, March 2, 2011

      Chocolate dipped (raised) Donuts

      Recipe No: 209
      There are two types of Donuts, Cake Donuts which uses Baking Powder/ Soda as the leavening agent and raised Donuts, which uses Yeast as the leavening agent and I should say the latter is hard to make but taste better than the other (at least for me).
      My son is a big fan of Donuts and every now and then he will ask me to make it. He like it with Chocolate glaze, I like it with Powdered Sugar and my husband like it without any coating. So when I make it at home, I usually make an assortment of these three varieties.
      Ingredients                                                Makes 12-14 
      To make the Donuts
      • Milk………………………..1/3 cup
      • Butter……………………..2 Tablespoons
      • Sugar…………………..…1 ½ Tablespoons
      • Warm Water…………..1/4 Cup
      • Instant Yeast……….….1 ½ Teaspoons
      • Egg…………………..……1 Large
      • Salt……………………..…1/8 Teaspoon
      • Bread Flour…………....1 ¾ - 2 Cups (Can be substituted with All Purpose Flour/ Maida)
      • Oil for deep frying
      To make the Chocolate topping
      • Semisweet Chocolate chips…1 Cup
      • Heavy Cream/ Milk………….1/4 Cup
      • Instant Coffee Powder……...1/2 Teaspoon
      • Vanilla Essence………………..1/2 Teaspoon
      • Sprinkles to decorate
      Method of Preparation
      To make the Donuts
      1. Heat Milk, Butter and Salt till they are warm and the Butter is melted thoroughly. Keep aside till it cools down.
      2. Dissolve Yeast and Sugar in Warm Water and keep aside for 5 minutes till it becomes frothy.
      3. Mix Yeast mixture, Milk mixture, Egg and 1 cup of Flour thoroughly in a stand mixture attached with a dough hook. Do it with a whisk if you don’t have a stand mixture.
      4. Add the rest of the Flour till you get a moist, sticky yet manageable dough.
      5. Knead it for 5 minutes in a stand mixer on speed 2 or 8-10 minutes by hand or till it becomes elastic.
      6. Keep the dough in a big container covered with a wet cloth and let it rise in a warm place till doubles in volume.
      7. Once doubled in volume, punch it down and roll it till it is ½ inch thick.
      8. Cut out Donuts using a Donut cutter and place in a lightly oiled tray; cover with a damp cloth and let it rise again for 20-30 minutes.
      9. Heat at least 2 inches of Oil in a pan on medium high heat and deep fry the Donuts till golden brown on both sides.
      10. Roll it in powdered Sugar (Add Cinnamon Powder if you like) while still hot or let it cool down for a Chocolate coating.
      To make the Chocolate coating
      1. Combine Chocolate chips, Heavy Cream, Coffee Powder and Vanilla Essence; heat it on a double boiler. (Heat the bowl with Chocolate on another pot with simmering Water without its bottom touching the Water)
      2. Once melted and combined thoroughly, mix it for a minute or till it becomes shiny.
      To assemble the Donuts
      1. Dip the cooled Donuts in the Chocolate; allow the extra Chocolate to fall back; put sprinkles on top and serve.
      Notes:
      • The Water in which the Yeast is dissolved shouldn’t be very hot or it will kill the Yeast.
      • If the Yeast mixture is not frothy after 5 minutes either you have killed the Yeast or it is old. In both cases start over again.
      • Don’t make the dough too stiff or the donuts will become very dry.
      • Bread Flour and All Purpose Flour (which is same as that of Maida) are different. Bread Flour contains a higher amount protein that will in turn develop a higher amount of Gluten while kneading. This Gluten is responsible for the elasticity. Thus Bread flour will make soft raised Donuts than All Purpose Flour. But you can substitute one with the other using the same measurements, even though, the results may vary slightly. Bread Flour is available near the All Purpose Flour in most of the grocery stores.
      • Heating milk and then cooling it seems like a step that can be avoided, but it is very crucial in determining the texture. So please don't avoid that step.  
      • Kneading is very important as it makes the Donuts soft. (I still remember the first time I made this... it was ridiculously hard!!!)
      • Don't use too much Flour to make the dough. Even though the dough is sticky if you can manage it, then don't use more Flour. That will make the Donuts hard and dry.
      • The doubling time for the dough will depend on the power of the Yeast and the temperature of the surroundings. So please wait till the dough doubles in your cooking conditions.
      • Instead of Donut cutter, you can use one glass and one bottle cap to make Donut rings.
      • You can gather all the scrap dough; knead it and let it sit for 10 minutes before rolling it again to make Donuts. 
      • You can make the Chocolate topping in the Microwave, but stop and mix every 30 seconds.
      • The Coffee and Vanilla in the Chocolate won't be tasted separately, but it will make the Chocolate more chocolaty.
      • Be very careful when you melt the Chocolate. If you apply strong heat, then instead of melting, it will attain a hard texture which is irreversible and is called scorching. So make sure that the Water is only simmering (not boiling) when you double boil.
      • If you are not planning to coat all of the Donuts with Chocolate, then please  half the recipe.


       Make it, enjoy the deliciousness and 
      serve it to your family with love…