Creating a blog was out of the question for a long time for me, as measuring everything in the kitchen was like biting into an eggshell. I enjoy cooking and don’t want to waste even a slightest bit of enjoyment in that small world of mine. But little did I know that everything will change, when my husband came home with the Oscar nominated film ‘Julie and Julia’( a real life story) where Julie Powell (part played by Amy Adams) challenged herself to make all the 524 recipes from Julia Child's cook book ‘Mastering the Art of French Cooking’ and blogging all her experiences (The Julie/Julia Project). It was an inspiring movie. A few days later when we were discussing this casually with a friend of ours over tea…everything changed dramatically…..” How about you making at least half of it in one year? Not French but your own. 262 recipes that will inspire others and present it as a blog?” For a minute my mind traveled faster than light… With an experience as a helper in my mother in laws kitchen for 6 years followed by a three year everyday struggle to satisfy the palate of my foodie husband, if I cannot do it then why should I cook? But on the other side with an experience in English literature extending no more than expanding outline stories in English grammar class when I was 18 and two small kids that come in handy at times, will a commitment for the next one year work? Anyway my ‘cook's ego’ didn’t allow me to say no...

So my friends …here I am opening my recipe book, trying to perfect and present 262 recipes in the coming 365 days….A Challenge that will of course tastes good. Come.. Have a walk with me along my journey.. Cheering and inspiring….Forgiving and tolerating…Testing and tasting….for ‘A Tasty Challenge’

Search This Blog

Showing posts with label Left Over Magic. Show all posts

Friday, April 29, 2011

Baked Chicken Parcels

Recipe No: 248
This is one of the best ways to use left over Keema. It is a very easy to make snack and the pastry/ covering, even though very different from Puff pastry, resembles it a lot being on the flaky side…
Ingredients                                        Makes 10
To make the covering
  • All Purpose Flour/ Maida……2 Cups
  • Baking Powder…………………..1 Teaspoon
  • Salt……………………………….....1/4 Teaspoon
  • Egg…………………………………..1 beaten (Reserve 1 Tablespoon from this to brush the top of the parcels.)
  • Luke warm Water as needed
  • Soft Butter…………………….....2 Tablespoons
For the Filling
Method of Preparation
  1. Mix together Flour, Baking Powder and Salt really well.
  2. Add the Egg (don't forget to reserve a tablespoon) and make a soft dough using enough Luke warm Water. The dough should be smooth and soft.
  3. Cover it with a damp towel and keep aside for 15 minutes. By this time the dough will be softer.
  4. Roll it out into a 14 inch square.
  5. Apply the Butter on top of the dough and roll it up tightly into a cylinder.
  6. Wrap this rolled up dough in a plastic sheet or Aluminum foil and refrigerate for at least 40 minutes. (This will solidify the Butter)
  7. Preheat the oven to 350˚F/ 180˚C.
  8. Cut the chilled dough into 10 equal portions.
  9. Press one portion of the dough slightly and roll it out into 5-5 ½ inch circle. The outer portions of the dough should be thin otherwise the underside of the Parcels , where all the dough from the sides meet, will be thick.
  10. Place a big Tablespoon of filling (Chicken Keema) in the middle, leaving some space along the sides.
  11. Fold the outer edges and pinch them together so that the filling is secured inside. (Take care not to gather up a lot of dough from the sides, which can make that  portion very thick.)
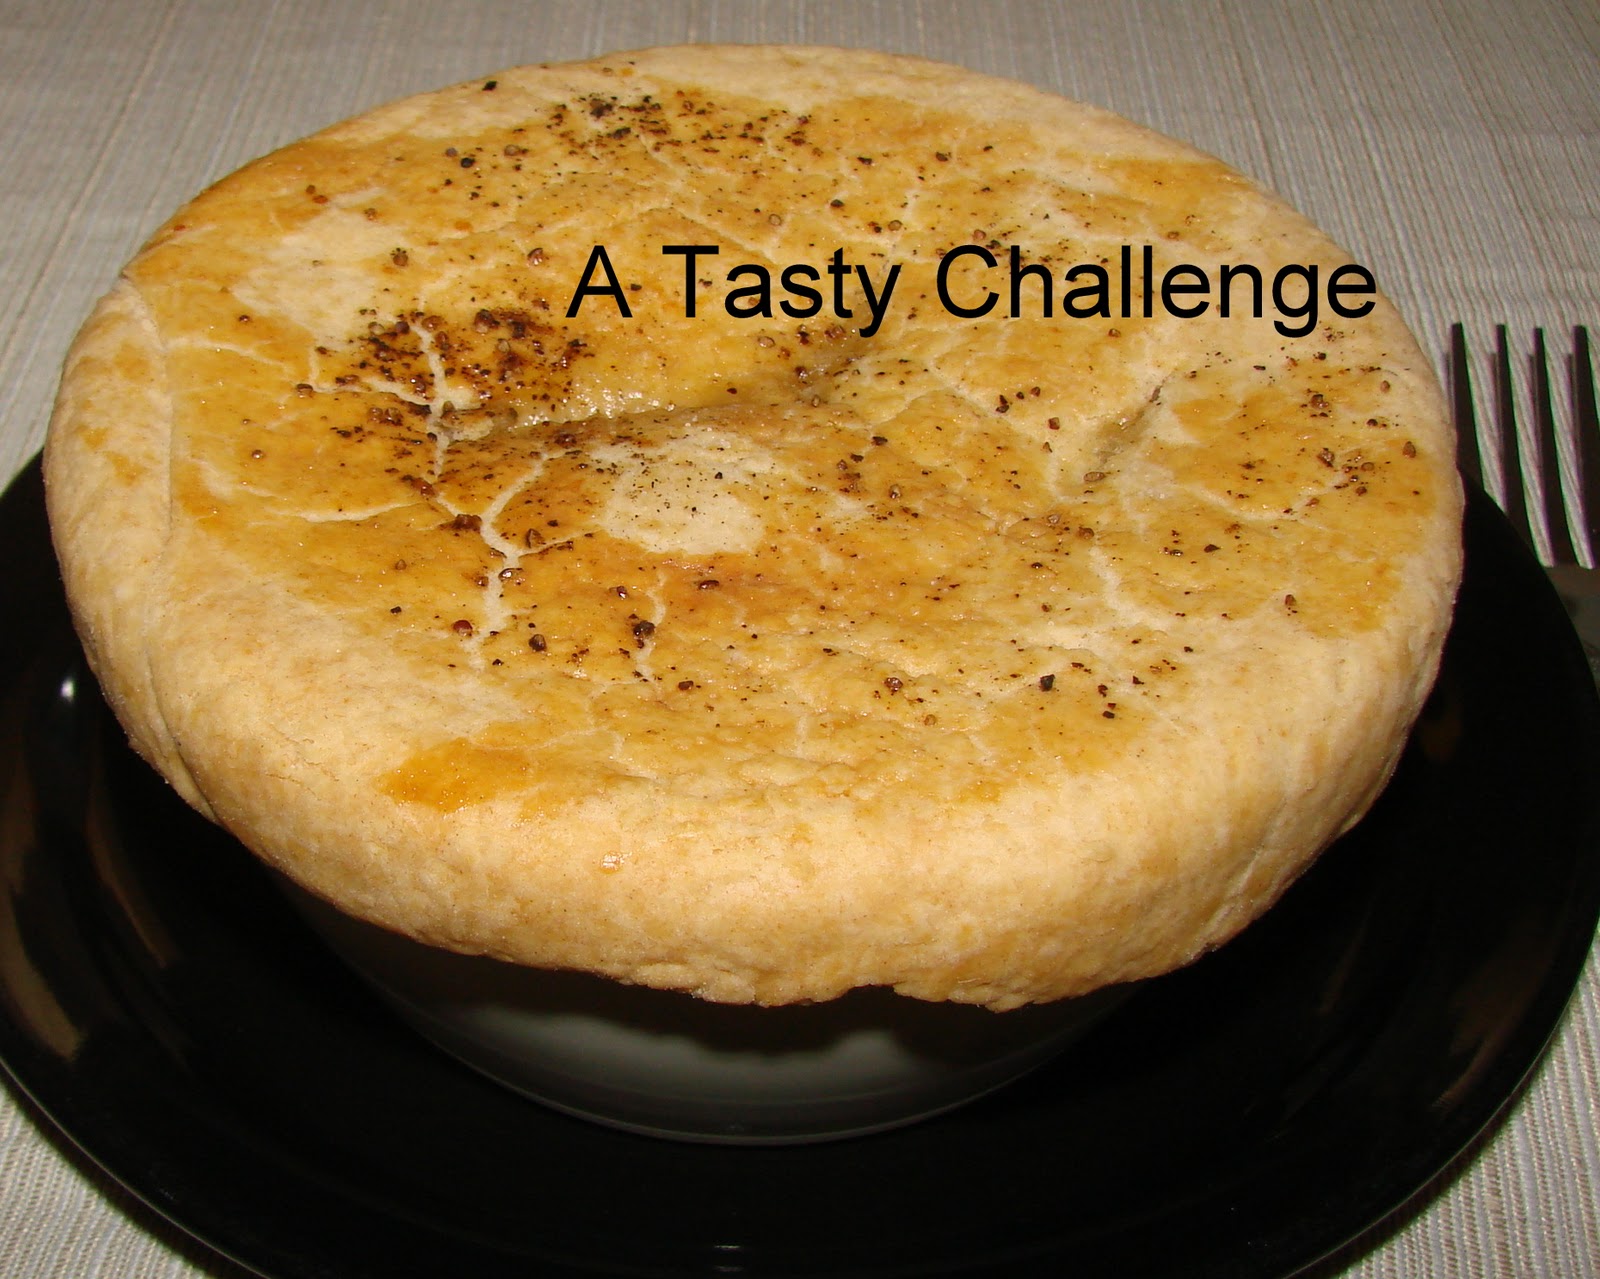
  12. Place this parcels seam side down and press slightly to make a 3 – 3 ½ inch circle. Repeat with all the other portions.
  13. Place this, seam side down, on an oiled baking tray; brush the leftover Egg on top evenly and bake for about 25- 30 minutes or till the parcels are golden brown.
  14. Serve hot with ketchup.
Notes:
  • Chilling the dough is very essential as it will solidify the Butter and the solid Butter when hits the hot oven releases vapor making the pastry flaky. (Solid butter pieces can be seen while rolling the chilled dough.)
  • The dough can be made earlier and refrigerated for about a day or two. You can just roll it out and make the snack when ever needed, making it good for parties.
  • You can use the filling of your choice to make this snack. If you are using left over Chicken Keema remove the big Potato pieces before using.


Make it, enjoy the deliciousness and
serve it to your family with love…

Thursday, December 2, 2010

Turkey/ Chicken Pot Pie

Recipe No: 132
This recipe is same for both Chicken and Turkey. I am doing it with Turkey here as I want to use the leftover Turkey from the Thanksgiving. Except for the slight taste difference of these two proteins, there is not much of a difference between the two dishes.
Ingredients                           Serves 3
For the Filling
  • Butter/ Oil………………..........3 Tablespoons
  • All Purpose Flour/ Maida…..3 Tablespoons
  • Milk…………………………….….3 Cups
  • Salt……………………………..….1 Teaspoon
  • Pepper Powder………………...1/3 Teaspoon
  • Carrots……………………………1/2 Cup (Cut into small cubes)
  • Fresh Green Peas……………..1/2 Cup
  • Cooked Turkey Cubed……….2 Cups
For the Crust
  • All Purpose Flour/ Maida….1 ½ Cups
  • Baking Soda……………….……1/8 Teaspoon
  • Salt…………………………...……1/4 teaspoon
  • Cold Butter ……………………..6 Tablespoons (Cut into cubes)
  • Cold Water…………………..….6 Tablespoons
Other Ingredients
  • Egg wash (Mix 1 Egg with 1 Tablespoon of water) for brushing
  • Salt and Pepper to sprinkle on top.
Method of Preparation
To make the Crust
  1. Mix together Flour, Salt and Baking Soda really well.
  2. If you have a Food Processor (or a stand mixer), put Flour mixture and Cold Butter into it and pulse a few times till Butter is evenly distributed in the Flour with a course consistency. If you don’t have food processor, rub Butter into the Flour to get a course consistency. Whatever method you use don’t let the Butter melt completely into the Flour, but it should remain as small pieces.
  3. Mix in the cold water to make a very dry, crumbly dough.
  4. Dump it onto a floured surface, pat it into a ball (don't knead), wrap in plastic wrap and keep in the refrigerator till ready to be used.
To make the filling Part
  1. In a thick bottomed pan on medium heat, melt 3 Tablespoons of Butter and add 3 Tablespoons of Flour and fry till the raw smell is gone. This will take at least a minute, so please be patient and take care not to burn the Flour.
  2. Mix in the cold milk and stir really good to dissolve all the lumps and let it cook till it is thickened. Stir constantly.
  3. Add the Carrots and Peas and allow boiling. Do stir now and then.
  4. Once boiled, add the cubed cooked Turkey and mix well.
  5. Mix Salt and Pepper and switch off the flame.
To assemble and cook the Pot Pie
  1. Preheat the oven to 400˚F/ 204˚C
  2. Divide the Turkey in the White sauce mixture between three oven proof bowls.
  3. Roll out the chilled dough into ¼ of an inch in thickness and cut out rounds with an inch more circumference than that of the top round of the bowl you are using.
  4. Brush the sides of the bowl with Egg wash. This will help the dough to stick to the sides of the bowl.
  5. Place the cut out dough on top of the bowl and press it to the sides to the bowl.
  6. Brush the top of the dough with the Egg wash and sprinkle  a pinch of Salt and Pepper.
  7. Make two or three small slits on top of the dough and bake it in the middle of the oven for 30-40 minutes or till the crust becomes golden in color and the inside is bubbly.
  8. Serve it hot.
Notes:
  • Keeping the butter cold is very important because when the heat from the oven hits the cold Butter , the vapor formed will help the dough rise, giving it the flakiness. (we are using only a very small amount of Baking Soda)
  • If you don’t use a thick bottomed pan the white sauce may stick to the bottom of the pan and may burn.
  • Cutting the dough with a bigger circumference will aid in easy sticking of the dough to the sides of the bowl.
  • The slits on top if the dough, will prevent it from bursting in the oven due to the pressure that builds up because of the vapor.
  • An easy alternative to homemade dough is Puff Pastry. If you are using it instead of the dough, cut out rounds and bake them separately before putting it on top of the baked filling. If Puff Pastry is placed directly on top of the filling, there are chances that it may touch the filling and become soggy giving an uncooked appearance. 
  • Left over Rotisserie Chicken is good for making Chicken Pot Pie.


Make it, enjoy the deliciousness and
serve it to your family with love...

Thursday, October 21, 2010

Ali Baba’s Chicken Curry (My Version)

Recipe No: 102
Did this ever happen to you?  You get up early in the morning and slave in the kitchen to make food to pack your husband a delicious homemade lunch….  And he together with his foodie friends go out to eat the lunch ignoring the food that his wife packed with love… Coming back home with his untouched food boosting about the food that he ate at noon while you were expecting him to say something about the food you packed…

Hmm… this has happened to me many times… not only me but many wives when we were in California. One of their hot spots used to be a Middle Eastern Restaurant ‘Ali Baba’ and most of them were crazy about their Chicken Curry that they served on top of yellow Saffron rice with a side salad and  sauteed Vegetables. One day when we went that way he forced me to have this dish saying that it was awesome, even though the above coated incident has already created some sort of an inhibition in me towards that Restaurant…. (My bad!!!) Any way I did eat it once and I should say that was superb…. If you happened to read my earlier posts then you will be aware of my habit to imitate food that I like… whether it is from a restaurant or from a home….  So I took their menu back and read the description that they had given with that dish and this Chicken curry was born…
Ingredients                                                  Serves 3
  • Cubed Roasted Chicken……. 2 Cups (Leftover Rotisserie Chicken works well)
  • Capsicum/ Bell Pepper………1/3 Cup (Cut into thin, small pieces)
  • Olive Oil………………….……….1 Tablespoon (Can substitute with regular Oil)
  • Cream…………………….……….1 Cup
  • Water………………………………1/2 Cup
  • Pepper Powder………………….1/2 -1 Teaspoon
  • Curry Powder………….………..1 ½ Tablespoon (Recipe Follows)
  • Salt as needed
Curry Powder Mix
  • Coriander Powder…………….2 Tablespoons
  • Cumin Powder…………………1 Tablespoon
  • Turmeric Powder……………..1 Tablespoon
Method of Preparation
  1. Mix the ingredients to make the Basic Curry Powder and keep it aside. We will be using only a part of this and you can store the rest for later use.
  2. Heat Oil in a pan on medium heat and add Capsicum and saute for a minute.
  3. Add the Chicken followed by the Curry Powder and saute for one minute.
  4. Add Cream, Water, Pepper and Salt. Let it come to a slow simmer. Close the pan and let it simmer for 5 minutes. Reduce the gravy more if you want a thicker sauce.
  5. Serve hot over Saffron Rice with a side salad and sauteed Veggies.
To Make Yellow Saffron Rice
  • Grind ½ Teaspoon Salt and a good pinch of Saffron in a mortar and pestle and keep aside. Bring 2 Cups of water to a rolling boil and add 1 Cup washed Basmati Rice, a pinch of Turmeric Powder and the Salt Saffron Mixture. Close the pan and put it on the lowest possible flame till the water is absorbed and the Rice is cooked through.
Notes:
  • The Masala mix given here is what I consider as the basic Curry Powder. Sometimes (not in this case) I add enough Red Chilly Powder to it to make it hot.
  • The Curry Sauce tends to become thick when it sits. In that case add a bit of water to thin it before serving.


Make it, enjoy the deliciousness and
serve it to your family with love…

Saturday, October 16, 2010

Chicken Spring Rolls

Recipe No: 98
This is a perfect finger food that can be served as an appetizer or as a simple nibble on a comfortable afternoon together with Tea. Something different to make with the left over Rotisserie Chicken. If you are a Vegetarian just substitute the Chicken with Mushrooms.
Ingredients                                                      Makes 16-18
  • Vegetable Oil………………………..2 Tablespoons
  • Bean sprouts……………………..…1 Cup
  • Green/ Spring onions…………....1 Cup (Slice into thin long strips. About 1 bunch)
  • Carrots…………………………...…...2 (Slice into thin long strips)
  • Shredded Cooked ..Chicken..….1 ½ Cups
  • Salt……………………………….…….1/2 Teaspoon
  • Brown Sugar……………………..…1 Teaspoon
  • Light Soy Sauce………………..….1 Tablespoon
  • Rice Wine……………………….…...1 Tablespoon
  • Spring Roll Wrappers………...…9 Large or 18 Small
  • Corn Flour…………………..……...1 Tablespoon + some for spreading on the bottom of the plate.
  • Oil for deep frying
Method of Preparation
To make the Filling
  1. Cut Green Onions and Carrots into thin shreds roughly the same size of Bean Sprouts.
  2. Mix together Brown Sugar, Salt, Soy Sauce and Rice Wine and keep aside till ready to be used.
  3. Heat Oil in a pan on high heat until smoking and add Bean Sprouts, Carrots and Spring Onions and saute for around 2 minutes, stirring constantly.
  4. Mix in the Chicken for a minute and add the prepared Soy Sauce mixture.
  5. Mix everything together until dry and switch off the flame.
To make the Rolls
  1. Mix 1 Tablespoon of Corn flour with 1 Tablespoon of water and make into a thick paste.
  2. Prepare a plate by spreading a bit of Corn flour on the bottom.
  3. Start working with one Spring Roll Wrapper at a time. Here I am working with small wrappers. (If you are working with large wrappers, please read the ‘notes’ section carefully)
  4. Spread a teaspoon of filling on the wrapper diagonally as a thin line. Fold the lower half of the wrapper above the filling followed by the two sides.
  5. Brush the remaining portion of the wrapper with the Corn Flour paste and roll it all the way to the end tightly without any air bubbles.
  6. Arrange them on the prepared plate with the seam side down.
  7. Heat at least two inches Oil in a frying pan on high heat for deep frying.
  8. Fry the prepared rolls till they are golden brown in color.
  9. Serve hot with Soy Sauce.
Notes:
  • If you are using the big Spring Roll Wrappers, cut them diagonally into two. Place a Tablespoon of the filling one third of the way down the wrapper with the triangle pointing away from you. Fold the lower portion on to the filling, followed by the sides and roll the rest up tightly. Don’t forget to brush the Corn starch paste before rolling.
  • Dust off the extra Corn Flour before frying the Rolls. 


Make it, enjoy the deliciousness and 
serve it to your family with love…

Friday, July 16, 2010

Chicken Noodle Soup

Recipe No: 61
Ingredients                                           Serves 3
  • Butter………………...........1 Teaspoon
  • Noodles….........................3 oz or 1 packet (I used Top Ramen, but you can use any. Discard the taste maker)
  • Carrot………………….…...1 Small (Cut into thin long pieces)
  • Beans…………………….....5-6 (Cut into thin long pieces)
  • Onion…………………….....1/2 Small (Cut into thin long pieces)
  • Chicken………………….....1/2 Cup (cooked and shredded)
  • Chicken Stock…………….4 Cups
  • Soy sauce……………….....1/2 – 1 Teaspoon (Optional)
  • Spring Onion……………...1 (Sliced)
  • Salt and Pepper to taste
Method of Preparation
  1. Heat butter in a deep pan and add Onion, Carrots and Beans and saute for a minute.
  2. Add the Chicken stock, close the pan and let it boil.
  3. Add the Noodles and let it cook.
  4. Once cooked add Chicken, Spring Onion, Soy Sauce, Salt (If needed) and Pepper. Let it boil one more time.
  5. Serve hot after a sprinkle of freshly chopped spring/ green onion.


Make it, taste the deliciousness and
serve it to your family with love…

Wednesday, July 14, 2010

Indian Style Chicken Fried Rice

Recipe No:60
Many a times I used to get this doubt from my friends regarding the difference between Vegetable Pulav and Vegetable Fried Rice. Let me try to make it clear.
Vegetable Pulav is an Indian dish while Fried rice has a Chinese influence. Hence I consider them  different. I fry the rice before cooking Pulav and will never fry after cooking. For Fried rice I cook the rice in a regular manner in lots of water, drain and then fry the already cooked rice. Thus Fried Rice is excellent to use the left over rice. Technically speaking for Fried Rice because of its Chinese origin I try to avoid all Indian spices like Cardamom, Cinnamon, Cloves, Bay leaves etc:- and also Raisins and Cashew nuts and even Fried Onions.  In Pulav I add all these things.
So for me these two are really different and if you follow this, I am sure you will also be able to taste the difference. But cooking is all about your preferences and your taste buds…so go ahead and make it the way you like….This is how I make it
Ingredients                                   Serves 6-8 adults
  • Basmati Rice………………....2 Cups
  • Vegetable oil…………….......4 Tablespoons
  • Vegetables……………….......1 Cup (Includes Carrot, Beans, Peas and Green Capsicum)
  • Celery………………………......3 Tablespoons (Finely Chopped)
  • Onion………………………......1/4 Cup (Thin long slices)
  • Ginger-Garlic crushed…...2 Tablespoons (together)
  • Egg………………………………2
  • Cooked Shredded Chicken…1/2 Cup
  • Spring Onion Chopped………4 (Separate White and Green portions)
  • Soy Sauce………………………..1 Teaspoon
  • Pepper…………………………….3/4 -1 Teaspoon
  • Salt as per taste
Method of Preparation
  1. Wash and soak the rice in warm water for 20 minutes. Drain and keep aside.
  2. Boil at least 12 cups of water. When boiled add the rice and cook till almost done. Take care not to overcook the rice.
  3. Drain and spread it on a large plate to cool. If possible refrigerate before doing the rest. 
  4. In a large pan or wok on high heat add the oil.
  5. To it add Ginger-Garlic, Celery and Spring Onion whites. Saute for a minute.
  6. Add the Onion followed by the Vegetables and stir for 2 minutes. Don’t brown the veggies. It should be crisp.
  7. Move all the vegetables to a side of the pan and crack the eggs into the pan. Stir fast to scramble it.
  8. Once scrambled mix everything together add the chicken pieces, Soy sauce, Pepper powder and a bit of salt.
  9. Now mix the rice in two additions. Add salt according to taste. Stir till the rice is reheated.
  10. Finish by sprinkling spring onion greens on top. Serve hot.
Notes:
  • It is very important to start with cold rice. Otherwise there are chances for the rice to break or to form clumps.
  • The whole process of making the rice is on high heat so keep everything ready to go before starting.
  • It is good to use white Pepper powder, that way the rice will remain white. As you can see I used black and the specks are visible.
  • Never avoid Green/Spring Onions/  Scallions. They give a signature taste to the Fried rice.
  • If you want you can add a pinch of Aginomotto (Mono sodium Glutamate/ MSG) to get that authentic taste. But I decided not to use.
  • You can avoid Chicken and Egg to make it a Vegetable fried rice and add Fried Shrimp to make a Shrimp fried Rice.


Make it, enjoy the deliciousness and
serve it to your family with love...

Monday, June 21, 2010

Chicken Pie

Recipe No 39                                                  
Even though the name of the dish is slightly western, after reading the recipe you will feel that it has a clean Indian taste. And it does for sure. This is an excellent recipe to use your leftover Rotisserie Chicken. Give this a try and you will be amazed to see how much vegetables you and your family is consuming, even though they had a ‘Chicken’ dish!!!! It is of course a different dish and will be perfect for those who wish for a change from their usual eating habits. Add a piece of bread and it is a whole meal by itself….
Ingredients                                                             Serves 6 adults
For the Filling
  • Cooked Chicken pieces………………..2 cups
  • Cubed Vegetables……………………....2 ½ cups (I used Carrot, Beans, Potato and Peas)
  • Oil……………………………………………....2 Tablespoons
  • Onion chopped………………………..….1 ½ cups
  • Ginger Garlic paste…………………..….2 Teaspoons
  • Slit Green Chilly………………………..….2
  • Turmeric Powder…………………..…….1/2 Teaspoon
  • Chilly Powder……………………………….1 Teaspoon
  • Coriander Powder.…………………..…..2 Teaspoons
  • Garam Masala Powder…………………1 Teaspoon
  • Tomato sliced………………………..…….1 small
  • Lemon Juice/Vinegar…………..……….1/2 – 1 Tablespoon
  • Soy Sauce……………………………………..1 Tablespoon
  • Chopped Coriander leaves……..…….3 Tablespoons
  • Salt and Pepper to taste
For The White Sauce
  • Butter…………………………………..………1 ½ Tablespoons
  • All Purpose Flour/ Maida………………1 ½ Tablespoons
  • Milk…………………………………………….…1 ½ cups
  • Grated Cheese……………………………....2 Tablespoons (I used Parmesan But any Cheese  (including Amul Cheese) will do)
  • Salt, Pepper to taste
For Assembling the Pie
  • Butter……………………………………………1 Tablespoon
  • Grated Cheese…………………………….3-4 Tablespoons
  • Bread Crumbs………………………….…1/2 Cup
  • Oil………………………………………………1 Tablespoon
Method of Preparation
To make the Filling
  1. Heat Oil in a pan and saute onions till translucent. Adding salt at this stage will speed up the process.
  2. Add Green chilly. Ginger Garlic paste and saute till the raw smell is gone.
  3. Lower the heat to medium low and add Turmeric powder, Chilly powder, Coriander powder and Garam Masala powder and saute for a minute or two.
  4. Add Tomato followed by the vegetables. If you are using dried Peas, precook it. Add a cup of water, close the pan and let the vegetables cook. Add more water if needed.
  5. Once the vegetables are 3/4th cooked, add the chicken and Soy sauce and let it cook through and the water is almost absorbed. It shouldn’t be dry but there should not be much water left.
  6. Add Coriander leaves, Pepper powder and Lemon juice, mix well and keep this aside till assembling. Don't forget to check for seasonings.
To make the White Sauce
  1. Heat butter in a pan and saute flour till the raw smell is gone for about 2 minutes on a medium flame.
  2. Add cold milk and  completely till there are no lumps. Wait till it thickens and boils through the sides. Using a whisk for mixing will reduce the lumps considerably.
  3. Off the flame and mix 2 Tablespoons of Cheese and salt and pepper to taste.
To assemble the pie
  1. Preheat oven to 375˚F/190˚C
  2. Apply a thin layer of butter on an oven proof dish.
  3. Add 1/3rd of the white sauce on the bottom and sprinkle a Tablespoon of grated Cheese.
  4. Add the entire Chicken filling on top of this and roughly smooth the surface.
  5. Spread the rest of the white sauce evenly on top and sprinkle 3 Tablespoons of grated Cheese.
  6. Sprinkle the bread crumbs on top. Add more bread crumbs than given in the recipe if you like.
  7. Drizzle some oil on top and bake for 30-45 minutes or until the bread crumbs looks golden brown. Oil will give a nice brown color to the bread crumbs.
  8. Let it rest at room temperature for 15 minutes before serving it warm with bread.
Notes: If you cut into the pie as soon as it comes out of the oven, it will be a bit runny. It will set with time.
You can use fresh bread crumbs if you want. You can make it with the help of a food processor or a blender. That way you can make crumbs with any type of bread you have in hand including whole grain breads.
This recipe got some steps, but each step is very easy to do. You can make the filling way ahead of time and make the sauce, assemble and bake the Pie when you need. 
If there are leftovers, reheat in the oven to make the crust crispy. The crust may become soggy if you reheat this  in a microwave.


Make it, enjoy the deliciousness and 
serve it to your family with love...

Thursday, May 20, 2010

Chicken Sandwich (ANN’S Style)

Recipe No: 9
Back in the days when I was a college student the week after the second Saturday used to be the most extravagant week. As hostel inmates we were allowed to go home only once in a month and that was the second week of every month. After spending the weekend at home we all will be back on that Monday with the pocket money for the whole of next month. So to ‘celebrate’ the short living richness once in that week we will go out to eat from ‘Ann’s’ which was the most expensive bakery around there. Most of us will have a chicken sandwich for Rs 10 and a mango juice for Rs 5. So the extravagant eating will make us 15 Rupee poor. But as the month progresses the ‘richness’ will deteriorate slowly but steadily. Once more during that time we will go out …But where? To 'Best Bakery'...one of the less expensive ones and will have a chicken puffs for Rs2:50 and lemonade for Rs 1:50, a total being 4 rupees.

Apart from all these, we all enjoyed those days and the thoughts alone bring a bunch of bliss in life, together with a sadness of reality that those days will never come back. Even though the days have gone by, the tastes haven’t. Here is my take on that ‘Ann’s Sandwich’ which was once an extravagance in life.
Posted by Picasa
Ingredients
  • Hot dog buns………………12 no.
  • Chicken roasted and shredded…..2 cups
 (Roast whole chicken breast rubbed with salt, pepper and oil in an oven at 350°F/180C
till done about 20 to 25 minutes. You can also use leftover Rotisserie chicken. I don’t prefer boiled chicken as it doesn’t have so much flavor)
  • Cabbage shredded……………………..2 cups
  • Carrot shredded…………………………1/4 cups
  • Onion chopped into small pieces….2 tablespoons
  • Tomato chopped………………………..1/2 medium (remove seeds if you can)
  • Mayonnaise……………………………….1/3  to ½ cup (Depending on your taste)
  • Crushed black pepper………………….1/2 teaspoon
  • Salt……………………………………………as per taste
  • Butter ……………….As needed
  • Wax/ Parchment paper and toothpicks for presentation.
Method of Preparation
  1. Mix together Chicken, Cabbage, Carrot, Onion, Tomato, Mayonnaise and crushed pepper.
  2. Taste and if it needs salt add it. As mayonnaise contains a lot of salt, don’t add salt in the first place.
  3. Open the hot dog buns taking care not to separate it. Apply butter on both sides.
  4. Put as much filling as you want and wrap a small strip of wax or parchment paper around it as secure with a toothpick.
  5. Serve at room temperature.
Notes: This is a good recipe to use the left over Rotisserie chicken.
It’s very good for outdoor entertaining and picnics.
You can make the filling hours or even a day before and assemble it when needed.


Make it, enjoy the deliciousness and 
serve it to your family with love….


Posted by Picasa