Creating a blog was out of the question for a long time for me, as measuring everything in the kitchen was like biting into an eggshell. I enjoy cooking and don’t want to waste even a slightest bit of enjoyment in that small world of mine. But little did I know that everything will change, when my husband came home with the Oscar nominated film ‘Julie and Julia’( a real life story) where Julie Powell (part played by Amy Adams) challenged herself to make all the 524 recipes from Julia Child's cook book ‘Mastering the Art of French Cooking’ and blogging all her experiences (The Julie/Julia Project). It was an inspiring movie. A few days later when we were discussing this casually with a friend of ours over tea…everything changed dramatically…..” How about you making at least half of it in one year? Not French but your own. 262 recipes that will inspire others and present it as a blog?” For a minute my mind traveled faster than light… With an experience as a helper in my mother in laws kitchen for 6 years followed by a three year everyday struggle to satisfy the palate of my foodie husband, if I cannot do it then why should I cook? But on the other side with an experience in English literature extending no more than expanding outline stories in English grammar class when I was 18 and two small kids that come in handy at times, will a commitment for the next one year work? Anyway my ‘cook's ego’ didn’t allow me to say no...

So my friends …here I am opening my recipe book, trying to perfect and present 262 recipes in the coming 365 days….A Challenge that will of course tastes good. Come.. Have a walk with me along my journey.. Cheering and inspiring….Forgiving and tolerating…Testing and tasting….for ‘A Tasty Challenge’

Search This Blog

Saturday, January 8, 2011

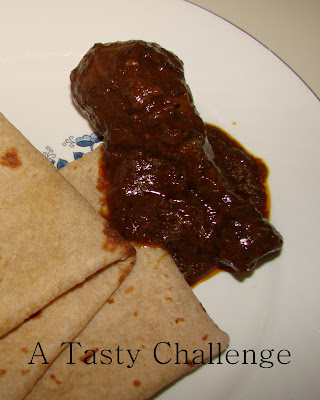
Ulli Varutharacha Chicken Curry (Chicken in fried Onion Gravy)

Recipe No: 164
In my house, we are a bunch of people who loves fried Onion. When I get Onions in a lower prize, I buy them in bulk and make fried Onions. I will slice them, apply a slight coating of Corn Starch (something I learned from Vahrehvah.com) and deep fry them. Once fried, these will stay good in the refrigerator for a very long time and I can use it whenever I want. Now the problem with this is that, I will be able to save only half of what I make, because both my husband and my daughter are big fans of these fried Onion and they will eat it  just like that…

This Chicken Curry is made especially for them as the predominant flavor is nothing but fried Onion.So for all fried Onion fans...

 
Ingredients                                         Serves 5
  • Chicken cut into big pieces………1 Kg
  • Onion sliced thin……………………3 Cups
  • Red Chilly Powder………………….3/4 Tablespoon
  • Coriander Powder…………………..1 ½ Tablespoons
  • Turmeric Powder……………………1/2 teaspoon
  • Garam Masala Powder………….…1 Teaspoon
  • Ginger sliced thin……………….…..1 ½ Tablespoons
  • Garlic sliced thin…………………….1 ½ Tablespoons
  • Split Green chilly…………………....3
  • Water……………………………….…..1 Cup
  • Vinegar………………………………….1 Teaspoon
  • Oil…………………………………….…..1/4 Cup
  • Salt as needed
  • ½ Teaspoon Garam Masala to sprinkle on top at the end
Method of Preparation
  1. Heat Red Chilly Powder, Coriander Powder, Turmeric Powder and Garam Masala Powder in a dry pan on medium low heat until lightly toasted. Keep stirring to avoid burning.
  2. Heat Oil in a pan on high heat and fry 2 Cups of Onion till brown. Drain the excess Oil into the pan itself and keep the Onion away. If you use a good non stick pan or Wok on high heat most of the Oil will remain.
  3. Grind together fried Onion and the toasted Spice Powders into a smooth paste using just enough Water. (I used around ½ Cup Water)
  4. Remove the excess Oil from the frying pan so that only 2 Tablespoon remains.
  5. When the Oil is hot, saute 1 cup Onion, Green Chilly, Ginger and Garlic till  golden brown.
  6. Add the Chicken and on high heat saute it for 5 minutes stirring now and then. Let the Chicken brown here and there.
  7. Add the ground paste, 1 Cup Water and Salt. Once boiled, reduce the heat and let the Chicken cook.
  8. Once cooked well and the gravy is reduced to a desired consistency, add Vinegar and mix well.
  9. Sprinkle ½ Teaspoon Garam Masala on top; close the pan; switch off the heat and let it sit for 30 minutes before serving.
Notes:
  • The color of this Curry depends on the fried Onion. So let it fry till brown but take care not to burn as, burnt Onion will taste bitter in the Curry.
  • It can be made dry with gravy sticking on to the Chicken pieces or with gravy. I prefer it with gravy as I mostly serve this with Rice or Chappathi.


Make it, enjoy the deliciousness and 
serve it to your family with love…

Friday, January 7, 2011

Pakkavada/ Ribbon Pakoda

Recipe No: 163
If you go through my snack list, you will surely realize that I am a great fan of Kerala snacks. Almost all of them are from my Mother’s kitchen….the snacks that I grew up eating and no change about this one too. To my amazement now my daughter likes most of these savory or slightly hot snacks and I definitely want her to know these tastes.... which I hope, one day she will pass on to her kids!!!
Ingredients
  • Besan/ Chick Pea Flour…………….1 ½ Cups
  • Red Chilly Powder……………………2 Tablespoons
  • Salt………………………………………..3/4 Teaspoon
  • Asafoetida/ Kayam Powder………1/8 Teaspoon
  • Water…………………………………….1/2 Cup
  • Curry Leaves………………………….A few sprigs 
  • Oil for deep frying
Method of Preparation
  1. Heat at least 2 inches of Oil in a pan on medium high heat.
  2. Mix together Besan, Red Chilly Powder, Salt and Asafoetida really well and make a wet dough using ½ Cup (approximately) Water.
  3. Make the Idiyappam maker ready with the attachment that has long holes.
  4. Fill the Idiyappam maker with the prepared dough. This is very sticky, so please wet your hands with water to reduce the stickiness.
  5. Press the dough into the hot Oil moving your hands to fill the pan. Don’t over crowd.
  6. Fry it until crispy turning in between . Half way through add some Curry leaves into the frying Oil.
  7. Drain the excess Oil in a paper towel and once cooled break it into pieces of desired length.
  8. Serve it with a cup of Tea and store the leftovers in air tight containers.
Notes:
  • A  medium high heat is essential for making Pakkavada. If the heat is too less it will absorb a lot of Oil and if too high it will burn.
  • I used Red Chilly Powder which is moderately hot. So if you are using one which is really hot, reduce its amount according to your taste.Curry Leaves will give its slight taste to Pakkavada which, I really like.
  • The process of frying a batch won’t take long, possibly between 3-5 minutes. When you take it out of the hot Oil it will be still a bit soft but crisps up within minutes.


Make it, enjoy the deliciousness and 
serve it to your family with love…

Thursday, January 6, 2011

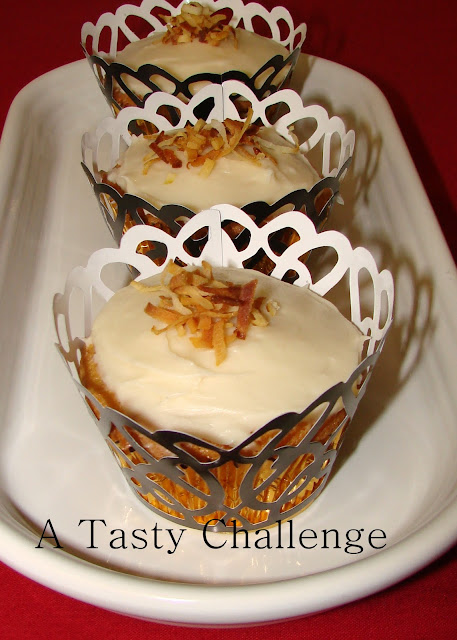
Coconut Cake/ Cup Cake with Cream Cheese Frosting

Recipe No: 162
Ingredients                                   Makes 18-20 Cup Cakes or two 8 inch Cakes
  • Butter…………………………….....1/2 Cup
  • Oil………………………………….....1/4 (very rare, but makes makes the Cake really moist)
  • Sugar……………………………......1 Cup
  • Egg……………………………….......3 Large
  • Vanilla Extract/ Essence….......1 Teaspoon
  • All Purpose Flour/ Maida….....1 ½ Cups
  • Baking Powder……………….......1/2 Teaspoon
  • Baking Soda…………………........1/2 Teaspoon
  • Salt…………………………………….1/4 Teaspoon
  • Milk…………………………………...1/2 Cup
  • Shredded Sweetened Coconut…3/4 Cup
  • 3 tablespoon of Sweetened Shredded Coconut for decoration
  • Cream Cheese frosting (recipe follows)
Method of Preparation
  1. In a dry pan toast 3 tablespoons of Sweetened shredded Coconut until it is crispy and light brown in color. (This is for decoration.) Keep it aside till ready to be used.
  2. Preheat the oven to 350˚F/ 180˚C.
  3. Grease two 8 inch pans or two Muffin pans (possibly make 18) with Butter and dust a bit of flour (this will prevent cake from sticking onto the pans) or simply use a cooking spray.
  4. Sift together Flour, Baking Powder, Baking Soda and Salt and keep it aside till ready to be used.
  5. Beat together Butter, Oil, Vanilla Essence and Sugar till light and fluffy.
  6. Add Eggs one at a time beating well to combine after each addition.
  7. Add Flour mixture and milk little by little alternating with each other starting and ending with Flour.
  8. Fold in ¾ Cup of Shredded Sweetened Coconut and mix to combine.
  9. Divide it between two 8 inch pans or pour equal amounts in 18 cups (for Cup Cakes)
  10. Bake in the middle of the oven for 12-14 minutes for Cup Cakes and 20-25 minutes for Cakes or till the inserted tooth picks comes out clean.
  11. Let it cool on a baking rack.
Notes:
  • For a good cake the Butter and Egg should be at room temperature.
  • Beat the Cake mix really well before adding the Flour. Once the Flour is added, (stop all the mixers at this stage if you are using one) fold with a wooden spatula till it is combined. If beaten too much, the Flour will start developing Gluten which will make the Cake dry and hard.
  • Oil is very rare to use in a Coconut Cake but, believe me, its addition makes the Cake very moist.
  • Sweetened Shredded Coconut is available in all grocery stores (where the Baking stuffs are kept).
  • Don’t open the oven often while the Cake is baking. Sudden lowering of the temperature may cause the Cake to fall in the middle. So if you want to see how it is doing, switch on the light and look through the glass panel (if it is possible). If not, check the Cake only towards the end.
  • Over baking will make the Cake dry. So stop baking once it is done.
Cream Cheese frosting
Ingredients
  • Cream Cheese………………….One 8 oz packet (at room temperature)
  • Butter……………………………..1 Stick/ 8 Tablespoons (at room temperature)
  • Vanilla Extract………………….1 Teaspoon
  • Powdered Sugar………..………2 cups (sifted)
Method of Preparation

  • Beat together Cream Cheese, Butter and Vanilla Extract till light and fluffy.
  • Add the powdered sugar slowly. When the sugar is almost combined, beat everything on a medium speed until fluffy.
To frost and serve the Cup Cakes/ Cakes
  • When the Cup Cakes are cooled, spread  frosting on top and sprinkle some toasted Sweetened shredded Coconut on top.
  • For Cakes, cut off the dome (the most risen parts in the middle, if any) and spread frosting in the middle and all around the cake as you wish. Decorate with toasted Coconut.

 Notes:  
  • Always use room temperature Butter and Cream Cheese.
  • The toasted Coconut will add a good crunch (if fresh) when you eat which I felt very satisfying!
  • This frosting will be on the softer side if made in a warm temperature. In that case put it in the refrigerator for 5 minutes rather than adding more Sugar to make it stiff (This  increases the sweetness of the frosting that will reduce the flavor of Cream Cheese).


    Make it enjoy the deliciousness and 
    serve it to your family with love…

    Tuesday, January 4, 2011

    Boondhi Ladoo

    Recipe No: 161
    I had never seen my mother making this, but she passed on the essential secret of making it. Powder or grind some Boondhi and add it together with the whole Boondhis into the sugar syrup, which will make it easier to form the Ladoos! Well that really works… If you have a boondhi ladle (a special ladle with small holes that is used  to make Boondhi) you will get small even sized Boondhis which will make the whole process easy, but as I don’t have one, I am using the regular slotted spoon with circular holes to make Boondhi. I have already posted the recipe for Sweet Boondhi, but the process of making Ladoo is a bit different. This is how I did...
    Ingredients                                        Makes 12
    • Chickpea Flour/ Besan…………1 Cup (Kadalamavu)
    • Water…………………………………2/3-3/4 Cup
    • Oil for deep frying
    • Sugar………………………….……..1 Cup (use ½ cup Water to make a Syrup)
    • Yellow food color…………………a pinch or 2-3 drops
    • Cardamom Powder………….....1/4 Teaspoon
    • Ghee……………………………..…...2 Tablespoons
    • Cashew nuts and Raisins……...a tablespoon each
    Method of Preparation
    1. Heat at least two inches of Oil in a pan on medium high heat.
    2. Mix Besan with enough Water to make a semi thick batter (I used around ¾ Cup water) it should not be thin like water but it should not be thick too. (If you pour this through the slotted spoon, it should fall down as droplets and should not be running down the holes. But at the same time it should fall down easily too. Read more in my post on Sweet Boondhi.)
    3. When the Oil is hot, pour the batter through a slotted spoon so that the batter forms small spheres.
    4. Fry the Boondhi until crispy. This will take only around 3 minutes for a batch.
    5. Drain the excess Oil on a paper towel and keep it aside till all the batter is used.
    6. Separate around 1- 1 1/4 cup big irregular shaped Boondhis (the presence of these will make it hard to form Ladoos) and grind it into a course powder. (I used my small food processor and if you don’t have one, powder it with your hands when they are crispy.)
    7. Melt Sugar with ½ cup Water and Yellow food color on high heat and let it boil till it is just attaining a one thread consistency. (Don’t go too far with the consistency. Stop as soon as it is reaching there.) Switch off the heat.
    8. Add whole Boondhi, ground Bhoondhi and Cardamom Powder into the Sugar Syrup; mix well and let it sit in the pan for 5-8 minutes or until it cools slightly and most of the syrup is absorbed. (If you have an electric stove move the pan away from that stove to prevent the residual heat from the coil).
    9. In another pan melt Ghee and fry Cashews first. Once it starts to brown along the edges, add Raisins and fry till it plumps up. Add this together with the Ghee into the Boondhi mixture.
    10. Mix well and once cool enough to handle, make tight Ladoos. (Read 'notes' on how to form the Ladoos)
    11. Serve at room temperature (I felt that it taste really good after 6-8 hours, if you can keep it for that long!) and store the left over in airtight containers.
    Notes:
    • Please read the post on making Sweet Boondhi before trying this recipe. It may give more tips on how to make them.
    • If the batter forms big irregular shapeless Boondhi then the batter is too thin. If it is hard for the batter to fall down through the holes, then the batter is too thick. In both cases make it into a proper consistency. Add more Water (if it is too thick) or more Flour (if too thin) to get the consistency.
    • If you make the Sugar syrup a really good one thread consistency the Ladoos will become  hard. So stop it when it is just reaching that stage.
    • You can check the one thread consistency by touching the index finger in a bit of the syrup and pressing it with the thump. If there is one strand in between the thump and the index finger while pulling them apart, then the stage is reached.
    • The amount of Ghee is crucial to make the Ladoos soft. Don’t reduce its amount and no harm (For the Ladoos and  not for the health) in adding ½ or 1 tablespoon more Ghee.
    • While making  for the first time, it is quiet natural to feel frustrated when you try to form the Ladoos (at least it was for me). But after a few times I found some tricks which worked for me. Let me try to explain:
    • Mash up the Boondhis with your hands as you go through the making. This will help the Ladoos from falling apart.
    • If it is okay with you, use both of your hands. (Do wash them before use and  remember, as per many great chefs  ‘hands are the best kitchen tools’)
    • When you first hold the Boondhis together to form the Ladoo, hold it tight for 10 seconds without losing the grip. This will make the Ladoos tight.
    • Make Ladoos while the Boondhi mixture is still warm. It is okay if some syrup is left but don’t make Ladoos if a lot of Syrup is left behind (wait for a few more minutes).
    • If too cold, it is difficult to make Ladoos. In that case warm the Boondhi mixture and make Ladoos.
    • As we make Ladoos while still warm, the Boondhis in the Ladoo will not be soft suddenly (it will be a bit crispy). But as it sits for like 6 hours it will become really soft.


    Make it, enjoy the deliciousness and 
    serve it to your family with love…

    Monday, January 3, 2011

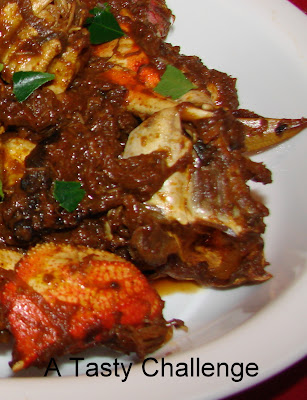
    Crab Roast

    Recipe No: 160
    A few days before when I posted my Mothers Shrimp Curry recipe, I mentioned about our Fish Monger, Mariya Chedathi.  Well Crab was also usual in her basket. I still remember she running with her signature bent posture to catch the Crabs that escaped from her basket, with me watching the whole thing with the curiosity of a kid. The most taunting task is to kill and clean the Crabs but here in US, already cooked Crabs are available in most of the stores that sells Fishes and other Seafoods.
    Ingredients                                                Serves 4
    To Grind
    • Shallots sliced…………………….1/4 Cup
    • Ginger Garlic paste………….….2 Teaspoon
    • Red Chilly Powder………..…….1 Teaspoon
    • Coriander Powder……………...2 Teaspoon
    • Pepper Powder……………………1/2 Teaspoon
    • Turmeric Powder………………..1/4 Teaspoon
    • Garam Masala Powder…….….1 Teaspoon
    • Vinegar……………………….…….1 Tablespoon
    • Salt……………………………………3/4 Teaspoon
    To Saute
    • Cleaned Crab………………..……1/2 kg (I used Dungeness crab, tap to make cracks on the legs pieces)
    • Coconut Oil………………………..3 Tablespoons
    • Onion Sliced…………………..…..2 Cups
    • Curry Leaves………………….…..2 Sprigs
    • Kokum/ Kudampuli…………….2 big pieces
    • ¼ teaspoon Garam Masala Powder, a sprig of Curry Leaf and 1 teaspoon Coconut Oil to sprinkle in the end
    Method of Preparation
    1. Grind all the ingredients mentioned in the ‘to grind’ section into a course paste (using 1 or 2 tablespoons of Water if needed) and keep aside till ready to be used.
    2. Heat Coconut Oil in a pan on medium high heat and saute the Onion and Curry Leaves till it becomes golden brown.
    3. Add the ground paste and saute on a medium heat till the raw smell is gone for about 4–5 minutes. (Don’t rush the process and stir constantly to avoid burning during this step)
    4. Add Crab pieces, Kokum and 2 cups of Water; mix well; close the pan and let it cook on medium heat till almost all of the Water is evaporated. Add more salt if needed.
    5. Once almost dry, sprinkle ¼ teaspoon Garam Masala Powder, some Curry Leaves (tear them for better flavor) and some Coconut Oil on top; switch off the heat; close the pan and let it sit for 20 minutes before serving with Rice.
    Notes:
    • For cleaning the Crab: First take off the legs and cut or break then along the joints. Tap to crack the shells of the legs which will allow the Masala to penetrate the meat. Remove the Carapace or the big shell from the top and an elongated shell from the underside.  Once this is removed, take off the gills and the waste (yellow in color) from the underside. Make the body into 4 pieces. Wash and keep them ready.
    • When you take the Carapace or the big shell off, sticking onto it you will find some yellowish thing called ‘Crab Butter’. It is usually said to give Crab preparations a very good taste. But at the same time most of the chemical pollutants specially the heavy metals from the Water in which the Crabs lived tend to accumulate in this. So it is safer to discard Crab Butter unless you are very sure that it is from a less polluted water body.
    • Don't avoid Kokum as it balances the natural sweetness of Crab apart from giving this dish its special flavor.
    • Don’t skip the process of sprinkling Oil, Garam Masala and Curry Leaves in the end as it gives a very pleasant smell to the dish.
    • Allow it to rest in its own cooking vessel for some time which is referred to as ‘Pathrapakam’ by elders meaning the time for the dish to attain its real taste  sitting in its own cooking vessel.


    Make it, enjoy the deliciousness and
    serve it to your family with love...

    Sweet Boondhi

    Recipe No: 159
    Do you know the recipe of ledukunju? Hope you remember that… Your uncle used to bring them when he comes to see you in the School Hostel…Missing those days…

    One of my school friends wrote this a few weeks before. While in the School Hostel, every weekend most of us will have visitors. I still remember all of us looking out of the window in our study room to see whose visitor is next and as soon as we see someone in the gate our eyes will travel to their hands to see if there are any packets (which will possibly be some eagerly waited food) before even looking whose relative it is!!! As my  friend stated, this sweet Boondhi ('Ladukunju' as we used to call then) was one of  the usual item anyone from my home would bring. It was lost in my memories until my friend  brought it up. So here is Boondhi or Ladukunju, as per me and my dear hostel friends...
    Ingredients                                                Makes around 3 cups
    • Chickpea Flour/ Besan…………..1 Cup (Kadalamavu)
    • Water………………………………….2/3-3/4 Cup
    • Sugar……………………………….....1 Cup
    • Cardamom Powder……………….1/4 Cup
    • Cashew nuts, Raisins and Rock Candy (Kalkandam) optional
    • Oil for deep frying
    Method of preparation
    1. Heat at least 2 inches of Oil in a pan on medium high heat.
    2. Mix Besan with enough Water to make a semi thick batter. I used ¾ cup Water and add more Water (if it is too thick) or more Flour (if too thin) to get that consistency.
    3. When the Oil is hot, pour the batter through a slotted spoon (the one with circular holes) so that the batter forms small spheres. If it forms big irregular shapeless droplets then the batter is too thin. If it is hard for the batter to fall down through the holes, then the batter is too thick. In both cases make it into a proper consistency.
    4. Fry the Boondhi until crispy. This will take only around 3 minutes for a batch.
    5. Drain the excess Oil on a paper towel and keep it aside till all the batter is used.
    6. In a pan, melt Sugar with ½ cup Water on high heat and let it boil till it attains a one thread consistency or 230˚F/ 110˚C.
    7. Add the Boondhi and Cardamom Powder into the Sugar Syrup mix well for a minute; off the heat and let it sit in the pan for 30 minutes or until it cools thoroughly.
    8. If using Cashew Nuts and Raisins, fry it in ½ tablespoon Ghee and add into the Boondhi along with the Ghee while the Boondhi is still hot. Add Sugar Candy (if using) only when it is cooled.
    9. Once cooled thoroughly, mix once more. By this time all the Sugar syrup will be absorbed and become dry so that each Bhoondhi will stay separate.
    10. Serve once cooled. Store the left over in airtight containers.
    Notes:
    • It is very easy to make Boondhi if you have a Boondhi ladle, but as we are using our regular slotted spoon, the Boondhis will be slightly big than that of the regular store bought ones.
    • The Oil should be hot enough so that the second the droplet hits the hot Oil it fries and become Boondhi. If the Oil is not hot enough there are more chances for the Boondhis to stick to one another.
    • Don’t overcrowd the pan while making Boondhi. If you pour more batter it will result in clumps. So if you are doubling this recipe, I will recommend using a bigger pan so that you can finish making Boondhis in a fewer number of batches. This way you can prevent the darkened bits on the bottom of the Oil (try to avoid it coming with the Boondhi).
    • When you make this for the first time, there are chances that you waste a lot of batter. The amount of Sugar given in the recipe is based on minimum wastage. So if you waste more batter reduce the amount of Sugar accordingly.
    • You can check the one thread consistency by touching the index finger in a bit of sugar syrup and pressing it with the thump. If there is one strand in between the thump and the index finger while pulling them apart, then the stage is reached.


      Make it, enjoy the deliciousness and 
      serve it to your family with love…

      Sunday, January 2, 2011

      Kozhi Pidi/ Chicken and Pidi/ Chicken n’ Dumplings – Kerala Style!

      Recipe No: 158
      This dish had been a mystery to me for a long time… Apart from the fact that I know it is a traditional dish, I didn’t even know whose. It was a pleasant surprise when I came to know that it is actually a Christian traditional dish. I don’t know anyone in or around my family who actually make this, may be because its very regional. I did make many versions of this but this happened to be my favorite. Of course this is not my own recipe but a recipe featured in Flavors of India hosted by Dr. Lakshmi Nair that I accidentally came across in Youtube. As it featured the amounts in restaurant style,  I decided to reduced it to suit a small family of 4.


      For the Pidi (Rice Dumplings)
       Ingredients                                   Serves 4
      • Rice Flour………………..…1 ½ Cup (I used from a cover, but raw preferred)
      • Coconut grated……………3/4 Cup + ¼ Cup
      • Salt……………………………1/2 Teaspoon
      • Water………………………..3 Cups
      • Garlic……………………..….3 medium cloves
      • Whole Cumin Seeds...….1/2 Teaspoon
      • Thick Coconut Milk….….1/2 Cup
      • Salt as per needed
      To make and cook the Pidi
      1. Mix Rice Flour, ¾ cup grated Coconut and ½ Teaspoon Salt and roast in a wide pan on medium heat till slightly pink in color. Stir constantly or the Flour in the bottom of the pan may burn.
      2. Crush Garlic and Cumin Seeds and drop it in 3 cups of Water and boil it.
      3. Once boiled, use enough Water from it to make soft dough out of the roasted Rice Flour mixture. (You will need approximately 2 cups) Keep the rest of the Water for later use.
      4. Press the dough really nice and make small balls out of it. (Mine is a bit big but make it in the size of a small gooseberry)
      5. Measure the left over Water with Garlic and Cumin and add more Water to make it 2 cups. To this add ¼ cup grated Coconut and ½ Cup Coconut milk and let it boil on high heat.
      6. Once boiled nicely, add the prepared dumplings and cook it down on medium heat till most of the liquid is evaporated. Do stir often to prevent burning and add more Salt if needed.
      7. Switch off the flame and leave it aside to cool.
      Notes:
      • Add only adequate amount of Water to the Rice Flour but press and knead really well to make the dough soft. If not soft enough the cooked dumplings will become hard.
      • While making the dough balls make sure that it has a smooth outside or it may fall apart while cooking.
      • Put the dough balls in the liquid only after it boils thoroughly, or it may fall apart.
      • Traditionally it is kept on a banana leaf to cool. I did like it as the Banana leaf  gives its flavor to the prepared Pidi making it all the more delectable. (If you don't like that flavor, do avoid that step)
      Chicken Curry
      Ingredients                                               Serves 4
      • Chicken……………..………..1/2 Kg (Cut into small pieces)    
      • Grated Coconut…………….1/4 Cup                         
      • Coconut Oil………………….2 Tablespoons
      • Ginger Chopped….………..1 Tablespoon
      • Garlic Chopped….…………1 Tablespoon
      • Sliced Coconut pieces……2 Tablespoons
      • Onion thinly sliced….…….1 Cup
      • Green Chilly Sliced.……….2
      • Chilly Powder……….………1 Teaspoon
      • Coriander Powder………….1 ½ Teaspoons
      • Turmeric Powder….……….1/4 teaspoon
      • Pepper powder…………..….1/4 Teaspoon
      • Garam Masala Powder..….3/4 Teaspoon
      • Thin Coconut milk…………1 Cup
      • Thick Coconut Milk…….….1 Cup
      • Curry Leaves……………...….2 Sprigs
      • Salt as needed
      For Tempering
      • Coconut Oil……………..…….1 Tablespoon
      • Mustard Seeds…………..…..1/2 Teaspoon
      • Split Whole Red Chilly…….2
      • Shallots Sliced………..………2
      • Curry Leaves………………….1 Sprig
      • Red Chilly powder………..…1/4 Teaspoon
      Method of Preparation
      To make the Curry
      1. Dry roast (without Oil) ¼ Cup of Grated Coconut in a pan on medium heat until brown and grind it into a smooth paste. Keep it aside till ready to be used.
      2. Heat 2 Tablespoons of Coconut Oil in a pan on medium high heat and saute Coconut pieces, chopped Ginger and Garlic for 30 seconds.
      3. Add Onion and Green Chilly and fry till the Onion starts to brown along the edges.
      4. Lower the heat and add Chilly Powder, Coriander Powder, Turmeric Powder, Pepper Powder and Garam Masala Powder and saute till its raw smell is gone for about 2 minutes.
      5. Add the Chicken and fry on high heat for a minute; add the Salt, Curry Leaves, ground roasted Coconut paste and thin Coconut Milk; cook covered till the Chicken is done.
      6. Once the Chicken is cooked well, add the thick Coconut Milk and heat till it starts to boil along the edges. Switch off the heat and keep it covered for 5 minutes.
      To make the tempering
      1. Heat a tablespoon of Oil in another pan on medium heat and splutter Mustard Seeds.
      2. Add Whole Red Chilly, Shallots and Curry Leaves and saute till browned.
      3. Add the Red Chilly Powder and switch off the heat.
      4. Take the Chicken Curry in a serving dish and pour the tempering over the Curry.
      To serve Kozhi Pidi
      1. Take some of the prepared Pidi (cooled) on a plate and pour the hot Chicken Curry on top.
      Notes:
      • Adding a bit of Red Chilly Powder while tempering will give a nice color to the Curry.
      • The taste of this Chicken Curry is really awesome and it will go not only with Pidi but also with Appam, Rice and Flat Breads.


        Make it, enjoy the deliciousness and 
        serve it to your family with love…