Creating a blog was out of the question for a long time for me, as measuring everything in the kitchen was like biting into an eggshell. I enjoy cooking and don’t want to waste even a slightest bit of enjoyment in that small world of mine. But little did I know that everything will change, when my husband came home with the Oscar nominated film ‘Julie and Julia’( a real life story) where Julie Powell (part played by Amy Adams) challenged herself to make all the 524 recipes from Julia Child's cook book ‘Mastering the Art of French Cooking’ and blogging all her experiences (The Julie/Julia Project). It was an inspiring movie. A few days later when we were discussing this casually with a friend of ours over tea…everything changed dramatically…..” How about you making at least half of it in one year? Not French but your own. 262 recipes that will inspire others and present it as a blog?” For a minute my mind traveled faster than light… With an experience as a helper in my mother in laws kitchen for 6 years followed by a three year everyday struggle to satisfy the palate of my foodie husband, if I cannot do it then why should I cook? But on the other side with an experience in English literature extending no more than expanding outline stories in English grammar class when I was 18 and two small kids that come in handy at times, will a commitment for the next one year work? Anyway my ‘cook's ego’ didn’t allow me to say no...

So my friends …here I am opening my recipe book, trying to perfect and present 262 recipes in the coming 365 days….A Challenge that will of course tastes good. Come.. Have a walk with me along my journey.. Cheering and inspiring….Forgiving and tolerating…Testing and tasting….for ‘A Tasty Challenge’

Search This Blog

Showing posts with label Dessert. Show all posts

Wednesday, May 16, 2012

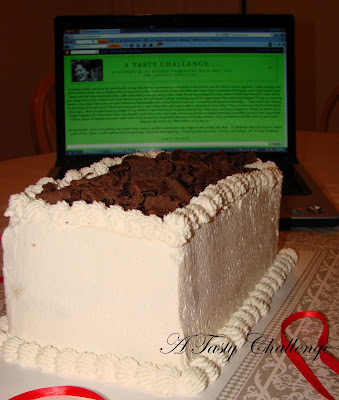
Swiss Chocolate Cream Cake

Recipe No: 300
On May 10th 2012 ‘A Tasty Challenge’ celebrated its 2nd birthday. I have a great satisfaction when I think of the very first post I published two years back. I thank all my friends and family who supported me in this venture….
This is also the 300th recipe I am posting, (Including the ones that I left uncounted when I did the 262 recipe challenge) and to make the occasion special I made this Swiss Chocolate Cream Cake. Even though the steps in making this Cake are simple, it takes a bit of time to reach the point where you can eat the Cake. But once you taste it you will feel like you are paid for your patience.
Ingredients                                        Serves 14-16
To make the Sponge Cake (You can use Sponge Fingers/ Lady fingers instead)
  • Eggs………………........3
  • Sugar………………......1/2 Cup
  • Vanilla Essence……..1/2 Teaspoon
  • All Purpose Flour…..2/3 Cup (Maida)
  • Corn Starch/ Flour…2 Tablespoons
  • Salt………………….…...a pinch
  • Baking Powder….…..1/3 Teaspoon
  • Baking Soda……….…1/4 Teaspoon
  • Butter…………………..2 Tablespoons
  • Milk………………….….3 Tablespoons
To make the Chocolate Cream
  • Chocolate Chips…............2/3 Cup (I used Semisweet Chocolate;100 grams/ 4 oz)
  • Instant Coffee Powder….1/4 Teaspoon
  • Milk…………………………...1/3 Cup
  • Butter………………………...6 Tablespoons (1/3 Cup)
  • Powdered/Icing Sugar...3/4 Cup
  • Egg Yolk………………….....1
  • Vanilla Essence…………...1/4 Teaspoon
To make the Whipped Cream
  • Heavy Cream……………….1 ¼ Cup
  • Powdered/ Icing Sugar…1/4 Cup
  • Vanilla Essence…………....1/4 Teaspoon
For Decoration
  • Sweetened Whipped Cream 
  • Chopped Nuts or Grated Chocolate
Method of Preparation
To make the Cake
  1. Line a loaf pan with parchment paper and grease it. Alternately apply a thin layer of Butter and dust it with Flour.
  2. Sift together All Purpose Flour, Corn Starch/ Corn Flour, Salt, Baking Powder and Baking Soda. Keep it aside till ready to be used.
  3. Preheat the oven to 320˚F/ 160˚C.
  4. Beat together Eggs and Sugar till it is tripled in volume and attains a pale yellow color. (Please refer the picture to see the volume attained.) I did it in a stand mixer. But if you are using a hand mixer or an Egg Beater, please do this step on a double boiler as it makes the whipping easy (This is mentioned in the 'Notes' section for Jam Roll). Add the Vanilla Essence in between.
  5. Heat Milk with Butter till it starts to simmer along the edges (I heated it in the microwave for 20 seconds.) and pour it into the Egg mixture while the beater is still on. Mix thoroughly.
  6. Sift the Flour mixture once more on to the top of the whipped Egg mixture and fold/ mix very gently to combine. Do this process with utmost care as we don’t want to destroy the volume attained; but everything should be combined well. It is better to do this with a spatula.
  7. Pour this mixer into the greased baking tray and bake in a preheated oven for 20-23 minutes.
  8. Once the Cake is spongy and an inserted tooth pick comes out clean, remove it from the oven; tap it twice on the counter; keep the pan upside down on a cooling rack and leave it there to cool.
  9. Once cooled, cut this horizontally into three equal parts and keep it aside till ready to be used.
Notes:
  • Corn Flour/ Corn Starch is different from Corn Meal and you cannot substitute Corn Flour with Corn Meal.
  • When the Egg reaches its full volume it should be homogenous. The non aerated fluid like portion, if present in the bottom, will make the Cake hard.
  • Tapping the baked Cake on the counter and leaving it upside down to cool can help the cake from falling.
  • Don’t open the oven until the last few minutes of baking or the Cake might fall (sink in the middle).
  • You can avoid the whole step of making this sponge Cake and use Lady Finger Cake/ Sponge fingers instead. (I just want to make sure that my readers can make this even if the Lady/ Sponge Fingers are not readily available in their place.)
  • This Sponge cake recipe can be used for most of the pastries.
To make the Chocolate Cream
  1. Melt the Chocolate Chips and Instant Coffee granules along with half of the Milk in a double boiler (the bowl containing the Chocolate Chips placed in a pan with simmering Water without its bottom touching the Water). When the Chips are melted, remove it from the double boiler and mix in the remaining Milk. Keep it aside till ready to be used.
  2. In the same double boiler, place a bowl with the Egg Yolk and a tablespoon of Water; keep on beating with a whisk until the Yolk is frothy and hot to touch. (Place a finger in the Yolk mixture and make sure it is nicely warm but not too hot; please refer the picture to see  before and after.) Keep on stirring during this process or it will form lumps from the cooked Egg Yolk. Let this cool down a bit.
  3. Cream/ mix together Butter, Powdered Sugar and Vanilla Essence until smooth.
  4. Add the Egg Yolk mixture and the Chocolate mixture to the creamed Butter. Combine this mixture for 4-5 minutes on medium speed or until it is really smooth, creamy, thick and lighter in color. Keep this aside till you are ready to assemble the cake.
Notes:
  • Let the Chocolate and the Egg mixture cool down before adding into the Butter mixture or the heat will start to melt the Butter making it soupy.
To Make Whipped Cream
  1. Whip together Cream, Sugar and Vanilla Essence till the Cream is stiff. (Meaning the Cream should hold the peak when you take the beater out.)
Notes:
  • It is good to use Icing/ Confectioner’s Sugar while whipping the Cream, as the Corn Starch present in the Icing Sugar can slightly stabilize (hold the shape) the Cream.
To Assemble the Cake
  1. Line a loaf pan (same one we made the Cake in) with Parchment paper in such a way that there is excess paper on both sides for easy lifting. (Don’t grease the paper now.)
  2. Pour 1/3rd of the Chocolate mixture on the bottom of the tin and cover with a layer of sponge Cake/ fingers and then 1/3rd of the Sweetened Whipped Cream.
  3. Repeat layering in the same order ending with Whipped Cream. Chill this thoroughly for at least 8 hours. (Overnight is the best.)
  4. Turn the Cake upside down on a nice plate; peel off the parchment paper, cover with Sweetened Whipped Cream; decorate as you wish (with Chopped Nuts, Chocolate curls, Chocolate rectangles, Chocolate Wafer cookies or Chocolate Cylinder Cookies) and serve cold.
Notes:
  • Chilling the Cake is important here, as it will give time for the moisture from the Chocolate filling and the Whipped Cream to sweep into the Cake, making it soft and moist. (I prefer to chill it overnight; finish decorating and Chill again for another 8 hours. The waiting period is the hardest in making this Cake, but it is totally worthy…)
To make the Decorations
  1. It is up to you to decide what to decorate the Cake with. Here are some of the suggestions…
  •  Sweetened Whipped Cream (Make it the same way we made Whipped Cream for layering) to cover the Cake with.
  • Chocolate Curls. To make it, melt Semisweet Chocolate Chips until smooth and spread thinly (If it is thick it won't form curls) on the back of a parchment paper lined (use a tape to fix the paper) cookie sheet. Chill it for a few minutes (like 4-5 minutes) and scrape off the Chocolate curls with a knife as shown in the picture.
  • Marbled Chocolate pieces. Spread the (spread it thicker than Chocolate curls) melted White and Semisweet Chocolate on the back of a parchment paper lined (use a tape to fix the paper) cookie sheet so that it makes a marbled design; (please refer the picture) chill it for 1 minute (not more); make cutting marks on the Chocolate with a knife (Make the cuts while the Chocolate is still soft) and let it cool completely in the fridge for at least an hour. Take it out and separate the pieces. (If you try to cut the pieces after the Chocolate solidifies, the Chocolate will break off easily; so make the marks before cooling the chocolate.)



Make it, enjoy the deliciousness and
serve it to your family with love…

Wednesday, May 2, 2012

Jujips

Recipe No: 295
I considered myself as one of the biggest consumers of Jujips back in India and have no idea that this can be made at home until this recipe aired on ‘Magic Oven’, a long time back. The original recipe is  slightly changed so that it can be made by ingredients available here in United States. (I will mention the substitutes along the way.) Even though substituted with the available ingredients, this recipe came out perfect.
Ingredients
  • Gelatin…………………..............3 Tablespoons (If using sachets, use 4)
  • Water………….........................1/2 + 3/4 Cup
  • Light Corn Syrup…................1 Teaspoon (Original recipe called for Liquid Glucose)
  • Sugar……………………..............1 ½ Cups
  • Salt………………………..............a dash
  • Lemon Juice……………...........1 ½ Tablespoons
  • Coarsely ground Sugar….....½ Cup
  • Food Colors and Essences….2-3 drops each
Method of Preparation
  1. Soak Gelatin in ½ cup cold/ room temperature Water for at least 15 minutes.
  2. Boil ¾ cup Water in a deep heavy bottom pan on high heat and add Sugar and Salt. Stir and let it dissolve.
  3. When it comes to a boil, add the soaked Gelatin and let it melt. Wait till the mixture boils again.
  4. Once boiled, lower the heat to medium and let it cook for 15 minutes. (This has a tendency to boil over, so please do keep an eye on it and stir often to avoid burning on the bottom. Don’t be shy to set your kitchen timer for 15 minutes during this process.)
  5. Add the light Corn Syrup and continue stirring for another minute and a half.
  6. Stir in the Lemon Juice and switch off the flame.
  7. Pour this into another bowl and remove the foam as much as possible. (Divide this mixture now if you are making more than one flavor.)
  8. Add Food Color and Essence to the Gelatin mixture. (Repeat this for the other portions also if you are making more flavors.)
  9. Take a flat bottomed plate/ tray and spread 3-4 drops of Water and Oil each on the bottom. (This will help to remove the Jujips easily from the tray. Prepare one tray/ plate for each flavor.)
  10. Pour the Gelatin mixture into the prepared plate and let it cool for 12- 16 hours at room temperature. (overnight is the best) By this time the Gelatin mixture will be solidified.
  11. Once solidified, run the knife along the edges; sprinkle some Sugar on top (to avoid sticking) and take the whole thing out on to a cutting board. Sprinkle generous amounts of Sugar on top and cut it into small pieces. It may stick to the knife, but sugar will help you through.
  12. Roll each piece in Sugar and serve. Do store the rest in air tight containers in a cool place. (Room temperature is the best, but if it is too high, do refrigerate. I prefer refrigeration only if the Sugar coating starts to melt.) 
Notes:
  • Liquid Glucose, which is present in the original recipe is not available in United States and Light Corn Syrup is the best substitute.
  • Soaking Gelatin in Cold/ room temperature Water is extremely important or it may not thicken the Jujips as intended.
  • Keeping an eye throughout the preparation of Jujips and continuous stirring (as much as possible if not fully) is advised.
  • As the foam/ scum that forms on top of the Gelatin mixture ruins the appearance and texture of the Jujips, do remove it as much as possible.
  • The tray/ plate in which you cool the Gelatin mixture decide the thickness of the Jujips. So if you are not dividing the mixture, do take a larger plate.
  • Sugar that is available in US is finely granulated; so no need to grind it when used for coating. But if Sugar available in your area has bigger granules (like those available in India) do grind it a bit before using.
  • Customize the flavors of Jujips by using different Extracts and Essences; but do go for the fruit flavors. Don’t forget to pair it with matching food colors. (I mean, if you are using Banana Extract, do use Yellow Food Color.)
  • Here are some of the examples for the color-flavor combinations… Yellow Food Color and Banana Extract, Red Food Color and Strawberry Extract, Orange Food Color and Orange Extract, Mango Extract and a drop each of Yellow and Orange Food Color; Tonovin for Grape flavor (as Tonovin Essence itself give the color, no need to add separate food color), Lime/ Lemon Extract with no food color (this will have a cream color without any food color) etc: - Please be creative about the flavors...
  • Making Jujips in different flavors make it interesting.


Make it, enjoy the deliciousness and 
serve it to your family with love…

Wednesday, April 25, 2012

Baked Yogurt

Recipe No: 292
I ate this once from Thiruvananthapuram Taj during our last visit to Kerala a couple of years ago. It was one among the long array of desserts in the dinner buffet but, the best in my opinion. It took a while for me to get this correct but it sure is different, easy and delicious. Here it goes…
Ingredients                                                 Serves 4
  • Greek Yogurt……….1 Cup (Substitute mentioned in ‘notes’)
  • Condensed Milk…..1/2 Cup (Sweetened; Milkmaid)
  • Saffron……………….a pinch
  • Sugar…………………1 Teaspoon
  • Cardamom…………3
Method of Preparation
  1. Take the seeds out of the Cardamom pods and crush it finely in a mortar and pestle (or something in which you can powder stuff in small amounts.).
  2. Add Saffron along with Sugar to the same Mortar with the crushed Cardamom seeds and crush finely.
  3. Mix the crushed mixture with Sweetened Condensed Milk and Yogurt; mix till incorporated evenly. Keep it in the fridge for 5-10 minutes so that the Saffron can infuse properly. (Adjust the sweetness by adding more Milkmaid at this stage depending on the sourness of the Yogurt.)
  4. Pour the Yogurt mixture equally into 4 Ramekins (small bowls that can withstand baking) and cover each of them with Aluminum foil.
To make Baked Yogurt in the Oven
  1. Preheat the oven to 325˚F/ 162˚C.
  2. Place the Ramekins in a big baking tray with hot Water till half way up the Ramekins.
  3. Place this in the preheated oven and bake for 15-17 minutes. Remove it from the oven; take the Ramekins out of the water (be sure to use kitchen mittens to avoid burning) and let it cool.
To make Baked Yogurt on stove top
  1. Heat some Water in a pan (that can fit the Ramekins) to a point just below simmering and place a small kitchen towel in the bottom (The kitchen towel will help to bake the Yogurt evenly.). Place the Ramekins on the towel; close the pan and let it cook for 15-17 minutes. Once cooked, take the Ramekins out of the Water and let it cool.
  2. Things to remember: If cooking on stove top please adjust the temperature of the Water so that it never boils but remains hot. I suggest heating the Water till it starts to form small bubbles on the sides; place the Ramekins and then reduce the temperature to low (not too low) and keep the Water hot throughout cooking. Higher temperature will spoil the texture of the Yogurt. (It will become grainier; but it will still be tasty.)
  3. The level of the Water should be till half way up the Ramekins. Once cooked, take the ramekins out of the Water and let it cool.
Chill the Yogurt for an hour in the Refrigerator. Serve Baked Yogurt in the same Ramekins or run the tip of a knife through the sides and turn it into another plate before serving.(The little yellow specks in the Yogurt is the Saffron.)

Notes:
  • Please use Yogurt with minimum sourness for this dish. But it is possible to use whole, low fat or fat free Yogurt in this recipe. I used plain fat free Greek Yogurt.
  • I made this dessert with regular yogurt too, but I like it the most when made with Greek Yogurt which is really thick and smooth. But in case Greek Yogurt is not available in your place hang the Yogurt and get rid of all the moisture before making.
  • A very easy way to get rid of the water content in the Yogurt is by the following method. Place a large strainer on top of a bowl so that the bottom of the strainer does not touch the bottom of the bowl (You should leave the space for the straining Water.) Place a cheese cloth (or a cloth with slightly large meshes) on the strainer and put the Yogurt on the cloth. Cover this and let it stand in the fridge for 3-4 hours. By this time most of the Water will be collected at the bottom of the bowl. Discard the Water and use the thickened Yogurt.
  • Saffron is used in this dish for the taste and color. So it is recommended not to use Saffron food color instead. However you can change the flavor of the dish by substituting Saffron and Cardamom with Vanilla extract or Rose Essence if you like.
  • Crushing Saffron along with the Sugar makes the crushing process easy.
  • This dessert should be served slightly cold. If you keep it for longer time in the Refrigerator it will become a bit hard. In that case either keep it at room temperature for sometime  or microwave it for 5-8 seconds to bring down the temperature before serving.


Make it, enjoy the deliciousness and 
serve it to your family with love…

Tuesday, March 6, 2012

Devil’s Food Cake with Chocolate Ganache

Recipe No: 288
This was the cake I made for the Valentine’s Day… The Cake together with frosting has a deep, rich Chocolate flavor, but the cake alone is very mild and on the less sweet side. I personally prefer the Cake alone with a light dusting of Powdered Sugar on top but as it was for an occasion, I dressed it up with this Chocolate Ganache.
Ingredients                              Makes one 8 inch Cake
For the Cake
  • Cocoa Powder………………....1/4 Cup
  • Instant Coffee Powder……...1 Teaspoon
  • Boiling Water…………………..1 Cup
  • All purpose Flour/ Maida….1 Cup
  • Baking Powder…………………1/4 Teaspoon
  • Baking Soda…………………….3/4 Teaspoon
  • Salt…………………………………a pinch (Avoid if using salted Butter)
  • Unsalted Butter……………….1/2 Cup/ 1 Stick
  • Sugar………………………………1 ¼ Cup
  • Eggs……………………………..…2
  • Vanilla Essence………………..1 Teaspoon
For Chocolate Ganache
  • Semisweet Chocolate Chips…7 oz/ 1 cup
  • Instant Coffee Powder………..1/8 Teaspoon
  • Heavy Cream…………………….1/2 Cup
  • Vanilla Essence/ Extract…….1/2 Teaspoon
Method of Preparation
To Make the Cake
  1. Dissolve Cocoa Powder and Coffee Powder in the Boiling Water and keep aside till it cools to room temperature.
  2. Sift together Flour, Baking Powder, Baking Soda and Salt well; keep aside till ready to be used.
  3. Preheat the oven to 350˚F/ 180˚C.
  4. Keep an 8 inch baking pan (I used a heart shaped pan) ready by applying a light coating of Butter and dusting it with some Flour. Alternatively line the pan with parchment paper and apply a light coating of cooking spray.
  5. Beat Butter and Sugar together until creamy.
  6. Add Eggs one at a time, beating thoroughly after each addition and mix in Vanilla during the addition of the second Egg.
  7. Add the Flour mixture and the Cocoa- Coffee solution alternating with each other, starting and ending with the Flour.
  8. Pour the batter to the prepared pan; level the top and bake in the middle of a preheated oven for 30-35 minutes or till an inserted toothpick comes out clean.
  9. Once the Cake is out of the oven, let it cool in the pan for 5 minutes; take it out and finish cooling on a rack before icing.
To make the Ganache
  1. Heat Cream and Coffee Powder in a pan till it starts to simmer along the edges. (Do stir often to avoid skin from forming.)
  2. Pour this over the Chocolate Chips in a bowl and let it sit for 2 minutes. (Please be patient and let it sit. Stirring before that will make the Ganache grainy from partially melted Chocolate. If this happens accidentally, reheat it in a double boiler until smooth.)
  3. Stir to a make a smooth, glossy Ganache and mix in the Vanilla Essence.
  4. Let it refrigerate for 5-8 minutes before frosting.
To frost the Cake
  1. Spread the Ganache all over the Cake (I opted to spread it only on the top of the Cake.) and decorate it as you wish. (I used Powdered Sugar, some homemade sugar flowers and leaves and some store bought edible beads.)
  2. Serve it at room temperature. 
Notes:
  • The quality of Cocoa Powder is very crucial for this recipe. So use a Dutch Processed Cocoa Powder or a really good Natural Unsweetened Cocoa Powder. I used Natural Unsweetened Cocoa Powder from Scharffen Berger. (Unlike the Dutch processed variety, this is slightly acidic and when used in recipes calling for baking Soda, which is an alkali, reacts together to create a leavening effect. So if in case you are using the Dutch processed Cocoa (which is neutral) please increase the amount of baking Soda to 1 teaspoon.
  • As Water has a tendency to expand when heated, measure it only after boiling.
  • Beat the Flour only till it is mixed. Over beating can result in a tough Cake.
  • Sudden lowering in temperature can cause the Cake to fall, so open the oven only during the last stage of the baking. Touch the top of the cake to feel the doneness and insert the toothpick only if you feel that it is done. (If you feel it is still watery, please don’t take chance by inserting the toothpick.)
  • Over baking can result in a dry Cake, so please don’t do it.
  • Increase the amount of Heavy Cream for a thin Ganache that can be poured over the Cake.
  • Refrigerating the Ganache for longer time will make it hard. So be careful with the time. If in case it hardens warm it slightly to make it soft again. (Don’t use high heat in this case as it may separate the Chocolate.)
  • As this Ganache is made in a spreadable consistency (thicker than the normal Ganache), it will become very hard on refrigeration. So if you are using Ganache to decorate, please don't refrigerate the Cake. If you don't feel like finishing the Cake within a day or two, do refrigerate; but let it thaw well and come to the room temperature before serving.


Make it, enjoy the deliciousness and
serve it to your family with love…

Tuesday, February 14, 2012

Coconut Macaroons with Chocolate drizzle

Recipe No: 285
Ingredients                                              Makes 12
  • Sweetened Coconut….............6 oz/ 155 grams/ 2 ¼ Cups
  • All Purpose Flour………...........1/3 Cup (Maida)
  • Sweetened Condensed Milk…7 oz/ ½ Cup and 2 Tablespoons/ ½ of a 396 Gram tin
  • Vanilla Essence…………………..1/4 Teaspoon
  • Pinch of Salt
  • Semisweet Chocolate Chips….1/2 Cup
Method of Preparation
  1. Preheat the oven to 325˚F/160˚C.
  2. Mix together Coconut, Flour, Condensed Milk, Salt and Vanilla Essence well.
  3. Using an ice-cream scoop, scoop the mixture onto a greased, parchment paper lined baking tray. (I used a medium sized Ice cream scoop to make 12 scoops.)
  4. Place it in the middle of a preheated oven and bake for 15 – 20 minutes or till the top of the Macaroons become light brown here and there. (The time to bake depends on the size of the scoops; so adjust it accordingly.)
  5. Let it cool completely on the baking tray itself.
  6. In a double boiler on low flame, (A dish with the Chocolate placed on top of a deep pot of simmering Water, taking care to avoid Water from coming in contact with the dish with the Chocolate.) melt Chocolate until smooth.
  7. Dip the bottom of the Macaroons in the melted Chocolate and place them on a parchment paper and press slightly so that the Chocolate spreads evenly. Repeat this with all the macaroons.
  8. Scrape all the remaining Chocolate into a small zip lock bag and make a hole on one end.
  9. Squeeze the Chocolate and drizzle it onto the Macaroons to make pretty patterns.
  10. Let it cool completely (so that the Chocolate hardens) and serve at room temperature. Store the left over in air tight containers. 
Notes:
    • Almond extract can be used instead of Vanilla Essence.
    • The dish to melt the Chocolate should be absolutely dry or the Chocolate will separate. (It becomes a thick mass that won’t melt; if it happens, do start with a fresh batch of Chocolate.)


    Make it, enjoy the deliciousness and 
    serve it to your family with love…


    Wednesday, January 18, 2012

    Pazham/ Banana Varattiyathu – Nurukku Gothambu/ Broken Wheat Pradhaman

    Recipe No: 281
    Jack fruit or Chakka Varattiya Pradhaman is one of my favorites (I had this Pradhaman more than one time from a friend of ours at Indianapolis) and as Jack fruit is not available in this part of the world (my friend used to bring Chakka Varattiyathu from Kerala), I settle with Pazham/ Banana instead of Jack fruit. Along with its tempting an addictive taste, this is a good way to use the overripe Bananas (with black/ dotted skin) that most of your family members may ignore. This Pradhaman should be thick so that it can be easily poured on to a Banana leaf without running for a traditional Sadhya/ Feast.
    Ingredients                                       Serves 6-8
    • Broken Wheat……......1/4 Cup (Nurukku Gothambu)
    • Jaggery………………....1 ½ Cups (broken into small pieces)
    • Mashed Banana……..2 Cups (4 large ones)
    • Ghee……………………...3 Tablespoons
    • Cashew nuts…………..2 Tablespoons (broken into small pieces)
    • Raisins…………………..2 Tablespoons
    • Milk……………………….1 Cup
    • Cardamom Powder…1/4 Teaspoon (homemade; if not, add a bit more)
    Method of Preparation
    1. Add a cup of Water to the washed Broken Wheat and cook till soft. If you are doing this in a regular pan let it boil on high heat; reduce the heat to minimum and let it cook covered (There are chances of boiling over if this is allowed to boil at high temperature for a longer time.). If you are using Pressure cooker, cook it for one whistle. (I used a regular pan method.)
    2. Melt Jaggery in ½ Cup Water on a medium flame and strain it twice to remove the impurities.
    3. Heat Ghee in a pan on medium heat and fry the Cashew pieces till it starts to brown along the edges. Add the Raisins to the Ghee along with the Cashews and fry till plump. Remove this from the Ghee and keep aside till ready to be used.
    4. To the remaining Ghee and the Mashed Banana and the strained Jaggery and cook till most of the Water is absorbed.
    5. Add the cooked Broken Wheat (I add the remaining Water too as it was only a little.) and most of the Cashews and Raisins (keep some for garnish); cook till the mixture starts to leave the sides. Stir occasionally to avoid burning at the bottom. Once the mixture starts to reduce considerably, do stir almost continuously. (Please refer the picture to know the stage at which you can proceed to the next stage).
    6. Add the Milk and let it start to simmer along the edges. 
    7. Add Cardamom Powder and switch off the heat. Mix well and serve hot or cold.
    Notes:
    • This Pradhaman is on the sweeter side; but it is meant to be eaten only in very less amounts. If you wish to make it less sweet, do reduce the amount of Jaggery. (Well I don't prefer that at all...)
    • I used the most commonly available (in US) Robusta type banana (Not plantains) for this preparation and only 4 of them. If you are using small variety Banana, you should mash at least 8 of them to make 2 cups of mashed Banana.
    • I used the dark Kerala style Jaggery and hence the dark color. The color of the dish will be a bit on the lighter side if lighter colored Jaggery is used.
    • If you are using already roasted Cashews, add both Cashews and Raisins together to the Ghee. But if you have to settle with raw Cashews, do give it a head start.
    • Don't let the milk boil vigorously in the Pradhaman or it may separate. Also do stir continuously at this stage.
    • I like this Pradhaman on the thick side; if you want it thin, add a bit more of Milk. But I don’t recommend adding too much Milk in order to preserve the uniqueness of this Pradhaman.


    Make it, enjoy the deliciousness and 
    serve it to your family with love…


    Friday, January 13, 2012

    Date Cookies

    Recipe No: 280
    When 'Our Santa' secretly sent me a message to change the usual Sugar or Ginger Bread Cookies to something new and exciting this year, this suddenly came into my mind. So when 'Santa' was busy finishing the last minute Christmas shopping, me and my daughter whipped up this Cookies on the Christmas Eve.
    Ingredients                                            Makes 14-16
    To make the Pastry dough
    • All Purpose Flour/ Maida……1 Cup
    • Cold Butter…………………….….6 Tablespoons (unsweetened; cubed)
    • Sugar……………………………..…1/4 Cup
    • Baking Soda……………………...1/8 Teaspoon
    • Salt……………………………….….a pinch (Avoid if you are using salted Butter)
    • Rose Essence…………………....1/3 Teaspoon
    • Cold Water……………………….3-4 Tablespoons
    For the filling
    • Dates Chopped…………………..1 Cup
    • Water………………………….……1/3 Cup
    • Sugar……………………...……….3 Tablespoons
    Method of Preparation
    To make the Covering/ Pastry
    1. In a Food Processor/ electric mixer, pulse together Flour, Sugar, Salt, Baking Soda, Rose Essence and Butter (cubed) for a few times till the Flour resembles wet sand or bread crumbs. (Don’t make it very fine; there should be small pieces of Butter left in the Flour.) Alternatively you can mix Butter into the Flour using your fingertips just like you would moisten the Flour for Puttu.
    2. Add 3-4 tablespoons of Water into the mixture to make a very crumbly dough. (At this stage the Flour will stick together if pressed but very crumbly.)
    3. Dump the dough onto a floured board/ work surface and pat all the dough mixture together into one mass; cover with a plastic or Aluminum foil and keep in the refrigerator for 20 minutes or till the filling is ready.
    To make the Filling
    1. Heat chopped Dates, Sugar and Water on medium heat till it comes to a boil and the Sugar is melted. Switch off the heat and let it cool a bit. Pulse it once or twice in a food processor or the dry grinder of a Mixer Grinder. The filling should not have any big pieces and don’t make it too dry as this mixture will continue to tighten up as it cools.
    2. Let the filling cool down completely before filling the cookie. If needed, add one or two tablespoons more of Water if the filling becomes too dry on cooling.
    To make and bake the Dates filled Cookie
    1. Preheat the oven to 325˚F/ 163˚C.
    2. Roll out the pastry into 1/8 inch thickness and make 14 - 16 squares 2 1/2 -3 inch squares. (I used a 2 3/4 inch square cookie cutter with a pretty edge.) Bring all the scraps together and make more. If it becomes sticky, do refrigerate the dough for a while.
    3. Divide the filling between the cut out squares taking care to place them along the middle of the pastry, leaving some space on the sides. (Please refer the picture.)
    4. Fold both sides of the pastry over the Dates filling, so that, most of the filling is covered showing only a thin line along the middle. Press slightly on top of the cookie so that the filling and the pastry stick together.
    5. Place it on a baking tray and continue with the rest.
    6. Bake the filled Pastry in the middle of the oven for 25-30 minutes. (The Cookie should be slightly crispy with light coloration along the edges, but not fully brown.)
    7. Serve warm or at room temperature with a glass of Black Coffee or Green Tea as a snack or as a dessert after dinner.
    Notes:
    • While mixing Butter into the Flour, there should be small pieces of Butter left and don’t knead this dough too much as it will melt the Butter. Just pat the dough together and roll it out. In a hot oven, the small pieces of Butter will melt creating steam that will help the dough rise making it flaky, which is very essential for this cookie.
    • Apply Flour on the board/ work surface and the rolling pin to avoid the dough from sticking. 
    • If you don't have the time for the dough to chill in the refrigerator, do put it in the freezer for 6-8 minutes.
    • You can make this pastry without Rose Essence, but its addition gives a very special taste.
    • If in case the Date mixture is too tight when cold, do add a tablespoon or two of Water and mix well to incorporate. Don’t make it very wet or it will be make the cookie soggy when cooked.
    • Let the Date filling cool completely before filling the Pastry or the heat from the filling will make the dough too soft to handle.
    • The low temperature setting of the oven will crisp up the cookie without browning  it too much.
    • Store the leftovers in an airtight container at room temperature. Don’t refrigerate.


    Make it, enjoy the deliciousness and 
    serve it to your family with love...

    Tuesday, January 10, 2012

    Orange Pudding

    Recipe No:279
    By Christmas, I had a basket full of Oranges sitting on the counter ideally, without being eaten and totally thrown into shadows by all the Cookies, Cakes and other festive items… So this pudding came as my desperate attempt to rescue those Oranges from not ending up in the garbage and I have to say that all of us who ignored those Oranges before, treated the pudding with respect and love!!!
    Ingredients                                       Serves 8-10
    • Milk…………….....….1 Cup
    • Sugar…………….......2/3 Cup +3 Tablespoons
    • Eggs…………….....….2 Large
    • Gelatin…………........1 Tablespoon (Flavorless)
    • Corn Flour…….........1 Teaspoon
    • Orange Juice…........1 Cup (Freshly squeezed; will need 3 large-5 small oranges)
    • Orange Segments…1/2 Cup (Take off the skin and seeds; cut into small pieces)
    • Heavy Cream……….1/2 Cup
    Method of Preparation
    1. Soak Gelatin in 3 Tablespoons of Cold Water and keep aside for 5 minutes.
    2. Dissolve Corn Flour in 2 Tablespoons of Water and keep aside till ready to be used.
    3. Take the Orange segments out either by peeling and removing the skin, seeds and the thin membranes around the segments. (If it is hard to peel the Oranges, please go through the ‘Notes’ section to find an alternative.) Break/ cut them into small pieces and keep aside till ready to be used.
    4. Beat the Eggs thoroughly and keep aside till ready to be used.
    5. Heat Milk and 2/3 cup of Sugar on medium heat till the Sugar is melted thoroughly and the Milk is heated through.
    6. Pour ¼ Cup of this hot Milk into the Egg and mix well (This is called tempering, which is important; more info in the ‘Notes’ section). Pour the Egg- Milk mixture back into the remaining Milk, together with the soaked Gelatin (which will now be plump) and let the mixture start to simmer on medium low heat. Do stir often at this stage or the mixture will separate.
    7. Once it shows the signs of a gentle simmer, add the Corn flour mixture and cook for a few more seconds or till thickened. (Not more than 30 seconds) Do stir continuously.
    8. Switch off the heat and let it cool down completely. This process can be quickened by placing the Custard in a bowl of Ice/ Cold Water. If you have, add 2-3 drops of Orange essence at this stage. (I did not have it on hand and the taste  of the pudding was perfectly fine without.)
    9. Once the Custard is cooled, strain it (to remove the solid pieces, if any) and then mix in the fresh Orange Juice and the Orange segments.
    10. Whip the cream with 3 Tablespoons of Sugar till thickened or soft peaks are formed. Fold/ mix this whipped cream into the pudding as gentle as possible so that most of the air incorporated while whipping stays. Mix till everything is evenly incorporated. (No whipped cream here and there)
    11. Pour it into a pan (you can decide that shape and size of the pudding, I used an 11 x 7 pan) and refrigerate for at least 8 hours (overnight is better). Cut it into desired shapes; add suitable decorations and serve cold.
    Notes:
    • Even though Gelatin is the component that solidifies this pudding, Corn flour gives it a soft nature so that your pudding can be cut easily into any shapes yet very soft and smooth.
    • It won’t take a long time to squeeze 3-5 oranges; so try to use freshly squeezed Orange Juice. Ready- made/ bottled orange juices are not advised.
    • This is how I took the Orange segments out of these Oranges which are nearly impossible to peel. Cut the top and the bottom of the Orange; place it on a flat surface and run the knife through the sides, so that the Peel along with the membrane is removed exposing the flesh. Once this is done all around the Orange, get the segments out by cutting on both sides of the flesh leaving all the membranes attached and all the flesh out. By doing this some juice will be coming out; do reserve that for the juice needed for the recipe. After taking the flesh out, do squeeze the remaining membranes to extract the remaining juice.
    • If you add Egg directly to the hot Milk, the sudden rise in temperature will cook the Eggs fast to make some sort of a ‘scrambled Egg’ mess. Adding a bit of hot Milk to the Egg first will raise the temperature of the Eggs slightly, so that it will not separate/ cook too fast when it hits the rest of the hot Milk. So this step, called tempering, is very crucial in making smooth Custards.
    • Corn Flour/ Starch when dissolved in water has a tendency to settle  with time. So do stir it just before adding. Don't confuse Corn flour with Corn meal...they are different. The type I mentioned in this recipe is called Corn Starch in US and  Corn Flour in India.
    • Please let the Custard cool thoroughly before adding the Orange Juice and segments; otherwise the acid in the Oranges will curdle the Custard.
    • As this pudding is Gelatin based, it may melt if you keep it at room temperature for a long time.


    Make it, enjoy the deliciousness and
    serve it to your family with love…

    Monday, August 15, 2011

    Banana Nut Cake

    Recipe No: 265
    Well most of the Banana Cakes recipes bear very close resemblance to Banana Bread… But this one is very different and you will realize as you go through the ingredient list. This was made for our friend who was an absolute Banana Cake fan when he asked me to make a Cake without Butter and less Egg… but he wanted it soft and moist. So I made this using Oil, less amount of Egg and Caramel for extra moisture and flavor.

    " I have been desperately hunting for a banana cake with caramel recipe. The objective was to replicate the taste of the banana cake that I buy from a real good bakery here in Chennai."

    I got this request from one of the reader a few days ago and decided to do, as my Banana Cake recipe closely matches what she asked for… I have no idea how the Cake that she was mentioning tasted like, but still I hope this works Priya.. try this out...
    Ingredients                                 Makes one 9 inch Cake
    • All Purpose Flour/ Maida….1 ½ Cups
    • Baking Soda………………….....1/2 Teaspoon
    • Baking Powder………………...1/2 Teaspoon
    • Cinnamon Powder…………...1/2 Teaspoon
    • Salt……………………………......1/4 Teaspoon
    • Sugar………………………....….2/3 Cups
    • Eggs…………………………....…2 (For those who want it a bit more healthy do use one whole Egg together with one Egg White)
    • Vegetable/ Canola Oil……...1/2 Cup
    • Vanilla Extract………………...1 Teaspoon
    • Banana…………………………...2 Big mashed / 1 Cup
    • Cashew Nuts…………………...1/2 Cup (dry roasted and chopped)
    To make Caramel
    • Sugar……………………………..1/3 Cup
    • Hot Water…………………..….1/4 Cup
    Method of Preparation
    To Make the Caramel
    1. On medium heat, caramelize Sugar in a very dry pan till golden brown without stirring (swirl the pan now and then, stirring can make the Carmel gritty).
    2. Once golden brown, add hot water and let it mix properly by stirring. Switch off the heat and let it cool completely.
    To make the Cake
    1. Preheat the oven to 350˚F/ 180˚C.
    2. Prepare a pan by buttering and flouring an 8 or 9 inch pan lined with parchment paper. (Or simply use cooking spray)
    3. Sift together Flour, Baking Powder, Baking Soda, Salt and Cinnamon Powder well; keep aside.
    4. Mix the toasted Nuts with a Teaspoon of the above Flour mixture and keep aside.
    5. Beat together Oil, Sugar, Eggs, Vanilla Essence, Caramel and Mashed Bananas really well until it is a homogenous mixture.
    6. Gently mix/fold in the Flour mixture to the above Oil Egg Banana mixture until just combined.
    7. Once mixed well, add the Nuts and stir till it is equally distributed.
    8. Pour this mixture into the prepared baking pan and bake in the middle of the oven for about 35 to 40 minutes or till a tooth pick inserted in the middle of the Cake comes out clean.
    9. Let it cool completely before serving. If you want to decorate it as a whole cake or as cupcakes, do use the Cream Cheese frosting.
    Notes:
    • I used 'Robusta' type Banana in this recipe. But if you are using the smaller ones please measure it after mashing.
    • If you are using freshly made Cinnamon Powder which tends to be very strong, use only less.
    • Don’t let the Caramel burn or the Cake will taste different.
    • If you use cold Water while making Caramel it will solidify the Caramel. In case if that happens, keep it on low flame and let the Carmel melt thoroughly. Add a bit more Water if needed.
    • To dry roast the Nuts, heat it in a dry pan on medium low heat until toasted and fragrant, stirring and turning often. Let it cool completely before using.
    • Traditionally Banana Cake uses Walnuts; but as Walnuts are hard to get in India, I used Cashew Nuts (and also I like them more!!).
    • Tossing the Nuts with some Flour will prevent it from sinking to the bottom of the pan..
    • Beat the Cake mix really well before adding the Flour. Once the Flour is added, (stop all the mixers at this stage if you are using one) fold it with a wooden spatula till it is combined. If beaten too much, the Flour will start developing Gluten which will make the Cake dry and hard.
    • Don’t open the oven often while baking. Sudden lowering of the temperature may cause the Cake to fall in the middle. So if you want to see how it is doing, please switch on the light and look through the glass panel (I mean, if it is possible.) If not, check the Cake only towards the end of the baking time.
    • Over baking will make the Cake dry. So stop baking once it is done.
    • The Caramel flavor in this Cake is subtle and will not over power the taste of Banana. If you want the taste of Caramel more, do make Caramel with 1/2 cup Sugar and 1/3 Cup Water.
    • This Cake is on the less sweet side as I used to frost it with Cream Cheese frosting. But still, I think the sweetness is adequate for having it with a cup of Tea or Coffee.


    Make it, enjoy the deliciousness and 
    serve it to your family with love…

    Tuesday, June 21, 2011

    Carrot and Date Cake

    Recipe No: 263
    This Cake was born as a complete surprise. A few months back my Mother in Law told me about a Carrot Cake, but memories of that was hidden in the back of my brain until a batch of Caramel that I made for Cashew Caramel tart went bitter. I realized that the batch went bad only after putting the Cashews in the Caramel… but what sort of a cook will I be if I throw that out? So the day after the completion of the blog, I whipped this cake up from that bitter Caramel (without paper and pen, as I decided to celebrate by cooking without them, which rarely happened after starting the blog!!!). But when that Cake turned out to be this good, I decided to make it once more but this time measuring and recording the ingredients….and thus this was born... So let me restart blogging with this Cake recipe…

    Before coming to the actual recipe, let me explain a bit about this Cake… If you go through the ingredient list, you can see that the amount of Carrots, Dates and Nuts are far more than the amount of Flour (than most of the other Carrot Cake recipes) and hence this will be a bit difficult to cut (will crumble fast) while hot or at room temperature. So it is better to cool it in the refrigerator before cutting and serving. And also the slight hint of bitterness from the Caramel complements the Cake well when served chilled.
    Ingredients
    • All Purpose Flour/ Maida…..1 Cup
    • Baking Soda……………………..3/4 Teaspoon
    • Salt………………………………....a pinch
    • Vegetable or Canola Oil……..3/4 Cup
    • Sugar……………………………….3/4 Cup
    • Eggs…………………………………2
    • Vanilla Extract/ Essence…...1/2 Teaspoon
    • Grated Carrots………………….1 Cup
    • Chopped Dates………………...1 Cup
    • Chopped Cashew Nuts…..….1/2 Cup
    To Make the Carmel
    • Sugar………………………….…..1/2
    • Hot Water………………….……1/4 Cup
    Method of Preparation
    To make the Caramel
    1. Heat Sugar in a dry pan on medium heat till nicely caramelized. (Don’t stir the Sugar while making the Caramel which makes it gritty, but do swirl the pan often to get the Sugar caramelized equally on all portions.) Make the Caramel really dark and on the bitter side. The bitterness of the Caramel complements this Cake really well.
    2. Add hot Water to the Caramel and switch off the heat as soon as the Caramel is dissolved. Keep aside till it is cooled thoroughly.
    To Make the Cake
    1. Line a loaf pan (9 x 5 inch, alternately use a 9 inch round pan)with Parchment paper and spray with cooking Oil. (Alternately, apply a thin layer of Butter on the pan and sprinkle some Flour evenly on top and dust the extra off.)
    2. Preheat the oven to 350˚F/ 180˚C.
    3. Sift together Flour, Baking Soda and Salt together and keep aside.
    4. Mix together Eggs and Sugar really well until most of the Sugar is melted through.
    5. Add the Oil and beat really well until it is thickened and the mixture looks like Mayonnaise.
    6. Add the prepared Caramel and Vanilla Essence; mix well.
    7. Add the Flour mixture and mix slowly and gently until just combined. (Don’t mix the batter too much after adding the Flour as the Flour may develop the Gluten which can make the Cake tough.)
    8. Add a tablespoon of Flour into the Carrots, Dates and Nuts and mix slightly (This will prevent them from sinking to the bottom of the pan (specially dates and nuts) and will aid to separate the Date pieces). Add this into the batter and mix till everything is distributed evenly.
    9. Pour this mixture into the prepared pan, level the top and bake for 35 – 45 minutes or till a tooth pick inserted in the middle of the Cake comes back clean.
    10. Once out of the oven, wait for some time for the Cake to cool and then keep it in the refrigerator.
    11. Once chilled, run a knife along the sides and unmold the Cake. Cut and serve while cold. Keep the left over Cake in the refrigerator.
    Notes
    • Using hot Water will help the Caramel dissolve fast. On the other hand using cold water will solidify the Carmel and will take a long time for it to dissolve back. So it is better to use hot water while making Caramel.
    • Caramel had an extremely high temperature, so take care and stand back while pouring the Water (hot or cold) into the Caramel as it bubbles up vigorously.
    • Grate Carrots using the big holes of the box grater and chop dates with the knife. I prefer not to use the food processor as it will make them very fine and sticky which may affect the texture of the Cake.
    • Do chop the Dates into small pieces or their weight will make them sink.
    • Don’t open the oven while the cake is baking because sudden temperature changes may lead to the falling of the Cakes. (sinking in the middle)
    • Do insert a toothpick only if the top of the cake feels cooked. If you do it before it  is almost cooked,  the Cake may fall in that area.
    • It is very difficult to cut this Cake while hot. So do chill it before cutting.
    • When chilled there are chances that the borders of the Cake become a bit chewy. So do remove it before serving. (If you have a family of at least two, it is almost certain that one among the two will love the chewy sides, unfortunately for me, all of us love the sides and it will be over before cutting the actual Cake!!!)
    • Be sure to make the Caramel a bit bitter or this Cake will be over sweet. I like it when less sweet.
    • This recipe can be doubled with the same quality if you want to serve more people.


    Make it, enjoy the deliciousness and 
    serve it to your family with love…


    Sunday, May 8, 2011

    Banana Foster

    Recipe No: 260
    I have no idea how many times I made this for my friends in California. I did make this with  Rum and Brandy; both have different tastes but very yummy. Another factor is that this will have the maximum taste only if you flambé (setting alcohol on fire) it. That gives the alcohol flavor and a great texture to this dessert that is usually served with Vanilla Ice-cream.
    Ingredients                                         Serves 2
    • Banana………………..3 Small/ 1 ½ big ones (I used big Robusta type Banana)
    • Butter…………….......2 Tablespoons
    • Brown Sugar……....2 Tablespoons
    • Brandy/ Rum….…..1 ½ Tablespoons
    • Ice Cream…………...2-3 Scoops
    Method of Preparation
    1. Slice the Banana into 2 (if small) or into 4 (if big; cut into two and split each part into two). Keep aside till ready to be used.
    2. Melt Butter and Brown Sugar in a pan on medium heat.
    3. Once melted, arrange the Banana slices in a layer and cook for a minute on both sides.
    4. Add the Brandy/ Rum and with a lighter set the Alcohol on fire (It will go off once the Alcohol is burned out, which takes like 20-30 seconds.), a process called Flambé.
    5. Once the flame is over, switch off the stove and serve it warm with cold Vanilla Ice-cream.
    Notes:
    • I used Robosta type Banana, which is larger in size, but you can use any soft variety Banana(Pazham). But dont use Plantain (Ethakka).
    • It is very important that the Banana slices have to be arranged in a single layer to ensure proper and even cooking.
    • Use ripe but firm Bananas for this preparation. If too ripe, please reduce the cooking time.
    • If Brown Sugar is not available for you, please do use regular Sugar but wait till it caramelize a bit giving the dish a light brown color.
    • Don’t pour Alcohol directly from the bottle into a hot pan to avoid the Alcohol in the bottle from catching fire.
    • As the Alcohol burns inside the pan, it is better to use a stainless steel one for making this.
    • You can set the Alcohol on fire with the help of a lighter or by slightly tipping the pan to let the Alcohol catch fire from the flame of the stove (I prefer the first method). Eventhough the Alcohol is burned out, the flavor remains.
    • When the Alcohol burns the heat will really melt all the ingredients in the pan making the juices very smooth and tasty. There is a huge difference if you flambé or not. Please do it; it is not dangerous as it sounds!!!


    Make it, enjoy the deliciousness and
    serve it to your family with love…

    Coffee Cocoa Mousse in Chocolate Cups

    Recipe No: 259
    I already posted a recipe on Chocolate Mousse, but I felt that this is much easy to make and Egg less too. Also I wanted to mention how easy it is to make these edible Chocolate cups.
    Ingredients                                          Makes 6
    To make the Chocolate Cups
    • Semisweet Chocolate chips………3/4 Cup
    • Shortening…………………………..…1 Tablespoon (Dalda will work)
    • Cup Cake liners……………………….6
    To Make the Mousse
    • Sweetened Condensed Milk……..1/2 can (7 oz/ 200 grams)
    • Unsweetened Cocoa Powder…….3 Tablespoons
    • Butter…………………………………….1 ½ Tablespoons
    • Instant Coffee Powder……………..1 Teaspoon (Dilute with 1 teaspoon Hot Water)
    • Vanilla Essence……………………….1/2 Teaspoon
    • Heavy Cream………………………….1 Cup
    Method of Preparation
    To make the Chocolate Cups
    1. Melt Chocolate Chips and Shortening in a microwave safe bowl in a microwave for around 1 ½ minutes or till the chips are almost melted. Do take care to stop and mix every 30 seconds.
    2. With a food grade brush, (I used a Silicon brush) paint the inner part of the cup cake liners and place them in a Muffin pan. (This is to keep the shape; otherwise the liners may lose its shape due to the weight of Chocolate.) Keep the left over Chocolate for later use.
    3. Repeat this with all the liners and keep in the fridge for 20 minutes. 
    4. Use the leftover Chocolate to coat the Chocolate cups once more to ensure the strength of the cups. If the reserved Chocolate hardens, do melt it in the microwave for a few seconds.
    5. Keep this overnight in the refrigerator. (Do refrigerate it all the times.)
    6. Peel the cup cake liner off and fill the Chocolate cups with the Mousse.
    To make the Mousse
    1. Heat together Condensed Milk, Cocoa Powder, Butter and Coffee on a low heat until the Butter is melted and everything is combined well without any lumps. (Don’t let it boil or thicken.)
    2. Off the heat and mix in the Vanilla Essence. Let it cool down. (Do stir it once in a while to avoid the skin from forming on top.)
    3. In another pan whip Heavy Cream until stiff.
    4. Fold in/ gently mix the Chocolate mixture into the Heavy Cream.
    5. Spoon this into the prepared Chocolate cups and serve chilled. (Or you can transfer it into a Zip Lock bag; cut the tip off and squeeze the Mousse into the cups in a pretty pattern.)
    Notes:
    • Do not use Butter to make the Chocolate cups as it  softens at room temperature. As shortening stays solid at room temperature, it gives more strength to the Chocolate cups.
    • If you don’t have a microwave to melt the Chocolate, do use a double boiler. (Place the Chocolate in a small bowl kept on top of a big pan with simmering Water, so that the bottom of the bowl with the Chocolate does not touch the simmering Water.)
    • Use the best Cocoa Powder that is available for this recipe. (Dutch processed is the best.)
    • Don't pour the hot Chocolate mixture into the Cream, as heat deflates the whipped Cream. So allow the Chocolate mixture to cool down before folding it into the whipped Heavy Cream.
    • It is easy to whip Heavy Cream when it is cold.
    • If you want to avoid the Chocolate cups, you can serve the Mousse in pretty glasses.


    Make it, enjoy the deliciousness and 
    serve it to your family with love…