Creating a blog was out of the question for a long time for me, as measuring everything in the kitchen was like biting into an eggshell. I enjoy cooking and don’t want to waste even a slightest bit of enjoyment in that small world of mine. But little did I know that everything will change, when my husband came home with the Oscar nominated film ‘Julie and Julia’( a real life story) where Julie Powell (part played by Amy Adams) challenged herself to make all the 524 recipes from Julia Child's cook book ‘Mastering the Art of French Cooking’ and blogging all her experiences (The Julie/Julia Project). It was an inspiring movie. A few days later when we were discussing this casually with a friend of ours over tea…everything changed dramatically…..” How about you making at least half of it in one year? Not French but your own. 262 recipes that will inspire others and present it as a blog?” For a minute my mind traveled faster than light… With an experience as a helper in my mother in laws kitchen for 6 years followed by a three year everyday struggle to satisfy the palate of my foodie husband, if I cannot do it then why should I cook? But on the other side with an experience in English literature extending no more than expanding outline stories in English grammar class when I was 18 and two small kids that come in handy at times, will a commitment for the next one year work? Anyway my ‘cook's ego’ didn’t allow me to say no...

So my friends …here I am opening my recipe book, trying to perfect and present 262 recipes in the coming 365 days….A Challenge that will of course tastes good. Come.. Have a walk with me along my journey.. Cheering and inspiring….Forgiving and tolerating…Testing and tasting….for ‘A Tasty Challenge’

Search This Blog

Friday, July 30, 2010

Meen Pollichathu (Banana leaf broiled Fish)

Recipe No: 70
This is a variant of the traditional Karimeen a.k.a. Pearl spot pollichathu. When we went to Kerala for a vacation last year, we traveled around 60 kilometers, only to get this Karimeen Pollichathu from a Toddy shop in Changanacherry- Alapuzha Highway. This is my take on that incredible preparation using an available  local fish.  As Pearl spot is very rare in the area where we are staying, I decided to go with Tilapia which is available in most of the places.  The result is very good, even though it cannot be compared with the taste our own  Karimeen. Other than the Fish, there are two other important ingredients too in this dish. Banana leaves and lots and lots of Curry leaves. When the smell of Banana leaves mingles with the other flavors of dish while broiling, the outcome is simply enticing. Hope you all will enjoy it as much as I.
Ingredients                                          Serves 4
  • Tilapia fillets……........4
  • Coconut Oil………….4 Tablespoons
  • Banana Leaves……..4 big Pieces
    To grind
    • Green Chilly…….........2-3 (I seeded it since I want only the flavor and not the heat as we are using red chilly powder and Pepper powder)
    • Shallots…………...........2 Big
    • Ginger-Garlic paste…2 Teaspoon
    • Red Chilly Powder…..1 Tablespoon
    • Turmeric Powder……1/2 Teaspoon
    • Pepper Powder……….1/2 Teaspoon
    • Lemon Juice……………2 Tablespoons
    • Salt………………………..1 Teaspoon
    • Oil………………………….1 Tablespoon
    To Saute
    • Coconut Oil……………..2 Tablespoons
    • Onion Sliced……………2 Cups
    • Shallots Sliced…………1 Cup
    • Curry leaves……………5-6 Sprigs
    Method of Preparation
    1. Put all the ingredients in the ‘to grind’ section in a food processor or a blender and grind into a course paste.
    2. Marinate the Fish with half of the ground paste and keep aside for half hour. Keep the other half of the paste for later use.
    3. In a shallow pan heat 3 Tablespoons of oil on high heat and shallow fry the fish for a minute on each side. Fish shouldn’t be cooked all the way through or browned. Remove the fish and keep aside till ready to be used.
    4. To the remaining oil in the same pan, add a tablespoon of Coconut oil and add the sliced Onion, Shallots and Curry Leaves and saute till golden brown.
    5. Once browned, add the left over of ground marinade and saute till the raw smell is gone for about 3 minutes on medium high heat. Switch off the heat.
    6. Arrange the Banana leaves and spread a tablespoon of the sauteed onion  mixture on each leaf.
    7. On top of the Onion place a Tilapia fillet.
    8. Spread the remaining Onion mixture equally on the top of all the fishes.
    9. Fold the leaves on all sides so that the fish is secure inside.
    10. Place the fishes seam side down on a baking pan and broil on high for 6 minutes on each side on the second rack from the top of the oven. If you don’t have a broiler it is easy to make in a pan on the stove top. Add a teaspoon of oil into a pan on medium high heat and place the fish wrapped in banana leaf, cover the pan and cook for 5 minutes on each side or till the Banana leaf is all charred and the fish is cooked through.
    11. Serve hot with plain boiled rice.
    Notes: 
    • Lining the baking pan with an Aluminum foil before placing the fish will make clean up very easy.
    • Banana leaves are available in the frozen section of most Indian stores and some other food specialty stores. In some places fresh Banana leaves are also available.
    • If you are using fresh Banana leaves, it is good to show it on the flame for a few seconds to make it more pliable.


      Make it, enjoy the deliciousness and 
      serve it to your family with love...

      Tuesday, July 27, 2010

      Jam Tart

      Recipe No: 69
      Ingredients                                                 Makes 2- 9 inch tarts
      For the Shell
      • All Purpose Flour/Maida…2 cups
      • Butter…………………………..1/2 Cup/ 1 stick
      • Egg Yolk……………………….1
      • Sugar………………………...…1/2 Cup
      • Baking soda…………………..1/4 teaspoon
      • Salt………………………………1/4 Teaspoon
      • Cold Water…………………….2-4 Tablespoons / as needed
      For the filling
      • Jam……………………………...As needed (I used homemade Strawberry preserve but you can use your own favorite jam)
      Method of Preparation
      1. Preheat the oven to 375˚F/190˚C
      2. Sift together Flour, Salt and Baking powder.
      3. Mix sugar and butter till creamy.
      4. Add egg yolk and mix till combined.
      5. Add the flour mixture and knead into a soft dough. Use some cold water if needed. But take care not to add too much water. Use only enough water to make soft dough.
      6. Sprinkle some flour on a work surface and roll out the dough into ¼ inch thickness. Transfer this to a tart tin. For a 9 inch tart pan, you will need only half of this dough. So take the amount of dough needed according to the size of your tart pan. If you don’t have a tart pan, cut it into small circles and do the same thing in a muffin tin. Take care not to stretch the dough. If you stretch, it will shrink right back in while baking.
      7. With the help of a fork, prick the bottom of the tart dough. This is to prevent the dough from raising too much.
      8. Put the jam in the middle of the tart as much or as less as you like. (I don’t like it too sweet, so I spread only 1/4 cup of jam in the middle of the Tart). If you don't like pieces of fruit in the preserve you are using, pulse it in a food processor/ blender for 10 seconds.
      9. Put it in the lowest rack of the oven for 10 minutes and then shift it to the middle rack and bake till the sides and the bottom of the tart is slightly browned, for about another 10 -15 minutes.
      10. Serve warm.


      Make it, enjoy the deliciousness and
      serve it to your family with love…

      Battura

      Recipe No: 68
      Even though I love Battura, thinking of the guilty feeling that I am going to have after eating them often kept me away from making it. So after some trials and a lot of greasy Batturas, I came up with this non greasy variety of Battura. The secret is much in the consistency of the dough. If the dough is too soft, it will absorb a lot of oil. If it is too hard, the end product will be hard. So take care in making the dough to the just right consistency.
      Ingredients                                                  Makes 16 small ones
      • All Purpose flour/ Maida….2 cups
      • Yeast…………………………….1 Teaspoon
      • Sugar…………………………….1 tablespoon
      • Salt……………………………….3/4 Teaspoon
      • Yogurt………………………..…3 Tablespoons
      • Lukewarm water……………1/2 Cup
      • Oil for deep frying
      Method of Preparation
      1. Dissolve Sugar and Yeast in lukewarm water. Cover this with a foil and keep aside for 5 minutes. This is to activate the yeast and it should be foamy by this time.
      2. Mix Flour, Salt and Yogurt and knead it into a soft dough using the Yeast water. It should not be too sticky. Use more water if needed.
      3. Place this in a big bowl, cover with a kitchen towel and keep it in a warm place till it is doubled in size.
      4. Once doubled, punch it down, and let it rise once more time for 1 hour. This time also cover it with a towel and keep in a warm place.
      5. Divide this into 16 equal portions and roll them into 3 inch circles. This should not be very thin otherwise it will not puff up.
      6. Heat the oil for deep frying on high flame. There should be at least 2 inches of oil.
      7. Deep fry the Batturas on both sides till they are cooked and nicely browned on both sides. With the back side of a  slotted spoon, push the Batturas into the oil till it is puffed.
      8. Once fried, take it out of the oil and drain the excess oil on a paper towel.
      9. Serve hot with Channa Masala.
      Notes: 
      • The Oil should be really hot while frying, otherwise it will absorb a lot of oil.
      • Put yeast only in lukewarm water. Hot water might kill the yeast and cold water might not activate the yeast. If the water in which the yeast is dissolved is not frothy in 5-10 minutes, then either you have killed the Yeast or its too old. In both cases start over again.
      • I like to make small Batturas than the traditional big ones, as its easy to be fried. But that's only a personal preference. 


        Make it, enjoy the deliciousness and
        serve it to your family with love…

        Monday, July 26, 2010

        Channa Masala

        Recipe No: 67
        ‘Channa’ or Chick Peas or Garbanzo is a protein rich source for vegetarians. This is a delightful side dish for Poori and Battura. Two very unusual ingredients in this preparation are Chaat Masala and Kasoori Methi. Apart from Poori and Battura, it goes well with Puttu and Uppuma.
        Ingredients                                        Serves 8-10 adults
        To Pressure Cook
        • Whole dry Chick Peas…......2 Cups (Soak at least 8 hours, overnight is the best)
        • Turmeric Powder………......1/2 Teaspoon
        • Salt…………………………….....1 Teaspoon
        To Saute
        • Oil……………………………......….2 Tablespoons
        • Onion chopped……………........2 Cups
        • Ginger-Garlic Paste…….........1 ½ Tablespoons
        • Curry Leaves……………….......2-3 sprigs
        • Red Chilly Powder………........1 Tablespoon
        • Coriander Powder………........2 ½ Tablespoons
        • Turmeric Powder………........1/2 Teaspoon
        • Garam Masala Powder…......1 Teaspoon
        • Chaat Masala Powder…........1/2Teaspoon
        • Kasoori Methi……………….....1 Teaspoon
        • Tomato Roughly Chopped…1 Cup
        • Chopped Coriander Leaves…3 Tablespoons
        Method of Preparation
        1. Pressure cook soaked Channa, Turmeric Powder, Salt and 3 cups of water (or water needed to cook the Channa) till the Channa is soft but not mushy.  (In my Cooker it takes around 20 minutes after the first whistle.) Keep aside.
        2. Heat 2 tablespoons of Oil in a pan and saute chopped Onion and Curry leaves till it starts to brown on the edges.
        3. Add Ginger-Garlic paste and saute till everything is brown in color.
        4. Add Chilly Powder, Coriander powder. Turmeric Powder, Garam Masala Powder and Chaat Masala Powder and saute till the raw smell is gone.
        5. Add chopped Tomato and saute till it is really mashed.
        6. Add the cooked Channa together with the remaining liquid (Add more water if needed) and mix well. Close the pan, reduce the heat to medium and let it simmer for 20 minutes or till the Channa absorb all the flavors and the gravy is reduced to the desired consistency. Add salt if needed.
        7. Take Kasoori methi in your palm and crush it with the other palm and add.
        8. Mix in the chopped Coriander leaves and switch off the flame. Serve hot.
        Notes:
        • Instead of using dry Channa, you can use 3 cans of Chick Peas/ Grabanzo Beans. This will save time as it is previously cooked.


          Make it, enjoy the deliciousness and
          serve it to your family with love…

          Saturday, July 24, 2010

          Freezing Strawberries and Strawberry Milkshake

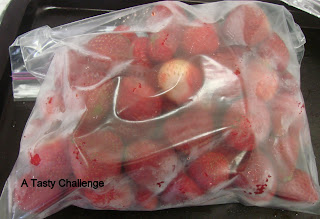
          As the Strawberry season is coming to an end, it is really good to freeze some for the coming months, especially considering the price of frozen Strawberries in the Grocery stores. So when I got my hands on some, I bought and made it into frozen ones. The procedure is very simple and can be done easily if you follow these steps. This is what I did.
          Method of Preparation
          1. Select Strawberries without any bruises or cuts.
          2. Wash and pat them dry. Remove the leaves and stems.
          3. Place them on a baking sheet without touching each other. Cover it with a foil or plastic wrap.
          4. Keep it in the fridge for one hour and then transfer it into the freezer. This will give the effect of freezing Strawberries individually.
          5. Once frozen, put all of them together in a zip lock bag and store it in the freezer till ready to be used.
          6. These berries will stay good for a long time and can be used for making desserts, smoothies and milkshakes.
          7. These frozen berries will not hold their shapes if thawed.
          8. Freezing individually first is very important, otherwise  in the end the berries will stay is one huge mass.


            Enjoy...


            Recipe No: 66                                   
             Ingredients                                           Makes 2 Medium glasses
            • Cold Milk…………………..1 ½ cups
            • Frozen Strawberries…..10 medium ones
            • Sugar………………………..3 tablespoons or as needed
            • Strawberry Ice cream...1/2 Cup
              Method of Preparation
              1. Blend all the ingredients together in a blender until smooth but still thick.
              2. Pour it into glasses, decorate with Strawberries and serve cold.


              Make it, enjoy the deliciousness and
              serve it to your family with love…

              Friday, July 23, 2010

              Diamond Cuts

              Recipe No: 65
              When I posted the recipe for Mixture, I mentioned about my mother making a variety of snacks during the vacation. This is one among those delicious treats. But now I have one more incident to remember when I think about Diamond cuts. Last year when we went for a vacation one of our friends asked me to bring some Diamond cuts from Kerala. But unfortunately, I was not able to bring them. By telling this, he bullied me for a long time even though his lovely wife tried to  scare him with her angry face many times!!! So the first thing I made after settling down from vacation was to make some Diamond cuts and give him. But after one year, he still says “anyway you didn’t bring Diamond Cuts from Kerala”. So this post is dedicated to my friend and his dear wife.
              Ingredients
              For the dough
              • All Purpose flour...4 Cups (or Maida)
              • Egg……………………1
              • Salt…………………...1/4 Teaspoon
              • Water………………..1-1 ¼ Cups or as needed
              For the sugar syrup
              • Sugar………………..1 ½ Cups
              • Water……………….1/2 Cup

              • Oil for deep frying
              Method of Preparation
              1. Mix Flour, Egg and Salt and make a soft dough with water (at room temperature). Start with 1 cup of water and then use more if needed. Let it rest for 5 minutes.
              2. Heat at least 3 inches of oil in a deep pan on a medium heat until hot.
              3. Divide the dough into 10 equal pieces.
              4. Roll each of them into 8 inch circles and cut them into diamond shapes.
              5. Drop the pieces in hot oil and fry till it is crispy and attains a light brown color. This will take at least 6-8 minutes per batch. Don't overcrowd the pan.
              6. Repeat this process for all the other pieces. You can easily roll and cut the next piece while frying one batch . Keep this aside till it is ready to be used.
              7. In a large pan on high heat, add sugar and water, boil and wait till it reaches a one thread consistency.
              8. Put all the fried Diamond cuts together into the sugar syrup and mix well till each of them are coated with the syrup evenly.
              9. Switch off the flame as soon as all the syrup is stuck to the Diamond cuts and no syrup is left behind.
              10. Once cooled store it in an airtight container and use when needed.
              Notes:
              • The oil for frying shouldn't be on high heat. Otherwise the dough will become brown fast but will not be crispy. So it is better to maintain a medium heat (or slightly above depends on your stove) and fry them till crispy. This will take a few minutes. So please be patient.
              • To check the one thread consistency touch the syrup with your index finger and press and separate it between the index finger and the thump. If the syrup forms one thread in between, it is ready. In the above given measurements this stage will be reached immediately after the sugar is melted.


              Make it, enjoy the deliciousness and
              serve it to your family with love…

              Wednesday, July 21, 2010

              Ginger-Lime Squash

              Recipe No: 64
              This is a perfect way to quench your thirst in the overwhelming heat of the summer with flavors that are very near to your heart and your palate. This is a concentrate that can be stored for a long time in the refrigerator and can be diluted when needed. To describe the taste…well you will taste the lime at first followed by a faint ginger taste at the end, in your throat, which for me feels very comforting. Above all we can feed our kids knowing what goes into it.
              Ingredients to make the concentrate
              • Lime juice………………….1 ½ Cups
              • Ginger Juice………………1/2 Cup
              • Sugar………………………..7 Cups
              • Water……………………….1 ½ Cups
              • Citric acid………………….1 ½ Teaspoon
              • Lemon/ Lime Extract...1 Teaspoon (optional)
              Method of Preparation
              1. Combine Water and Sugar in a pan and boil till it is of one thread consistency. (230˚F/110˚C on Candy Thermometer)
              2. While this is happening set up a double boiler by heating an inch of water in a small pan and put a bowl on top in such a way that the bottom of the bowl does not touch the water in the pan.
              3. Add Lime juice and Ginger juice into the bowl and heat slowly till warm.
              4. Once the sugar has reached the one thread consistency, switch off the heat and add the warm juices and Citric Acid. Mix well and let it cool. Skim off the foam that forms on top of this.
              5. Once cooled slightly add the Lemon/Lime extract (if using) and mix. 
              6. After cooling thoroughly, bottle this concentrate and keep in the refrigerator until ready to be used.
              To Prepare the Squash
              • Ginger-Lime Squash Concentrate...3-4 Tablespoons or as needed
              • Water………………………………………..1 Cup
              • Ice cubes……………………………….…..3-4
              Method of Preparation
              1. Mix everything together and enjoy.
              Notes:
              • Citric acid is available in most of the Indian stores. This gives the sourness which is essential for the squash. So please don’t avoid it.
              • To check the one thread consistency touch the syrup with your index finger and press and separate it between the index finger and the thump. If the syrup forms one thread in between, it is ready. In the above given measurements this stage will be reached immediately after the sugar is melted.


              Make it, enjoy the deliciousness and 
              serve it to your family with love…