Creating a blog was out of the question for a long time for me, as measuring everything in the kitchen was like biting into an eggshell. I enjoy cooking and don’t want to waste even a slightest bit of enjoyment in that small world of mine. But little did I know that everything will change, when my husband came home with the Oscar nominated film ‘Julie and Julia’( a real life story) where Julie Powell (part played by Amy Adams) challenged herself to make all the 524 recipes from Julia Child's cook book ‘Mastering the Art of French Cooking’ and blogging all her experiences (The Julie/Julia Project). It was an inspiring movie. A few days later when we were discussing this casually with a friend of ours over tea…everything changed dramatically…..” How about you making at least half of it in one year? Not French but your own. 262 recipes that will inspire others and present it as a blog?” For a minute my mind traveled faster than light… With an experience as a helper in my mother in laws kitchen for 6 years followed by a three year everyday struggle to satisfy the palate of my foodie husband, if I cannot do it then why should I cook? But on the other side with an experience in English literature extending no more than expanding outline stories in English grammar class when I was 18 and two small kids that come in handy at times, will a commitment for the next one year work? Anyway my ‘cook's ego’ didn’t allow me to say no...

So my friends …here I am opening my recipe book, trying to perfect and present 262 recipes in the coming 365 days….A Challenge that will of course tastes good. Come.. Have a walk with me along my journey.. Cheering and inspiring….Forgiving and tolerating…Testing and tasting….for ‘A Tasty Challenge’

Search This Blog

Monday, January 31, 2011

Baklava

Recipe No: 183
Originated in Turkey, Baklava is quite a famous Exotic Dessert in US. These are layers of thin pastry sheets and nuts, with Honey or Syrup poured over generously.

One of these days, a friend of ours gave us some Baklava they bought from somewhere in the Middle East, on their way back to US from India. Unlike the usual square ones, these were rolled and surprisingly it was not too sweet at all. My daughter who is not a big fan of anything sweet, was just head over heels with those Baklavas and the rest of the three got only bits and pieces. She was asking me to make Baklavas like that from the day she ate those and so I decided to give it a try.

 As a part of trail, I did experiment with the spices going into it from Cinnamon and Cardamom to Cloves and Nutmeg. I should say that each one of them has their own identity and I liked all of them. So if you try this recipe go ahead and use the ones that suit your palate and personalize them accordingly.
Ingredients                                        Makes 32 pieces
  • Phyllo Dough Sheets………………8 no
  • Almonds (skin removed)………..1/2 Cup
  • Shelled Pistachios…………….……1/2 Cup
  • Walnuts………………….……………1/2 Cup
  • Sugar…………………………..………1/2 Cup
  • Cinnamon Powder………………...1/2Teaspoon
  • Cardamom Powder………….……1/3 Teaspoon (Optional)
  • Cloves and Nutmeg Powder…..a Pinch each (Optional)
  • Butter……………………….…………1/2 Cup/ 1 stick (melted)
  • Honey………………..……………….1 Tablespoon
Method of Preparation
  • Preheat the oven to 350˚F/ 180˚C.
  • Grind together all the Nuts into a course mixture and mix in Sugar, Cinnamon and the other spices (Cardamom, Cloves and Nutmeg) if using. Keep it aside till ready to be used.
  • Carefully spread one Phyllo sheet on a flat surface and bush a thin layer of melted Butter. Place another sheet on top and spread Butter.
  • Starting from the smaller side cut the dough half way up, so that it is possible to make two rolls out of one.
  • On the smaller side, place 1/8th of the filling in a small line leaving an inch on the side to help in rolling.
  • Carefully roll it tightly and place them in a baking pan.
  • Continue to make this till all the Phyllo sheets are used. (will make 8 rolls)
  • Cut each of the roll into 4 equal parts in the baking pan and brush the top with Butter.
  • Bake it in the middle of the oven for 10 minutes.
  • Take it out of the oven after 10 minutes, drizzle the honey on top and with the help of a brush spread it evenly.
  • Put it back in the oven and let it crisp up for another 5 minutes or till the top become slight golden brown.
  • Serve warm or at room temperature.
Notes:
  • Don’t use roasted and salted nuts for this preparation.
  • If you don’t have any one of these nuts, increase the amounts of the other two to make 1 ½ cups.
  • When you grind them, take care to make a course consistency; don’t powder them.
  • Thawing Phyllo dough should be done as per the instructions on its cover. Be very patient with them as they are very delicate. Cover them with a lightly damp kitchen towel when not in use and take them out only when necessary as they have a tendency to dry fast.
  • You have to layer two Phyllo sheets and  cut in the middle so that each Baklava will have only adequate amount of pastry around.
  • Phyllo Dough is available in the frozen section of the grocery stores.
  • If you want your Baklava on the sweeter side then increase the amount of honey.
  • Instead of Honey, it is also possible to use Sugar Syrup also.


Make it, enjoy the deliciousness and 
serve it to your family with love…

Sunday, January 30, 2011

Mutta/ Egg Ularthiyathu

Recipe No: 182
This is an idea given to me by one of my relative. One day while talking to her over  phone, she mentioned that this used to her Mother’s specialty and how much everyone at theirs used to enjoy it. According to her, Duck’s Egg is better for this preparation, but as I had only Chicken Eggs in my refrigerator, I went with it and I should say it was pretty good.
Ingredients                                       Serves 3
  • Hard Boiled Eggs………………….5 (chop into cubes)
  • Coconut Oil…………………….…..2 Tablespoons
  • Mustard Seeds……………………..1/2 Teaspoon
  • Coconut Pieces…………………….2 Tablespoons
  • Shallot sliced……………………….1/3 Cup
  • Ginger sliced thin…………………1 Tablespoon
  • Garlic sliced thin…………………..1 Tablespoon
  • Curry Leaves………………….……2 Sprigs
  • Red Chilly Powder………….…….1/2 Teaspoon
  • Coriander Powder…………………1 Teaspoon
  • Turmeric Powder………..………..1/4 Teaspoon
  • Pepper Powder……………..………1/4 Teaspoon
  • Garam Masala Powder…..……...3/4 Teaspoon
  • Water………………………………….1/3 Cup
  • Salt as needed
  • Pinch of Garam Masala, a teaspoon of Coconut Oil and a sprig of Curry Leaf to sprinkle on top at the end
Method of Preparation
  • Heat Coconut Oil in a pan on medium high heat and splutter the Mustard Seeds.
  • Add the Coconut slices and fry them until slightly brown.
  • Add Shallots, Ginger, Garlic and Curry Leaves and saute till slightly brown.
  • Reduce the heat to medium low and add Red Chilly Powder, Coriander Powder, Turmeric Powder, Pepper Powder and Garam Masala Powder; saute for a minute or two until the raw smell is gone and the powders are fried a bit, taking care now to burn them. Add enough Salt and mix well.
  • Add Water followed by Egg pieces and mix gently until combined.
  • Sprinkle a pinch of Garam Masala Powder, a teaspoon of Coconut Oil and some torn Curry Leaves on top; off the heat; close the pan and let it sit for 5 minutes before serving.
Notes:
  • Be careful while mixing once the Eggs are added, so that the Egg Yolks stays intact.


Make it, enjoy the deliciousness and 
serve it to your family with love…

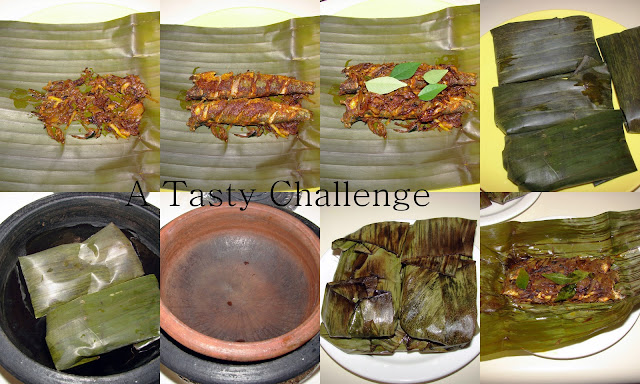
Mathi Vazhayilayil Pollichathu/ Sardines grilled in Banana Leaves

Recipe No: 181
I don’t know what you just cooked… but please don’t cook that thing again while staying here.’ This is a response that one of my friends got from a neighbor when she fried Sardines in her apartment!!! This is the same reason why sometimes I am so intimidated when it comes to cooking Sardines in these sorts of closed apartments especially during winter, as there are no chances of keeping the windows open when the temperature is like -11˚F outside. But, what can you do when your loved ones crave Sardines in the peak of winter?

This is a very traditional dish which I just love and is very much like the Fish/ Meen Pollichathu recipe but with some variation to reduce the sharp flavor of Sardines. I have to say that this didn’t produce even half of the smell produced during regular Sardine frying.
Ingredients                                       Serves 4
  • Fresh Mathi/ Sardines……………8
  • Shallots sliced……………………….1 ¾- 2 Cups
  • Ginger sliced thin……………….…2 Tablespoons
  • Curry Leaves………………………..4-5 Sprigs
  • Thick Coconut Milk……….……..1/4 Cup
  • Banana/ Plantain Leaves…......4 pieces, each big enough to cover 2 Sardines, showed on the top of fire to toast slightly (Vaatuka), making it flexible to wrap.
  • Salt as needed
  • Coconut Oil as needed
To make the Marinade
  • Red Chilly Powder…………..……1 Teaspoon
  • Coriander Powder…………..……1/2 Teaspoon
  • Turmeric Powder…………………1/2 Teaspoon
  • Pepper Powder………………..…..1/2 Teaspoon
  • Fenugreek/ Uluva Powder….…1/8 Teaspoon
  • Ginger Garlic Paste………………1/2 Teaspoon
  • Vinegar………………………………1/2 Teaspoon
  • Salt…………………………….……..1/2 Teaspoon
Method of Preparation
  1. Clean the Sardines and make a few slits on each side.
  2. Make a paste with all the ingredients in the marinade section with 1-2 teaspoons of Water.
  3. Use 2/3 of the marinade to coat the Sardines thoroughly; let it sit on the counter for 15 minutes. Keep the rest of the marinade for later use.
  4. In a shallow pan on medium heat, add 2-3 tablespoons of Coconut Oil and fry the Sardines slightly, for about 1 minute on each side. The fish shouldn’t have to cook thoroughly as it will complete cooking later.
  5. Take it out of the pan and add a tablespoon of Oil more if needed and saute the Shallots, Ginger and 3 sprigs of Curry Leaves till they are wilted (doesn’t have to brown).
  6. Once wilted thoroughly, add the left over marinade and fry till the raw smell is gone for a minute.
  7. Add the Coconut Milk; mix well and let it boil and reduce. Look for seasonings and add more Salt if needed.
  8. Once the Shallot mixture is dry (with no Coconut Milk visible), switch off the heat and divide it into 4.
  9. Take a clean Banana Leaf and put a small amount of the Shallot mixture in the bottom and arrange 2 Sardines on top.
  10. Put some more of the Shallot mixture on top followed by some Curry Leaves. Fold all the four sides of the Banana leaves, so that the contents are covered properly. Repeat this with all the 4 portions.
  11. Heat a Chatti (an earthen cooking vessel)/ Pan on medium heat and drizzle a teaspoon of Coconut Oil on the bottom.
  12. Place the fish pouches in the pan and put a lid on top so that it gives some pressure on the Fish. (I used another small Chatti which gave that pressure to the Fish on the bottom.)
  13. Let it fry like that for 5 minutes each on both sides or till the Fish is done and the Leaves are slightly blackened.
  14. Serve it hot.
Notes:
  • Instead of doing it on the stove top, you can do it in the broiler too as with the Fish / Meen Pollichathu.
  • If you are using a nonstick pan, there is no need to drizzle Oil on the bottom.
  • If the Pan/ Chatti in which you are making this is small, do it in batches, drizzling more Oil in between.
  • Once you make this, wait the ‘Chatti’ to cool down before washing, otherwise it may crack.
  • Even though you can use other Oils, Coconut Oil suits the best for this preparation.


Make it, enjoy the deliciousness and
serve it to your family with love…

Thursday, January 27, 2011

Biscuit Coffee Pudding

Recipe No: 180
This is an old fashioned steamed Pudding with a Coffee taste, which for me, is quiet addictive. It can also be baked and there are no fancy ingredients, making it easier to make. Biscuit here acts only as a thickening agent and when combined with the Eggs give a very peculiar texture.
Ingredients                                           Serves 8
  • Milk……………………………2 Cups
  • Sugar…………………………3/4 Cup
  • Glucose Biscuits…………..5 no
  • Instant Coffee Powder….1 ½ Tablespoons
  • Eggs…………………………..3
  • Vanilla Extract…………….1/2 Teaspoon
    Method of Preparation
    1. Beat the Eggs really good and keep them aside till ready to be used.
    2. Heat Milk, Sugar and Coffee Powder together till the Sugar is melted.
    3. Take ½ Cup of milk and soak the Biscuits. Keep them aside.
    4. Once the milk is warm, mix in beaten Eggs, Vanilla Essence and the soaked Biscuits (together with the Milk).
    5. Pour this into a mold (in which the Pudding has to be baked/steamed) through a strainer.
    6. Cover the top with a foil and steam for 20-25 minutes or place it in a big pan with hot Water and bake in a 350˚F/ 180˚C preheated oven for 20 minutes or till it is done (an inserted toothpick will come out clean).
    7. Once cooled, keep it in the refrigerator for 4-6 hours.
    8. Cut it into desired shapes and serve cold after sprinkling with powdered Biscuit.
    Notes:
    • It is not necessary to boil the Milk or to cook the Eggs as it will be cooked together while steaming/ baking.
    • I used Bru for the Coffee Powder and the measurement given is according to its strength. So change the amount of Coffee according to the strength of the Coffee Powder you are using.
    • Make sure you cover the Pudding with a foil specially if you are steaming, otherwise vapor may fall back into the Pudding.
    • It is very important to use a water bath if you are baking the Pudding. Place the pan with the Custard in a big baking pan with hot Water, filling half way up the smaller pan.
    • The dark brown region of the Pudding is the top part and is formed due to the accumulation of the Coffee foam which adds to the appearance. 


    Make it, enjoy the deliciousness and 
    serve it to your family with love…

    Beef and Broccoli Stir Fry

    Recipe No: 179
    This is a very easy but delicious Chinese style preparation, with which you can fool all those who fuss over Broccoli  in your house. At least it works in my household!!!
    Ingredients
    For Marinating
    • Beef………………………250 Grams (slice into very thin pieces)
    • Salt……………………….1/3 Teaspoon
    • Pepper Powder……....1/2 Teaspoon
    • Soy Sauce………………1 Teaspoon
    To make the Stir Fry
    • Broccoli florets……….300 Grams
    • Onion cubed………….1/2 Heaping Cups
    • Oil………………………..2 Tablespoons
    • Garlic chopped……….2 Tablespoons
    • Light Soy Sauce……..1/3 Cup (I used Kikkoman)
    • Brown Sugar………….2 Tablespoons
    • Corn Flour/ Starch…1 Tablespoon
    • Water…………………...1/4 Cup
    Method of Preparation
    1. Marinate Beef slices with the ingredients mentioned in the ‘to marinate’ section and keep aside for 15 minutes.
    2. Mix together Soy Sauce, Brown Sugar, Corn Starch and Water; keep aside till ready to be used.
    3. Heat Oil in a Wok/ Pan on high heat and Fry the marinated Beef pieces till slightly browned, adding Garlic in between. Take care not to burn the Garlic.
    4. Add Broccoli florets and Onion and saute for 2 minutes.
    5. Add the Soy Sauce mixture and mix well. Let it cook for 3 minutes or till Broccoli is slightly cooked and the sauce is thickened.
    6. Serve hot with seasoned rice (Read notes for details about the rice).
    Notes:
    • It is very essential to slice the Beef thin. This process will be easy if you do it with semi frozen meat.
    • Don't cook Broccoli too much. It should be crisp.
    • As Soy Sauce is salty, it will not be necessary to add more Salt.
    • I used light Soy Sauce (Kikkoman) for this dish and never made it with dark Indian style  Dark Soy Sauce. So if you are using it use lesser quantity; I will say like 3 tablespoons of Soy Sauce with remaining Water to make it 1/3 cup. 
    • The whole process is done on high heat and don't forget stir constantly.
    • If you don't eat Meat, use Chicken instead. 
    • Seasoned Rice: For this Rice I sauteed cooked Jasmine Rice in a tablespoon of Oil, Salt, Pepper and some Soy sauce.


      Make it, enjoy the deliciousness and 
      serve it to your family with love…

      Tuesday, January 25, 2011

      Chocolate Nut Triangles

      Recipe No: 178
      When I posted the recipe for Fried Chocolate Wontons, I mentioned my family’s love for the Chocolate – Hazelnut spread, Nutella. This is another recipe that I use to satisfy their Nutella cravings. The toasted Cashew nut is a wonderful addition and it makes a whole lot of difference in this dish.
      Ingredients                                     Makes 8 pieces
      • All Purpose Flour/ Maida…..2/3 Cup
      • Cocoa Powder…………………..1/4 Cup
      • Baking Powder………………...1/2 Teaspoon
      • Salt………………………………...a pinch
      • Instant Coffee Powder……...1/4 Teaspoon
      • Butter………………………….….6 Tablespoons
      • Vegetable Oil.......................2 Tablespoons
      • Light Brown Sugar……..…..1/2 cup packed (means Press hard into the cup while measuring)
      • Vanilla Essence……………..…1/2 Teaspoon
      • Eggs………………………………..2
      • Nutella………………………..…..1/3 Cup
      • Cashew Nuts………………..….3 Tablespoons (Toasted and chopped)
      Method of Preparation
      1. Preheat oven to 350˚F/ 180˚C.
      2. Line a square baking pan with parchment paper and grease it.
      3. Sift together Flour, Cocoa Powder, Baking Powder, Salt and Instant Coffee Powder; keep aside till ready to be used.
      4. Beat Butter, Vegetable Oil, Brown Sugar and Vanilla Essence until light and fluffy.
      5. Beat in Eggs one at a time combining well after each addition.
      6. Add the Flour mixture and mix in gently.
      7. Pour it into the prepared pan and as we want to avoid the hump in the middle of the Cake, push the batter slightly towards the edges.
      8. Place it in the middle of the oven for 17-20 minutes or till a toothpick  inserted in the middle of the Cake comes out clean.
      9. Take the Cake out of the pan and let it cool down completely. If you turn the Cake over to take it out of the pan, quickly turn it back so that the top of the Cake face upwards.
      10. Once cooled, cut the crusty edges off and spread the Nutella on top evenly.
      11. Quarter the Cake and cut each piece into two triangles and spread the Nuts on top evenly.
      12. Serve them at room temperature with a cup of Tea.
      Notes:
      • Don't over bake the Cake.
      • Let the Cake cool completely before spreading Nutella or it will melt and make a mess.
      •  If you are able to get Hazelnuts, please use that instead of Cashew nuts.


      Make it, enjoy the deliciousness and 
      serve it to your family with love…

      Mushroom Cutlet

      Recipe No: 177
      • Mushrooms…………………….…350 grams (approximately 4 cups chopped)
      • Oil………………………………..…..2 Tablespoons
      • Onion chopped fine…………….1 Cup
      • Indian Green Chilly……………2 (chopped fine)
      • Ginger Garlic paste…………….2 Teaspoons
      • Turmeric Powder……………….1/2 Teaspoon
      • Pepper Powder…………………..1/2 Teaspoon
      • Garam Masala Powder……….1/3 Teaspoon
      • Coriander Leaves chopped….2 Tablespoons
      • Salt as needed
      • Potato……………………………...2 small (approximately 1 1/4- 1 ½ Cup mashed)
      • Egg………………………………....1 (Beat with a Tablespoon of Water)
      • Bread Crumbs…………………..1/2 – ¾ Cup
      • Oil for deep frying
      Method of Preparation
      1. Heat Oil in a pan on medium heat and saute Onion and Green Chilly till they are translucent.
      2. Add Ginger Garlic paste and saute till the raw smell is gone.
      3. Add chopped Mushrooms and fry till it is slightly browned for about 10 minutes on medium heat. By this time all the Water will come out of the Mushrooms and they will be reduced a lot.
      4. Add Salt, Turmeric Powder, Pepper Powder and Garam Masala Powder and saute for a minute.
      5. Sprinkle the Coriander Leaves and switch off the heat.
      6. Add boiled and mashed Potatoes to the Mushroom mixture and mix  till everything is combined well. Add more Salt and Pepper if needed at this stage.
      7. Divide this mixture into 12 equal portions and make it into desired shapes.
      8. Dip the cutlets in Egg and roll in Bread Crumbs.
      9. Heat at least an inch of Oil in a pan on high heat and fry the Cutlets until golden brown and serve hot.
      Notes:
      • Mushrooms tend to absorb a lot of Oil like a sponge while sauteing. But once sauteed, it will give out some of that Oil. So don’t add more than 3 tablespoons of Oil in total , otherwise, the mixture will become too oily.
      • Try to chop Mushrooms into small pieces.
      • Add Salt only after the Mushrooms had reduced or there are chances that you may misjudge the amount of Salt seeing the huge amount of Mushrooms which will actually reduce considerably.
      • The Cutlets should be immersed in Oil while frying. If you use less Oil the temperature of the Oil will drop once you put the Cutlets which results in over absorption of Oil by the Cutlets.
      • If in any case Oil is only coming up to the sides of the Cutlets, then temperature will increase in the portion of the Cutlet lying in the Oil. This will cause cracks in between these two portions. So a way to avoid this is to turn the Cutlet over after 30 seconds of putting it in hot Oil  so that the temperature will be even on both sides which will prevent a lot of cracking.
      • Please use Mushrooms as fresh as possible.


      Make it, enjoy the deliciousness and
      serve it to your family with love...

      Sunday, January 23, 2011

      Pathiri (Rice Tortillas!!!)

      Recipe No: 176
      Making Pathiri used to be a challenge for me until one of my good friend, one I spend 7 years together in College hostel, moved to US. (She used to bring stacks of Pathiri  to our hostel  from her home, which we devoured so quietly that no one else around will know about it...well almost...except the smell of the Chicken Curry that accompanies,  attracted some). This dish used to be a staple at hers and I was very much interested in knowing how they make it. So willingly, she took charge as my ‘Pathiri Guru’ and even if it was ‘distant learning’ I think I grasped her pretty well. Now , after making it a few times, I am pretty comfortable in describing how to make it and I truly hope that I will make my ‘teacher’ proud with this posting…
      Ingredients                                     Makes 8
      For making Pathiri
      • Rice Flour/ Pathiri Podi……1 Cup
      • Water…………………………….1 ¼ Cup
      • Salt………………………………..1/3 Teaspoon
      For making the tempered Coconut Milk
      • Coconut Oil…………………….1 Tablespoon
      • Shallots sliced…………………2
      • Coconut milk………………….3/4 Cup
      Method of Preparation
      To Make the Pathiri
      1. Boil Water with Salt on high heat. Once boiled, drop the Rice Flour steadily into the Water with one hand while mixing with the other hand.
      2. Once the Flour is dropped completely, mix it thoroughly; off the heat and leave it closed for a minute.
      3. Dump it into a wide plate and when cooled enough to handle, knead it really good to make the dough smooth.
      4. Divide it into 8 equal portions.
      5. Roll out each portion as thin as possible. About an 8 inch circle will be good.
      6. Place the rolled Pathiri  on a hot pan/ thawa on medium heat and cook one side.
      7. Turn it over and let the other side also cook.
      8. Turn it once more and press the top with a spatula. This will make the Pathiri puff up. (Don’t let it brown)
      9. Once cooked and puffed, take it from the pan and let it cool on a parchment paper.
      10. Once cooled, stack it up and cover with a foil and keep aside till ready to be used.
      To make the tempered Coconut Milk
      1. Heat Coconut Oil in a  pan and saute the sliced Shallots.
      2. Once the Shallots are golden brown, add the Coconut Milk; let it warm up  and switch off the heat.
      To Assemble and Serve Pathiri
      1. When ready to be served, dip the Pathiri in the tempered Coconut Milk for a couple of seconds and serve.
      Notes:
      • Rice Flour for making Pathiri is very fine and it is easily available in most of the Indian stores (Pathiri/ Appam/ String Hopper/ Idiyappam Podi can be used).
      • If you drop the whole Flour at once into the boiling Water, there are chances that some Flour may not combine well, so adding Flour slowly while whisking at the same time works better.
      • There are chances for the dough balls to dry out. So when you take one portion to roll , knead it a bit to make it more pliable.
      • If you want a perfect circle, cut out circles from the rolled out dough with the help of a plate. Knead the scraps together to make more. But I found that the Pathiri made from the rolled out scraps is a bit harder than the others. So I prefer not to cut  the sides. Some irregularity along the sides won't hurt, after all it is homemade!!!
      • Don’t let the Pathiri brown while cooking.
      • Once dipped in Coconut Milk, don’t keep Pathiri for long as Coconut Milk makes them soggy. So dip it in Coconut Milk only just before serving.
      • You can make the Pathiri 4-6 hours in advance, but dip in warm Coconut Milk before serving (so that the dish will be warm when served).


      Make it, enjoy the deliciousness and
      serve it to your family with love...

      Friday, January 21, 2011

      Bullseye Appam/ Egg on Appam/ Egg on Laced Rice Pancake

      Recipe No: 297
      My Mother in Law used to make this whenever she make Appam. But when I came to US, I came to know that this is a usual dish in Sri Lankan restaurants. I can’t call this a recipe, but only a recipe idea…
      Ingredients
      Method of Preparation
      1. Heat a Palappachatti (special pan to make laced  Rice Pancake) on medium low heat and pour the batter.
      2. Swirl the pan to make the signature lace; cover and let it cook till the Appam is almost done.
      3. Crack an Egg on top of the Appam, taking care not to break the Yolk.
      4. Sprinkle Salt and Pepper on top of the Egg; cover the pan and let the egg cook through. The Whites should be cooked thoroughly but the Yolks should be runny.
      5. Serve hot with or without a side dish.
      Notes:
      • Don’t use more heat than mentioned in the recipe or it will make the lace brown fast.
      • I like the Egg Yolk runny, but you can cook it to the extend you want.


      Make it, enjoy the deliciousness and 
      serve it to your family with love…
      Mutton Stew

      Recipe No: 175
      Ingredients                                                               Serves 4
      To Marinate and Pressure Cook
      • Mutton…………………………..350 grams (Cut into small pieces, wash and drain)
      • Curd………………………………1 Tablespoon
      • Salt…………………………….…3/4 Teaspoon
      • Pepper Powder……………….1/2 Teaspoon
      • Garam Masala Powder……1/4 Teaspoon
      To Make the Stew
      • Oil………………………….......1 + 1 Tablespoons
      • Crushed whole Spices…....4 Cardamom pods, 6 Cloves and 1 small Cinnamon piece
      • Onion sliced…………….......1/2 cup
      • Ginger chopped…….…......1 1/2 Tablespoons
      • Garlic chopped…………......1 1/2 Tablespoons
      • Indian Green Chilly.....…..3-4 slit
      • Potato cubed………….........2 medium
      • Thin Coconut Milk…........1 cup (mix 1/3 cup thick coconut milk with  2/3 cups water)
      • Thick coconut milk...….....1 cup
      • Shallots sliced……………….2
      • Curry leaves………………….2-3 sprigs
      • All purpose flour/ Maida...1 teaspoon
      • Water……………………….….1/4 cup
      • Garam Masala Powder…...1/2 Teaspoon
      • Tomato sliced………………..1/2 big
      • Vinegar………………………...1/4 Teaspoon
      • Coriander Leaves.........…..2 Tablespoons (chopped)
      Method of Preparation
      1. Marinate Mutton cubes with all the ingredients mentioned in the ‘to marinate’ section and keep aside for 30 minutes.
      2. Pressure cook with 3/4 cups Water till the Meat is done. (In my Pressure Cooker it took only 4 whistles, but time it according to your cooking conditions)
      3. Heat a tablespoon of Oil in a pan on medium high heat and fry the crushed Whole Spices until fragrant.
      4. Add sliced Onion, Ginger, Garlic, Green Chilly and a sprig of Curry Leaf and saute till they are wilted.
      5. Add the cooked Mutton together with the gravy, cubed Potatoes and the thin Coconut milk. Cover the pan and let it cook.
      6. When the Potatoes are almost cooked add the Tomato and let it cook through.
      7. Heat 1 ½ Tablespoons of Oil in another pan on medium low heat and saute sliced Shallots and Curry leaves and let it brown.
      8. Add All Purpose Flour and saute till the raw smell is gone. Mix in ¼ cup of Water until smooth.
      9. Add this to the Stew and let it boil. (Reduce the gravy a bit if there is too much.)
      10. Add thick Coconut milk, Garam Masala Powder, Vinegar and chopped Coriander leaves;  let it start to boil along the edges.
      11. Add Salt and Pepper Powder if needed.
      12. Switch off the heat and serve hot with Appam or Bread.
      Notes:
      • If you are health conscious or don’t want too much of the ‘lambiness’ follow this: Once the Meat is cooked, remove all the pieces and put the gravy for 1 hour in the fridge or 30 minutes in the freezer. By this time all the fat will be solidified on top of the gravy. Remove it with a spoon and follow the rest of the cooking.


      Make it, enjoy the deliciousness and
      serve it to your family with love…

      Monday, January 17, 2011

      Mushroom Stewed in Coconut Milk (Koon Theenga Paalil Veyichathu)

      Recipe No: 174
      This is a tasty but very easy and fast  stew which tastes the best when eaten hot out of the pan. This is one of my very few Mushroom preparations where I don’t use Turmeric Powder and please use fresh Mushrooms.
      Ingredients                                       Serves 3
      • Mushrooms………………..150 Grams/ 3 heaping Cups (cleaned and sliced)
      • Oil……………………………..2 Tablespoons
      • Shallots chopped fine…..1/4 Cup
      • Indian Green Chilly……..1 (chopped fine)
      • Garlic chopped fine………1 ½ Tablespoons
      • Coconut Milk………….…..1 Cup
      • Pepper Powder………..…..1/2 Teaspoon
      • Coriander leaves……..…..1 Tablespoon (chopped fine)
      • Salt as needed
      Method of Preparation
      1. Heat Oil in a pan on medium high heat, and saute Shallots, Green Chilly and Garlic till it is slightly brown.
      2. Add the sliced Mushrooms and fry for 5 minutes. By this time, most of the Water will come out of the Mushrooms and it will be reduced considerably.
      3. Add Salt and Pepper Powder and fry for 30 seconds before adding Coconut Milk.
      4. Close the pan, reduce the heat and let it cook covered for 3-4 minutes.
      5. Once cooked and the gravy is reduced to a desirable consistency, add the Coriander leaves and serve hot with Appam, Chappathi or Bread.
      Notes:
      • Cleaning Mushrooms- I have a habit of peeling the skin off the Mushroom. (To see how it is done, see the picture in this post on Mushroom Curry) In this case, I washed the Mushrooms, dried them with a paper towel and then peeled off the skin. As the Mushrooms were big, I cut them into two before slicing. If it is small just slice it.
      • If the Coconut Milk is too thick, please add some Water to thin it a bit. If you are making Coconut milk by squeezing grated Coconut then mix first and second Milk together.
      • Don’t add Salt to the Mushrooms before it reduces, as there are chances that you may misjudge the amount of Salt seeing the huge amount of Mushroom, which will actually reduce considerably.
      • If you are making this dish in a shallow pan, the Coconut Milk may boil over. So in that case, keep the pan partially opened while cooking.


      Make it, enjoy the deliciousness and 
      serve it to your family with love…

      Pork Ularthiyathu

      Recipe No: 173
      Ingredients                                             Serves 4
      To Marinate and Pressure Cook
      • Pork………………………….1/2 Kg (Cut into cubes)
      • Red Chilly Powder……...1 Teaspoon
      • Coriander Powder……....2 ½ Teaspoons
      • Turmeric Powder………..1/2 Teaspoon
      • Garam Masala Powder…3/4 Teaspoon
      • Ginger Garlic Paste………1 Teaspoon
      • Vinegar………………………2 Teaspoons
      • Salt……………………………1/2 Teaspoon
      To Saute
      • Coconut Oil………………..2 Tablespoons
      • Coconut Pieces...............1/4 Cup
      • Onion thinly sliced……...1 Cup (make it around the same length as that of Shallots)
      • Shallots sliced…………….1/2 Cup
      • Ginger……………………….1 Tablespoon (slice into thin long pieces)
      • Garlic………………………...1 Tablespoon (slice into thin long pieces)
      • Curry Leaves……………...1 Sprig
      • Pepper Powder……………3/4 Teaspoon
      • Tomato sliced……………..1/2 Big
      • 1 Sprig Curry Leaves, ½ Teaspoon Garam Masala Powder and 1 Teaspoon of Coconut Oil to sprinkle on the top at the end
      Method of Preparation
      1. Marinate the Pork pieces with the ingredients mentioned in the ‘to marinate’ section and keep aside for 30 minutes.
      2. Put the meat along with ½ cup Water into a pressure cooker and cook till it is done. (This will take around 4 whistles on high heat)
      3. Heat Oil in a pan on medium high heat and fry the Coconut pieces till slightly brown.
      4. Add Onion, Shallots, Ginger, Garlic and a sprig of Curry leaf  and saute until the Onion is golden brown in color. Add a bit of Salt to speed up the process.
      5. Sprinkle Pepper Powder and fry for 30 seconds and add Tomato. Cook until it is mashed.
      6. Add the cooked Pork along with the gravy into the sauteed Onion mixture. Add a bit more Water into the cooker and wash all the bits that may be sticking to the sides and the bottom and pour this also into the sauteed Onion mixture.
      7. Let it boil and then lower the heat to medium and let it attain the desired consistency. Add more Salt if needed. (I would prefer slightly thick gravy without much Water but  not too dry)
      8. Sprinkle some Garam Masala Powder, some torn Curry Leaves and a teaspoon of Coconut Oil on top; switch off the heat; close the pan and let it sit for 20 minutes before serving warm with Rice or Breads.
        Notes:
        •  I usually cut Pork into slightly big pieces when compared to Beef.
        • I don’t like using too much of Pork fat, so I take most of them away taking care to leave some (after all it is Pork). But that is entirely up to you.
        • If you are using a Pressure pan, there are chances that the excess fat can clog the nozzle, so do take care.
        • Pork has a lower cooking time when compared to Beef. (In my Cooker, it took 4 whistles to cook) Adjust the cooking time according to your Pressure cooker.
        • Pepper is a very good compliment to Pork. So if you need more heat add more Pepper Powder than adding Red Chilly Powder.
        • Don't forget to give the Coconut pieces some head start while frying as it needs more time to brown than Onion. 
        • The resting period in the pan is kind of important as per the elders ,as, they call it ‘Pathrapakam’ meaning  the prepared dish should sit in the same vessel it cooks for some time to attain the perfect taste.


        Make it, enjoy the deliciousness and 
        serve it to your family with love…

        Sunday, January 16, 2011

        Fish in Fish (Fish shaped Bread with a Fish Filling)

        Recipe No: 172
        Friday is always a fun day at my house as there is no school for kids and office for my husband for the next two days. So mostly we may go out, shop, eat out may be a movie  a late night (for kids)…. the extravaganza goes on and on… As it was really cold this weekend we decided to stay at home and as a fun thing to do with the kids, I decided to make this. Ha... forgot to mention, this name 'Fish in Fish' was suggested by my daughter...
        Ingredients                                   Serves 4
        For the filling
        • Oil……………………………………….2 Tablespoons
        • Onion chopped……………………..1 Cup
        • Ginger Garlic paste………………..1 Teaspoon
        • Indian Green Chilly chopped….1 no
        • Curry Leaves…………………….….1 Sprig
        • Red Chilly Powder………………..1/2 Teaspoon
        • Coriander Powder…………………1 Teaspoon
        • Turmeric Powder………………….1/4 Teaspoon
        • Garam Masala Powder………….1/2 Teaspoon
        • Pepper Powder………………..……1/2 Teaspoon
        • Tomato chopped……………….….1 small
        • Tuna……………………………………1, 7oz can drained (1 cup cooked and shredded fish)
        • Soy Sauce…………………………….3/4 teaspoon
        • Coriander Leaves chopped……..2 Tablespoons
        • Salt as needed
        Method of Preparation
        To make the Filling
        1. Prepare a batch of Bread Stick dough and let it rise as mentioned in the recipe.
        2. Heat Oil in a pan on medium high heat and saute the Onion, Green Chilly and Curry Leaves till the Onion is translucent.
        3. Add the Ginger Garlic paste and saute till the raw smell is gone.
        4. Lower the heat and add Red Chilly Powder, Coriander Powder, Turmeric Powder, Garam Masala Powder and Pepper Powder and fry till the raw smell is gone for a minute.
        5. Add Tomatoes and cook till it is mashed up.
        6. Add cooked Fish or Tuna and mix really well.
        7. Mix in Coriander Leaves and Soy Sauce.
        8. Add more Salt if needed and switch off the heat before it dries up.
        9. Let it cool completely before stuffing.
        To stuff and bake the dish
        1. Punch down the raised dough and divide it into two equal portions.
        2. Roll out each portion of the dough into 10 x 7 inch rectangle.
        3. From each of the rolled dough, cut off pieces roughly in the shape of a fish.
        4. Place one piece of dough on a baking sheet, and on top of that, place the Fish filling  leaving 1 centimeter from the periphery  (will help in sticking both of  the dough pieces) and with more filling towards the middle (will give the height).
        5. Place the other  piece of dough on top and seal the edges tightly by pressing with a fork. Make Fins with the extra dough and attach with the help of some Water.
        6. Cover this with a damp towel and let it rise in a warm place for 30 minutes.
        7.  Preheat the oven to 375˚F/191˚C, with a pan filled with 2 cups of Water in the lower level of the oven.
        8. Once the prepared bread is raised, place a clove for the eyes, cut a slit in the front for mouth and  score the top of the fish to give the features of a fish like the Operculum (the covering of the Gills) and the scales with the help of a pointed object (like a tooth pick or the end of a knife).
        9. Beat an Egg with a tablespoon of Water (Egg Wash) and brush the top of the fish thoroughly.
        10. Bake this in the middle of the oven for 18 to 20 minutes till the top is nicely browned and the middle of the Fish is 165˚F/ 74˚C or cooked through.
        11. Let it cool on a wire rack and serve warm.
        Notes:
        • Don't make the filling too dry.
        • When you make the filling, add more Salt only towards the end, as Soy Sauce contains Salt.
        • Placing more filling in the middle will give more height in the middle like the real Fish.
        • Make the marks on the top only after the second rising period, otherwise the marks will be erased while rising.
        • The Water Vapor that comes from the Water in the pan will make the Bread soft.


        Make it, enjoy the deliciousness and 
        serve it to your family with love...

        Friday, January 14, 2011

        Honey Chicken

        Recipe No: 171
        This is a treat for all those who love that sweet and savory taste together.  It can be made  dry or with gravy depending on your needs and this is best when served with Chinese style Fried Rice.
        Ingredients                                          Serves 4
        • Chicken……………….........1 Pound/ 450gms (Skinless, boneless cut into very small pieces)
        • Oil………………………….....2 Tablespoons
        • Garlic chopped…….........1/3 Cup
        • Celery chopped…….........1/3 Cup
        • Spring Onion……………...2 (chop and separate the Whites and Greens)
        • Crushed Black Pepper...3/4 Teaspoon
        • Water………………………..1 Cup
        • Dark Soy Sauce…..……...2 Tablespoons (I used Ching’s Secret Dark Soy Sauce)
        • Honey………………….…..1 ½ Tablespoons
        • Corn Starch……….………1 Teaspoon (Dilute with 1 Tablespoon Water)
        • Salt as needed
        Method of Preparation
        1. Heat Oil in a pan on high heat and saute Garlic, Celery and Spring Onion Whites for a minute till the raw smell is gone.
        2. Add the Chicken pieces and saute for another minute.
        3. Add Water, Pepper Powder, a bit of Salt (don’t add too much as Soy Sauce contains Salt) and Soy Sauce and cook till the Chicken is done and the gravy is reduced to the desired amount on medium low heat.
        4. Once the Chicken is fully cooked, add Honey followed by Corn Starch (diluted).
        5. Mix well and let it boil until the sauce is thickened. Add more Salt if needed.
        6. Sprinkle the Spring Onion Greens and serve hot with Chinese Fried Rice.
        Notes:
        • The amount of gravy is entirely up to you. I like some gravy as I usually serve this with Chinese style Fried Rice.
        • If you don’t like sweetness in your Chicken reduce the amount of Honey. Start by adding a little and then increase the amount until the desired taste is achieved.
        • Even though I used Chicken Breast pieces, skinless boneless thigh pieces will taste really good too.
        • Corn Starch is known as Corn Flour in many parts of India.
        • Ching's Secret Dark Say Sauce is available in most of the Indian grocery stores.


        Make it, enjoy the deliciousness and 
        serve it to your family with love…

        Thursday, January 13, 2011

        Chinese Style Brinjal/ Eggplant/ Aubergine/ Vazhuthanaga Fry

        Recipe No: 170
        What about a change from all the regular Brinjal dishes and from all the regular Chinese dishes? Well the inspiration of this came from a photograph I saw in a magazine. It has all the ingredients of a regular Chinese dish and I have to say, it was hmm… heavenly.  Just try it yourself…
        Ingredients                                          Serves 2
        • Brinjal/ Eggplant……….5 medium sized ones cut into big pieces, two heaping cups
        • Ginger chopped………….1 Tablespoon
        • Garlic chopped…………..1 Tablespoon
        • Spring Onion ...............2 (Chop and separate whites and greens)
        • Sambal Oelek…............1/2 Teaspoon (substitute with Red Chilly sauce or Red Chilly flakes)
        • Crushed Black Pepper…1/4 Teaspoon
        • Vinegar……………….......1/2 Teaspoon
        • Soy Sauce………………...3/4 Teaspoon
        • Sugar……………………….1/2 Teaspoon
        • Corn Starch...........…….1/4 Teaspoon (Diluted with 1 Tablespoon of Water)
        • Salt as needed
        • Oil for deep frying
        Method of Preparation
        1. Cut Brinjal/ Eggplant into big pieces and put it in a colander and sprinkle some Salt. Keep it aside for 20-30 minutes.
        2. Rinse it thoroughly with your hands under running water to remove the Salt and some of the seeds.
        3. Dry the pieces thoroughly with a kitchen towel or tissue.
        4. Heat 1/2 cup Oil in a pan/ wok on high heat and deep fry the Eggplant pieces in batches for a minute or two.
        5. Drain out the excess Oil on a paper towel and keep them aside till ready to be used.
        6. Remove all the Oil except a Tablespoon from the pan and saute Ginger, Garlic and Spring Onion Whites for 30 seconds.
        7. Add Sambal Oelek and fry for 10 seconds.
        8. Add fried Eggplant pieces, Crushed Black Pepper, Vinegar, Soy Sauce and Sugar; mix well.
        9. Pour the Corn starch liquid and mix gently. Add more Salt if needed.
        10. Sprinkle Spring Onion greens on top and serve hot.
        Notes:
        • I used Indian Eggplant for this dish and so used the skin too. If you are using big American Eggplant the skin may be bitter, so whether to use its skin or not is entirely up to you.
        • It is essential to cut the Eggplant in big pieces or it will disintegrate in the final stage.
        • Use high heat for deep frying or the Eggplant will absorb a lot of Oil. As the cooking time for Brinjal is very low, take care not to over fry.
        • Sambal Oelek is dry Red Chilly in Vinegar and is present in most of the Store that sells Chinese sauces (In the international section or the Chinese section of most of the grocery stores).
        • Add Salt only in the end as most of the sauces have Salt.


        Make it, enjoy the deliciousness and 
        serve it to your family with love…

        Cabbage Mezhukkupuratti (Cabbage fry)

        Recipe No: 169
        This is something that my mother used to make me often after  my delivery. That time she used to make this  in Ghee, but I substituted Ghee with Oil as none of us are actually in need of Ghee!!! This is very easy (as we don’t have to chop or shred Cabbage finely), yet very delicious and healthy (considering the fact that Cabbage is the vegetable with the least amount of Calories).
        Ingredients                                       Serves 4
        • Cabbage cut into big cubes…….3 Cups
        • Shallots sliced……………………...1/2 Cup
        • Dry Red Chilly…………………….3-5 (According to your taste, can be substituted with Red Chilly Flakes or even Red Chilly Powder)
        • Curry Leaves………………………..1 Sprig
        • Oil…………………………………..…..1 ½ Tablespoons
        • Mustard seeds…………………...…1/4 teaspoon
        • Thoor or Channa Dal…………....1 Teaspoon (Optional)
        • Turmeric Powder………………….1/4 Teaspoon
        • Salt as needed
        Method of Preparation
        1. Crush together Shallots and Dry Red Chilly together and keep aside till ready to be used.
        2. Heat Oil in a pan on medium high heat and splutter the Mustard Seeds.
        3. Add the Thoor (Thuvara Parippu) or Channa Dal (Kadala Parippu) if using and fry for a few seconds.
        4. Add the crushed Shallot- Dry Red Chilly mixture, Turmeric Powder, and Curry Leaves and saute for a minute.
        5. Add  Cabbage and Salt; mix really well and fry on high heat for a minute.
        6. Lower the heat; close the pan and cook for 3-5 minutes or till the Cabbage is cooked.
        7. Open the pan and on high heat saute till it is dry.
        8. Serve hot with Rice or Chappathi.
        Notes:
        • Don’t cook this for too long, it will become mushy.
        • Made in Ghee, it tastes awesome.
        • Adding Dal is completely optional, but I kind of like when I bite into it while eating this dish.
        • If you don't have Shallots, use Onion.


        Make it, enjoy the deliciousness and 
        serve it to your family with love…

        Wednesday, January 12, 2011

        Ethakka Porichathu (Fried Plantain Bananas with Ghee and Sugar)

        Recipe No: 168
        When my daughter was around 4 years old, she used to refer to her Grandmothers as ‘French fries Ammachi’ (French Fries, being her favorite food by my  Mother in Law) and ‘Uppari Ammachi’ (Ethakka Uppari/ Plantain Chips, being her favorite food by my Mother) (Many of you guys who know us personally will be thinking "foodie daughter of  foodie parents"...Yes...she is a perfect match to us and we are still mending our Son who is not yet there!!!). As for me nothing screams ‘Home’ and ‘Mother’ more than this dish. Three of us, her kids, ate a lot of these during our childhood and for me this was 'the' extravaganza during my pregnancy and for a few months after delivery. Can you believe my brother, who is 9 years older, used to envy me for this!!!!!

        This will be familiar to many in many ways, but this is how my Mother used to make  them. So here is it just like the way she made and just like the way she presented…

        Ingredients                                        Serves 1
        • Ripe Sweet Plantain…………..1
        • Ghee as needed
        • Sugar as needed
        • Oil for deep frying
        Method of Preparation
        1. Cut the Plantain into 2 through the middle. Then slice each piece lengthwise into 4.
        2. Heat 4-5 Tablespoons of Oil in a pan on medium heat and fry the Bananas.
        3. Once fried, drain the excess Oil and arrange them on a serving plate.
        4. Spread some Ghee on the fried Plantains while still hot.
        5. Sprinkle some Sugar over the Ghee.
        6. Layer all the pieces like the the way you want and serve warm.
        Notes:
        • Fry the Plantains in batches and avoid overcrowding.
        • Do I have to mention specially that this is very good for kids?
        • I had seen my Sister in Law frying Plantains in Ghee itself. But I prefer Oil just because that's the way my Mom always does.
        • As the Sugar we get here is very fine, it will melt very fast. So it is not very clear in the picture.


        Make it, enjoy the deliciousness and 
        serve it to your family with love…

        Kappa Biriyani/ Ellumkappa (Tapioca/Yucca Roots cooked with Beef Ribs)

        Recipe No: 167
        As a part of his work, my Father happened to stay in a small town, Thottacad (near Kottayam) in Kerala, along with all of us. At that time, our neighbors across the street happened to be a Butcher. I have to say we were so fortunate in eating the best meats while  staying there. My Mother came to know about this dish from them and she used to make it often when we were there. But as we moved, getting good Ribs (Vari ellu) became very hard and this dish slowly disappeared from our dining table. 
        Suddenly I remembered this dish when I saw an episode of 'Flavors of  India'. My mother also used to make it more or less the same way (Of course there are a lot of small changes here and there). Let me make an effort to recollect that taste from old days…
        Ingredients                                    Serves 5
        • Tapioca/ Yucca roots……………1 Kg (cut into medium sized pieces)
        • Turmeric Powder…………………1/2 Teaspoon
        • Salt………………………………...….1/2 Teaspoon
        To Marinate and Pressure Cook
        • Ribs with its meat and fat….......850 grams (cut into small pieces, wash thoroughly)
        • Red Chilly Powder…………….…..1 Teaspoon
        • Coriander Powder………………….1 Teaspoon
        • Turmeric Powder…………….…….1/2 Teaspoon
        • Garam Masala powder……………1 Teaspoon
        • Pepper Powder…………………..….1/2 Teaspoon
        • Vinegar…………………………..…….1 Teaspoon
        • Ginger Garlic paste…………………2 Teaspoons
        • Onion sliced thin…………………...1/2 Cup
        • Salt……………………………….……..1 Teaspoon
        For dry Roasting and Grinding
        • Shallots sliced thin………………….1/2 Cup
        • Coconut grated…………………...….1 Cup (I used desiccated Coconut which is easy to brown)
        • Curry Leaves………………………….1 Sprig
        • Red Chilly Powder……………….….1 Teaspoon
        • Coriander Powder…………………..2 Teaspoons
        • Turmeric Powder……………………1/2 Teaspoon
        • Pepper Powder……………………...1/2 Teaspoon
        • Garam Masala Powder…………….1 Teaspoon
        For Tempering
        • Coconut Oil…………………………….2 Tablespoons
        • Mustard Seeds……………………..….1/2 Teaspoon
        • Shallots sliced thin…………………..2 no
        • Curry Leaves……………………………1 Sprig
        Method of Preparation
        To make the Ribs
        1. Marinate the Beef Ribs with all the ingredients mentioned in the ‘to Marinate and pressure Cook’ section (including the Onion); combine thoroughly with your hands and let it sit for 30 minutes.
        2. Add 1 Cup of Water and let it cook in the Pressure Cooker on high heat till the first whistle, then reduce the flame to medium and cook till the meat is done (I cooked for 20 minutes, but decide the time based on the performance of your Cooker; the meat should start to fall off the bones).
        3. Once the pressure is gone, open the cooker and dump the pieces and the gravy into a wide pan and on high heat, reduce the gravy so that it attains a thick consistency.
        To make the Tapioca
        1. Wash and clean the Tapioca pieces and put this in a big pan.
        2. Add cold Water to the Tapioca pieces so that the level of Water is at least 1 inch above the pieces.
        3. Boil it on high heat together with turmeric Powder till it is cooked.
        4. Once it is almost cooked add Salt.
        5. Once completely cooked, (it will easily mash when pressed)  drain the Tapioca pieces, discard the cooking liquid and reserve the pieces till ready to be used.
        To Dry Roast and Grind
        1. On a dry pan (without Oil) on medium heat, roast together grated Coconut, sliced Shallots and Curry Leaves till golden brown in color. Off the heat and add Red Chilly Powder, Coriander Powder, Turmeric Powder, Garam Masala Powder, Pepper Powder and a Teaspoon of Salt.
        2. Once cooled slightly, grind it into a smooth paste using only just enough Water.
        To Make Ellum Kappa
        1. Dump the cooked and drained Tapioca pieces on top of the prepared Ribs on medium heat, followed by the ground roasted Coconut paste.
        2. Mix everything really well and let it cook covered on medium heat for 10 minutes.
        3. Check for Salt and add if needed. Mash the tapioca a bit with the help of a Spatula. Don't make it very dry nor too watery.
        4. Switch off the heat and keep it covered.
        To make the tempering
        1. Heat Coconut Oil in a pan on medium high heat and splutter the Mustard Seeds.
        2. Add sliced Shallots and Curry leaves and saute till the Shallots are golden brown.
        3. Pour this together with the excess Oil on top of the prepared Ellum Kappa and serve warm after mixing really well.
        Notes:
        • While cooking Tapioca, add salt only after it is partially cooked or the Tapioca may not cook properly.
        • If you are using a lid while boiling the Tapioca, remove it once it is boiled to avoid boiling over. This will aid in easy clean up!!
        • I love to bite Tapioca pieces here and there and so I won’t mash it that well (only partially). But if you don’t like that go ahead and mash it really good.
        • I used unsweetened dessicated (dry) Coconut as it browns fast, but follow the same recipe for freshly grated Coconut also.
        • Don't make the ground paste too watery. Use only enough Water to make your blender work.
        • Use Ribs with some Meat attached. Even though you can make this with meat only, its taste won’t come near the one that made with bones. Ask your butcher (at the fresh meat counter in almost all the shops that sells fresh meat) to cut it into small pieces (It is difficult to cut at home). Remove some of the excess fat but do keep some.


        Make it, enjoy the deliciousness and 
        serve it to your family with love…